
KIT OPS Extra Utils — User Manual
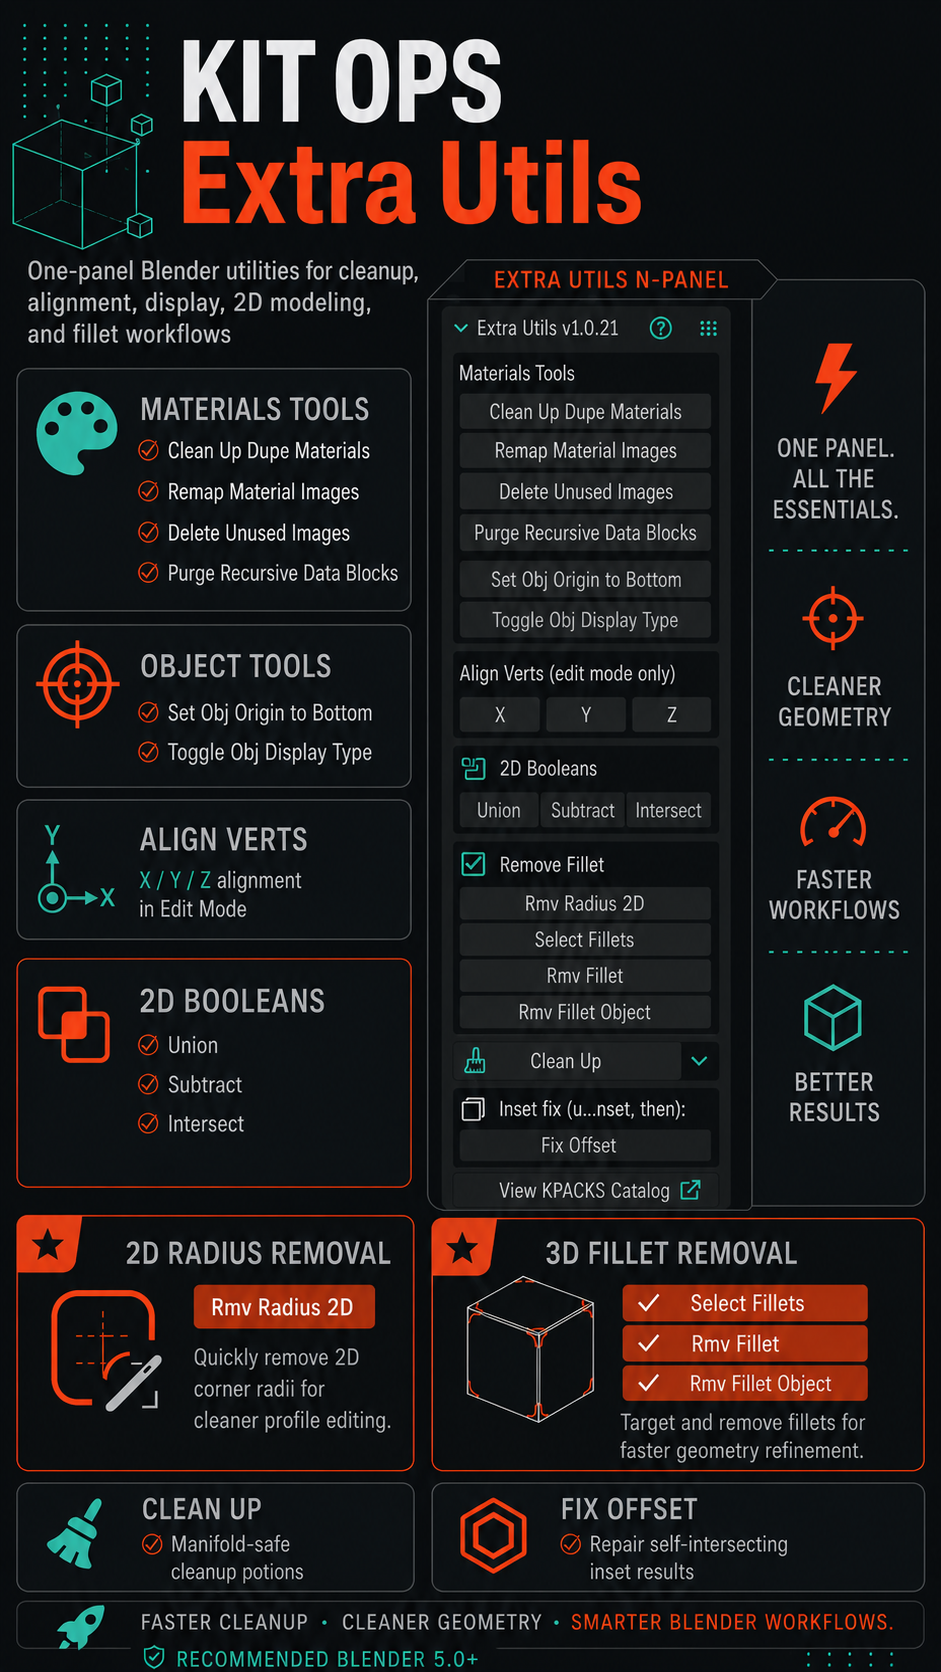
A small collection of cleanup, alignment, display, and 2D/3D‑modeling utilities for Blender, built for KIT OPS kitbashing workflows. Everything lives in one collapsible panel in the 3D Viewport sidebar.
- Add‑on name: KIT OPS Extra Utils
- Authors: Chipp Walters, Anthony Aragues
- Minimum Blender: 3.6 (developed and tested through Blender 5.1)
- Category: 3D View
- Website: https://www.chippwalters.com
KIT OPS itself is not required. The add‑on works standalone; one optional button (the boolean‑solver toggle) only appears when KIT OPS is installed, and by default the panel docks under the KIT OPS panel when KIT OPS is present (see Docking under KIT OPS).
Table of contents
- Requirements & compatibility
- Installation
- Finding the panel
- Materials Tools
- Object Tools
- Align Verts (edit mode)
- 2D Booleans
- Remove Fillet
- Fix Offset (inset fix)
- View KPACKS Catalog
- Keyboard shortcuts
- Tips & troubleshooting
1. Requirements & compatibility
- Blender 4.2 or newer recommended (installs as an Extension). Also installs as a legacy add‑on on Blender 3.6+. Exercised on Blender 5.1. (The bundled Shapely now covers both Blender 4.2–5.0 and 5.1+, so Fix Offset works out of the box on either.)
- Most tools have no external dependencies — they use Blender’s built‑ins and bundled numpy.
- Fix Offset needs Shapely. On a 4.2+ Extension install, Shapely is bundled (no action needed). On a legacy (pre‑4.2) install Shapely isn’t bundled, so Fix Offset reports “needs shapely” while every other tool still works.
- Works at any model scale, including millimeter‑scale 3D‑print parts — tolerances scale with the model instead of being tuned for meter‑scale scenes.
- KIT OPS is optional. Install it if you want the EXACT/FAST boolean‑solver toggle and the docked panel layout; otherwise that single button is hidden, the panel gets its own tab, and everything else works.
2. Installation
As an Extension (Blender 4.2+, recommended — Shapely bundled):
-
Get the extension ZIP (
kitops_extra_utils-<version>.zip). - Edit ▸ Preferences ▸ Get Extensions, then the top‑right ▾ menu ▸ Install from Disk…, and choose the ZIP.
- It’s enabled on install; the panel appears in the 3D Viewport sidebar.
As a legacy add‑on (Blender 3.6–4.1):
- Edit ▸ Preferences ▸ Add‑ons ▸ Install…, choose the ZIP, and enable it.
- Fix Offset will be inactive (no bundled Shapely); all other tools work.
To update, install the new version over the old (or remove + reinstall).
3. Finding the panel
- Hover over the 3D Viewport and press N to open the sidebar.
- Click the panel’s tab (see below for which one it is).
- Expand the Extra Utils panel (it starts collapsed). Its header shows the add‑on version and a ? link to the online docs.
The panel is organized top‑to‑bottom into: Materials Tools, a few object utilities, Align Verts, 2D Booleans, Remove Fillet (with Clean Up), an Inset fix, and a link to the KPACKS catalog.
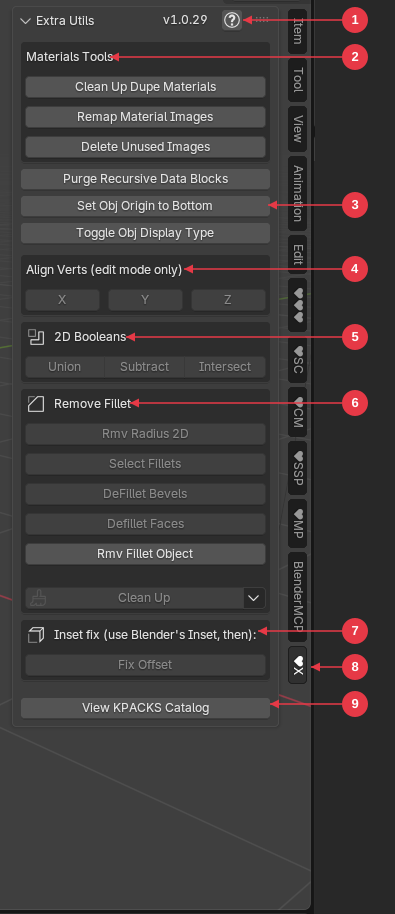
- Panel header — the add‑on version and a ? link to these online docs.
- Materials Tools — material/image cleanup for the whole file.
- Object tools — Purge data blocks, Set Obj Origin to Bottom, Toggle Obj Display Type (and the KIT OPS EXACT/FAST toggle when KIT OPS is installed).
- Align Verts — flatten selected verts to X/Y/Z (Edit Mode).
- 2D Booleans — Union / Subtract / Intersect on co‑planar filled meshes.
- Remove Fillet — the fillet‑removal tools plus Clean Up.
- Inset fix — Fix Offset, for repairing a self‑intersecting inset.
- Sidebar tab — the ♥X tab here (or the shared ♥♥♥ tab when docked under KIT OPS).
- View KPACKS Catalog — opens the online KPACKS catalog.
Docking under KIT OPS
Where the panel lives in the sidebar is controlled by one add‑on preference, Dock under KIT OPS panel (Edit ▸ Preferences ▸ Add‑ons ▸ KIT OPS Extra Utils ▸ expand the preferences). It is on by default.
- On, with KIT OPS installed — the Extra Utils panel sits in the shared ♥♥♥ tab, just below the KIT OPS panel, so both share one tab.
-
Off — Extra Utils moves to its own
♥Xtab. -
KIT OPS not installed — Extra Utils uses its own
♥Xtab regardless of the setting (there’s no KIT OPS tab to dock under).
Toggling the preference moves the panel to the right tab immediately. The tabs sort to the bottom of the sidebar tab list.
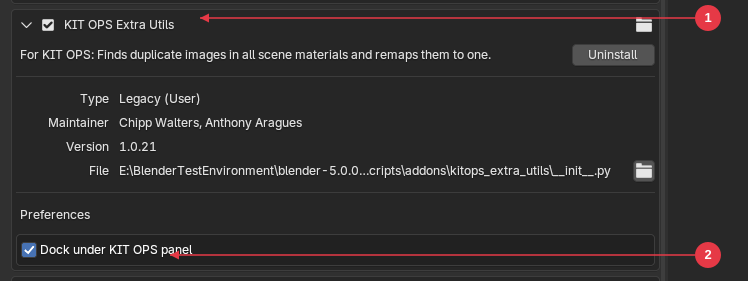
- KIT OPS Extra Utils — find it in Edit ▸ Preferences ▸ Add‑ons and expand it.
- Dock under KIT OPS panel — the preference (on by default). Checked = share the ♥♥♥ tab below KIT OPS; unchecked = its own ♥X tab.
4. Materials Tools
These operate on the whole .blend file’s material/image data, not just the
selection. They are safe to run repeatedly.
Clean Up Dupe Materials
Button: Clean Up Dupe Materials
Removes Blender’s auto‑numbered duplicate materials. When Blender imports or
appends data it often creates copies named Material.001, Material.002, etc.
This tool finds every material whose name ends in a dot plus exactly three digits
(e.g. Brick.001) and whose un‑suffixed base name (Brick) also exists,
then:
- re‑points every user (objects, faces) of the duplicate at the original, and
- deletes the duplicate.
Notes
-
Names that merely end in three digits without a dot are left alone. For
example
Brick999is not treated as a duplicate ofBrick. - The status bar reports how many materials were removed.
Remap Material Images
Button: Remap Material Images (asks for confirmation)
Finds images that are binary‑identical but stored as separate data‑blocks and collapses them onto a single image. This commonly happens when the same texture gets imported several times, or exists both packed and unpacked.
How it decides two images are the same:
- It hashes the original source bytes of each image — the packed bytes if the image is packed, otherwise the file on disk (falling back to the raw pixel buffer for generated/render images).
- Because it hashes the source bytes, a packed copy and the same file on disk hash equal, so they are correctly recognized as duplicates.
Every texture node (including nodes inside node groups) that referenced a duplicate is re‑pointed at the single kept image. The status bar reports how many images were remapped.
Tip: Run Delete Unused Images afterward to actually free the now‑orphaned duplicates.
Delete Unused Images
Button: Delete Unused Images (asks for confirmation)
Removes every image data‑block that has zero users. Use this after remapping duplicates, or any time you want to drop textures nothing references. The status bar reports how many images were removed.
Purge Recursive Data Blocks
Button: Purge Recursive Data Blocks
A one‑click wrapper around Blender’s Outliner ▸ Purge with all options on (local IDs, linked IDs, and recursive). It repeatedly removes orphaned data (meshes, materials, images, node groups, …) until nothing unused remains — a fast way to shrink a bloated file.
5. Object Tools
Set Obj Origin to Bottom
Button: Set Obj Origin to Bottom • Shortcut: Ctrl + Alt + Shift + B
Moves each selected mesh object’s origin to the bottom‑center of its bounding box — handy for dropping objects onto the floor or stacking them.
Notes
- Works in Object Mode on selected mesh objects only. Unselected objects are never touched.
- The mesh stays exactly where it is in the world; only the origin point moves.
Toggle Obj Display Type
Button: Toggle Obj Display Type • Shortcut: Ctrl + Alt + Shift + Z
Cycles the viewport display type of the selected objects through:
Textured/Solid → Wire → Bounds → Textured/Solid → …
The active object’s current state decides the next step, and that new state is applied to every selected object, so a mixed selection ends up consistent.
Alongside the display type it also updates render visibility to match, so a “wired” or “bounded” object gets out of the way of renders and Line Art:
- All ray‑visibility flags (camera, diffuse, glossy, transmission, volume scatter, shadow) are turned off for Wire/Bounds and back on for Textured.
- The object’s Line Art usage is set to Exclude for Bounds and Include otherwise (only on object types that support Line Art).
Use it to quickly de‑clutter a heavy kitbash scene while keeping objects in place.
Booleans set to EXACT / FAST (KIT OPS only)
Button: Booleans set to EXACT / Booleans set to FAST
This button only appears when KIT OPS is installed and enabled. It is a pass‑through to KIT OPS’s own boolean‑solver toggle and reflects the active object’s current boolean solver: it reads EXACT (depressed) or FAST depending on the object’s boolean modifiers, and clicking it flips KIT OPS between the two solvers. If KIT OPS is not installed, the button is hidden.
6. Align Verts (edit mode)
Box: Align Verts (edit mode only) • Buttons: X Y Z
Flattens the selected vertices onto a single plane by collapsing them to 0
on one global axis — the classic “scale to zero on an axis” move, as one click.
| Button | Effect | Shortcut |
|---|---|---|
X |
Selected verts → X = 0 (aligned on the global YZ plane) | Ctrl + Alt + X |
Y |
Selected verts → Y = 0 (aligned on the global XZ plane) | Ctrl + Alt + C |
Z |
Selected verts → Z = 0 (aligned on the global XY plane) | Ctrl + Alt + Z |
Notes
- Available in Edit Mode on a mesh. The buttons appear in the panel; the shortcuts work directly in the viewport.
-
“Zero” means zero in the object’s local space relative to the transform pivot —
i.e. the standard
S, axis,0behaviour, just bound to one key.
UV alignment (shortcuts only)
The same flatten exists in the UV Editor for selected UV vertices. There are no buttons for these — only shortcuts:
| Shortcut | Effect |
|---|---|
Ctrl + Alt + X |
Selected UVs → U = 0 |
Ctrl + Alt + C |
Selected UVs → V = 0 |
7. 2D Booleans
Box: 2D Booleans
Combine two or more flat, co‑planar, filled meshes into one clean 2D shape using Union, Subtract, or Intersect. This is aimed at building 2D profiles (for extruding, KIT OPS cutters, Line Art, decals, etc.).
What counts as a valid input
- Each object must be a mesh with at least one face (a filled shape — not a curve, and not an edges‑only outline). Curves and face‑less meshes are rejected with an error.
- You need two or more selected mesh objects.
- The objects should be co‑planar (lying in the same flat plane). If they are not, the tool projects the off‑plane ones onto the active plane automatically (on an internal copy — your originals are never moved).
Union / Subtract / Intersect
Buttons: Union Subtract Intersect
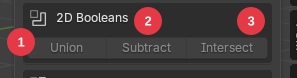
- Union — merge all selected shapes into one outline.
- Subtract — the active shape minus the others.
- Intersect — only the area where all shapes overlap.
How to use
- In Object Mode, select all the shapes you want to combine.
- Make the keeper shape the active object (select it last, so it shows the brighter outline). For Subtract, the active object is the one the others are cut out of.
- Click Union, Subtract, or Intersect.
| Operation | Result |
|---|---|
| Union | All shapes merged into one outline. |
| Subtract | The active shape minus all the other selected shapes. |
| Intersect | Only the area where all shapes overlap. |
What happens to your objects
- The operation is non‑destructive: your original objects are kept, but they are hidden so the result is what you see. Press Alt + H in the viewport to bring the originals back.
-
A new object named
<active>_2DBoolis created, becomes the active selection, and contains the clean flattened result (coplanar faces merged into a tidy shape). - Off‑plane inputs are flattened onto an internal copy before cutting, so your originals keep their position and tilt — there’s no confirmation prompt.
Good to know
- The boolean uses Blender’s Exact solver with self‑intersection handling, so overlapping and touching edges are dealt with robustly. Coplanar Subtract (including concave “bite” cuts) and cutters wound the opposite way are handled.
- Intersect of shapes that don’t actually overlap produces nothing; the tool warns you and makes no result object.
- Before combining, each shape is cleaned with a merge‑by‑distance pass to avoid doubled vertices tripping up the boolean. Tolerances scale with the input size, so mm‑scale parts work the same as meter‑scale ones.
8. Remove Fillet
Box: Remove Fillet
Turn rounded edges and corners (fillets / bevels / round‑overs) back into sharp ones. There are four removal tools, each with its own scope — a 2D one for the bevels on a flat outline, one for the bevel faces you select, one for the fillets between the flat faces you select, and a one‑click whole‑object tool — plus a selection helper and a Clean Up tool to tidy the result.
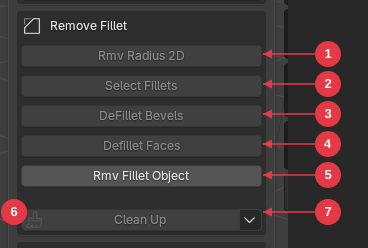
- Rmv Radius 2D — remove the radius (bevel) from a flat 2D path: selected arc edges collapse to sharp corners (Edge mode).
- Select Fillets — helper: grow a seed face into one bevel’s full rounded profile.
- DeFillet Bevels — select the actual bevel faces; removes the ones you selected, sharpening that edge.
- Defillet Faces — select flat faces; removes the fillets between/around them.
- Rmv Fillet Object — select the whole object; attempts to remove all its fillets.
- Clean Up — tidy the result (merge doubles, sliver/loose removal, …).
- ▾ options — opens the Clean Up options popover (below).
Rmv Radius 2D
Button: Rmv Radius 2D • Edit Mode, Edge select mode
For flat 2D outlines (filled shapes or open polylines). Select the rounded‑corner (arc) edges themselves — the edges that make up the curve — and the tool extends the two straight legs flanking each arc until they meet, collapsing the arc onto that sharp corner.
How to use
- In Edit Mode, switch to Edge select mode (the button is disabled in vertex/face mode).
- Select the arc edges of the corner(s) you want sharpened. Each continuous run of selected edges is treated as one corner.
- Click Rmv Radius 2D.
Good to know
- Select several arcs at once to sharpen several corners in one click (e.g. all four corners of a rounded rectangle → a plain rectangle).
- A single selected edge is treated as a chamfer and collapsed the same way.
- This replaces the old “select the two bounding legs” method — now you select the radius you want gone, the same idea as DeFillet Bevels in 3D.
Select Fillets
Button: Select Fillets • Edit Mode, Vertex/Face select mode
A helper for the 3D fillet tools: it grows a seed selection into the full rounded cross‑section of one fillet, so you don’t have to click every face.
How to use
- In Edit Mode (not Edge select mode), select one face — or a short strip of faces — sitting on a rounded edge.
- Click Select Fillets. It fills in the rest of that fillet’s rounded profile for the length you selected, without running off down the edge or wrapping around the corners.
- Press DeFillet Bevels to remove the now‑selected bevel (or fine‑tune the selection by hand first — manual selection always works).
Good to know
- It completes the profile flat‑to‑flat for the seed’s length only — it will not run the whole length of the edge, and won’t leak across the rest of the model.
- Disabled in Edge select mode (that mode is for Rmv Radius 2D).
DeFillet Bevels
Button: DeFillet Bevels • Edit Mode, Face selection
Removes the bevel faces you select. Select the actual rounded strip of a bevel — one bevel, i.e. one rounded edge sitting between two flat faces (by hand, or via Select Fillets) — and click DeFillet Bevels: the selected bevel faces are removed and collapsed onto the sharp line where the two flats meet.
How to use
- In Edit Mode, select the bevel’s faces — the quickest way is to click one face on the bevel and press Select Fillets.
- Click DeFillet Bevels.
Good to know
- Only the selected bevel changes — the corners at its ends stay rounded and the rest of the model is untouched.
- The button works on one bevel at a time and is only enabled when the selection is a single bevel (one rounded edge between two flats). For several edges, repeat per bevel; for a whole rounded box, use Rmv Fillet Object.
Defillet Faces
Button: Defillet Faces • Edit Mode, Face selection
Removes the fillets between and around the flat faces you select. Select the flat face(s) you want kept sharp — e.g. the front of a box — and click Defillet Faces: every fillet bordering those faces is removed, so the edges between the selected flat and its neighbouring flats become sharp. Fillets elsewhere on the model are left alone.
How to use
- In Edit Mode, select the flat face(s) to keep sharp. If the flat is subdivided into a grid of faces, selecting any one of them is enough — the whole flat side is detected automatically.
- Click Defillet Faces.
Good to know
- You can select faces on several planes at once (e.g. the two flats flanking one bevel) — each plane is defilleted in turn, so the bevel between two selected flats comes out as one sharp edge.
- A flat that sits on a larger body (like a raised block standing on a base, or a base top with a block on it) works too — its bordering fillets are sharpened in place and the rest of the body is left untouched. On these attached flats the bordering bevels collapse fully sharp (edges and their end corners).
- On a free‑standing flat (like the front of a rounded box), corners stay rounded where the flat’s edge crosses a perpendicular fillet — the silhouette comes out sharp against flat sides and rounded at the corners, exactly as if the flat had been cut in with a boolean.
- A feature that pokes through the selected flat (like a neck rising out of a top face) is preserved — the flat is rebuilt around it with a clean sharp base.
- If a selected plane has no fillets left around it, that plane is skipped with an “already sharp” message instead of guessing at a cut.
Rmv Fillet Object
Button: Rmv Fillet Object • Object Mode
The whole‑object version: select the entire object (in Object Mode) and it attempts to remove all the fillets/bevels on it, restoring every sharp edge and corner from the flat support faces — no face selection needed.
How to use
- In Object Mode, select the rounded box/die mesh.
- Click Rmv Fillet Object.
Good to know
- Best for a standalone rounded box (or die). It detects the large flat support faces and collapses the rounded shell between them, handling inner (concave) corners where three fillets meet so they come out as clean sharp corners — no notch/flap faces left behind.
- A fillet that’s part of a larger model may need that part isolated first — use Select Fillets + DeFillet Bevels (or Defillet Faces) instead.
- If the mesh isn’t box‑like enough to identify flat support faces, it reports so and makes no change.
Clean Up
Button: Clean Up • ▾ options popover • Edit Mode
Tidies a mesh after fillet removal (or any messy edit) by running a chosen set of cleanup steps. The small ▾ button beside it opens a popover where you pick which steps run; the settings are remembered.
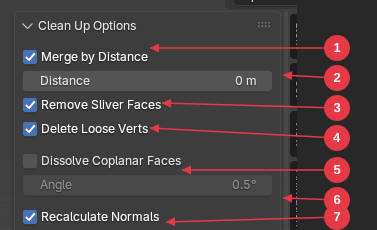
- Merge by Distance — weld coincident vertices (on by default).
-
Distance — the merge distance;
0= automatic (a tiny fraction of the object’s size). - Remove Sliver Faces — dissolve zero‑area / degenerate faces.
- Delete Loose Verts — remove stray vertices with no edges.
- Dissolve Coplanar Faces — merge near‑flat faces into n‑gons (off by default — it removes edge loops).
- Angle — the coplanar threshold used by step 5.
- Recalculate Normals — make face normals consistent.
| Option | What it does | Default |
|---|---|---|
| Merge by Distance (+ Distance) | Welds vertices closer than the distance. 0 = automatic (a tiny fraction of the object’s size). |
On |
| Remove Sliver Faces | Dissolves zero‑area / degenerate faces. | On |
| Delete Loose Verts | Removes stray vertices with no connected edges. | On |
| Dissolve Coplanar Faces (+ Angle) | Merges near‑flat neighbouring faces into n‑gons. Removes edge loops, so it’s off by default. | Off |
| Recalculate Normals | Makes face normals consistent. | On |
How to use
- In Edit Mode, optionally select just the messy face(s) (with nothing selected it works on the whole mesh).
- Open the ▾ popover and tick the steps you want.
- Click Clean Up.
Good to know
- It never moves vertices in a way that changes the model’s shape. Merge by Distance only welds truly‑coincident vertices — it won’t drag verts to new positions or flatten your silhouette.
- Dissolve Coplanar Faces is off by default because it strips edge loops and turns flat regions into n‑gons — turn it on only when you actually want that.
- Manifold‑safe. If a cleanup would turn watertight (manifold) geometry non‑manifold, it’s skipped and the mesh is left unchanged, with a message telling you to select just the messy face(s) and retry.
- The status bar reports how many verts/edges/faces were removed.
9. Fix Offset (inset fix)
Box: Inset fix (use Blender's Inset, then): • Button: Fix Offset •
requires Shapely (bundled in the 4.2+ extension)
Repairs a self‑intersecting inset. Blender’s own Inset Faces keeps clean quads, but at a corner tighter than the inset distance the inner loop folds over itself and crosses (“swallowtails”) — geometrically broken. Fix Offset cleans that up: it keeps every valid quad and collapses only the over‑tight corners to triangles.
How to use
- In Edit Mode, select the face(s) you want to inset.
- Run Blender’s normal Inset Faces (press I) and drag/type the distance you want.
- With the inset’s inner face still selected, click Fix Offset.
The button enables right after an Inset, or whenever a selected face looks like a fresh inset (a face ringed by inset quads).
Good to know
- Where corners hold, you keep clean quads; only collapsing corners become triangles. An inset that didn’t self‑intersect is left untouched (“already valid”).
- Handles deep insets on concave outlines (notches, cut‑outs, inner corners), where the inner loop can cross at several corners at once — these are pulled back into order so the result doesn’t stay tangled.
- Fail‑safe. Fix Offset will never make a face worse than Blender’s inset: if it can’t repair a corner without creating new crossings, it leaves that inset unchanged and tells you so (try a shallower inset). On a sharp, deeply‑cut corner a tiny sliver can remain — run Clean Up to tidy it.
- If the inset is deeper than the shape itself (e.g. a circle inset past its radius — there’s no real inner region), Fix Offset collapses the inside to a clean fan at the shape’s center rather than leaving a tangle. Note that Blender’s own Inset clamps or misbehaves at such extreme depths, so there may be nothing to fix.
- Works at any model scale, and operates in place (Ctrl + Z to undo). Reports how many faces were repaired.
10. View KPACKS Catalog
Button: View KPACKS Catalog
Opens the online KPACKS and INSERTs catalog (cw1.me/kpacks) in your default
web browser — a shortcut to KIT OPS content packs.
11. Keyboard shortcuts
| Shortcut | Action | Context |
|---|---|---|
Ctrl + Alt + Shift + B |
Set Obj Origin to Bottom | 3D Viewport, Object Mode |
Ctrl + Alt + Shift + Z |
Toggle Obj Display Type (Textured/Wire/Bounds) | 3D Viewport, Object Mode |
Ctrl + Alt + X |
Align selected verts to X = 0 | Mesh Edit Mode |
Ctrl + Alt + C |
Align selected verts to Y = 0 | Mesh Edit Mode |
Ctrl + Alt + Z |
Align selected verts to Z = 0 | Mesh Edit Mode |
Ctrl + Alt + X |
Align selected UVs to U = 0 | UV / Image Editor |
Ctrl + Alt + C |
Align selected UVs to V = 0 | UV / Image Editor |
These are registered in the add‑on keymap. If another add‑on claims the same combination you can rebind them in Edit ▸ Preferences ▸ Keymap (search for the operator name, e.g. wire_toggle or scale_z).
12. Tips & troubleshooting
The panel’s tab isn’t showing. Press N in the 3D Viewport to open the sidebar; the tab (♥♥♥ when docked under KIT OPS, otherwise ♥X) sorts to the bottom of the list. Make sure the add‑on is enabled in Preferences.
The panel is on the wrong tab / I want it separate from KIT OPS. Toggle Dock under KIT OPS panel in the add‑on preferences (Edit ▸ Preferences ▸ Add‑ons ▸ KIT OPS Extra Utils). On = shares the ♥♥♥ tab below KIT OPS; off = its own ♥X tab. See Docking under KIT OPS.
A 2D Boolean button did nothing. You need to be in Object Mode with two or more selected mesh objects, and each must have at least one face. Curves and edges‑only outlines aren’t accepted — convert curves to mesh and fill them first (e.g. select all in Edit Mode and press F).
My objects disappeared after a 2D Boolean.
They weren’t deleted — the originals are hidden and a new <name>_2DBool
result was created in their place. Press Alt + H to unhide the originals.
Subtract removed the wrong shape. Subtract is active minus the others. Re‑select so the shape you want to keep is the active object (selected last, brighter outline), then run it again.
Intersect produced nothing. The selected shapes don’t all overlap, so there’s no common area. The tool warns and makes no result.
Rmv Radius 2D / Select Fillets is greyed out. Rmv Radius 2D needs Edge select mode with edges selected. Select Fillets needs Vertex/Face select mode (it’s disabled in Edge mode). Both require Edit Mode on a mesh.
DeFillet Bevels is greyed out. It enables only when the selection is a single bevel — the rounded faces of one edge, sitting between two flats. Click one face on the bevel and use Select Fillets to complete it, then try again. For corners or whole objects, use Rmv Fillet Object; for the fillets around a flat face, use Defillet Faces.
Defillet Faces says “already sharp” / “defilleted 1 of 2 planes”. That plane has no fillets bordering it — usually because an earlier pass (or an earlier click) already sharpened the shared bevel. Nothing is wrong; the plane is simply done.
Rmv Fillet Object says it can’t find flat support faces. It expects a box‑like mesh whose fillets sit between large flat faces. For a fillet that’s part of a bigger model, isolate it with Select Fillets then use DeFillet Bevels instead.
Clean Up “destroyed” my mesh / removed edge loops. That’s almost always Dissolve Coplanar Faces — it’s off by default for this reason. Open the ▾ popover and make sure it’s unticked, then run Clean Up again. Clean Up never moves vertices in a way that changes the model’s shape.
Clean Up skipped and changed nothing. The cleanup would have created non‑manifold geometry, so it refused (manifold‑safe). Select just the messy face(s) and retry.
Fix Offset says it “needs shapely”.
You’re on a legacy (pre‑4.2) install or a dev symlink load, where Shapely isn’t
bundled. Either install via the 4.2+ Extension (Shapely bundled), or pip install shapely into that Blender’s bundled Python.
Remap Material Images didn’t free any memory. Remapping only re‑points users onto one image; run Delete Unused Images (or Purge Recursive Data Blocks) afterward to actually remove the orphaned copies.
This manual lives at D:\GitHub\kitops_extra_utils\docs\extra-utils-docs.md.
For the version history see D:\GitHub\kitops_extra_utils\Changes.md.