
MD-DOCS User Manual
Version 1.2.85
Created by Chipp Walters, Altuit, Inc.
A fast, modern markdown editor for Windows, Mac, and Linux.
Table of Contents
- Features
- Getting Started
- User Interface Overview
- Chatting with an AI Agent
- DocuMark — Image Annotation Editor
- Local Server Feature
- Recommended Workflow: The Google Docs Pipeline
- Tips and Tricks
- Troubleshooting
- MD DOCS Web
- Appendix A: MCP Server — AI Assistant Integration
Features
MD DOCS is an advanced Markdown editor designed specifically to bridge the gap between content creation and publication. It combines a modern writing environment with unique utilities for cleaning up imported documents.
🚀 Workflow & Cleanup Tools (Unique Features)
- Google Docs to Markdown Rescue: Automatically extracts Base64 encoded images from imported files (like those from Google Docs) and saves them as local files, drastically reducing file size.
- Smart “Sentence-to-Paragraph” Conversion: Rapidly converts blocks of sentences into distinct paragraphs—essential for fixing formatting issues often found in voice-to-text or PDF exports.
- Advanced Table Formatting: Overcomes standard Markdown limitations by allowing you to embed HTML lists, breaks, and multiple lines directly inside table cells.
-
CSV / TSV to Table: Import a
.csv/.tsvfile or paste clipboard data to drop in a clean markdown table — comma/tab auto-detected, RFC 4180 quoting handled. See Insert CSV as Table. - Integrated Local Server: Launches a built-in HTTP server to properly test YouTube embeds, JavaScript, and forms before publishing.
📝 Editing & Preview
- Synchronized Live Preview: A WYSIWYG side-by-side display that locks scrolling, ensuring your editor and preview are always on the same line.
- Multiple Document Support: You can open as many .md documents as you like. Each has it’s own tab.
- TOC: The table of contents expands and collapses to allow for quick navigation to the section you are interested in.
- Files: The Files list shows all of the file and folders in the current directory you are working in. You can launch files and even copy links.
- Professional Theming: Includes multiple Markdown-to-HTML themes (including the custom “Altuit” branding). Themes are CSS-based and fully customizable.
- Smart YouTube Embedding: Correctly embeds YouTube videos as lightweight, clickable thumbnails that play in the browser, preventing page bloat.
- In-Document Anchor Links: Auto-generates slug IDs for every heading and provides a Link button picker so you can jump between sections of a document with one click. See In-Document Anchor Links.
-
Link Between Documents: Right-click any
.mdfile in the DIR tab to drop in a link to it. Clicking the link in the preview opens that document, and Export to Browser rewrites the links so they keep working in the published HTML. See Linking Between Documents. -
Home Button on Published Pages: A tag at the top of a document gives its published page a ⌂ Home button that links back to the site’s home page —
index.htmlin the same folder by default, so it works on any site you build without configuration. See Home Button Tag for Browser Export. - Double-Click to Source: Double-click any word in the preview to jump the editor straight to it. See Jump to Source.
- Chat with an AI agent: If you have Claude Code, Codex, or Grok Build installed, a chat panel opens in the left sidebar so you can ask it to edit the open document — using your existing subscription, with no API key and no API credits. See Chatting with an AI Agent.
- Built-in Spelling Checker: Ensures your documentation is error-free.
🛠️ Core Utilities
- Comprehensive Toolbar: One-click access to formatting, tables, code blocks, and media insertion.
- Cross-Platform: Full compatibility for Windows, Mac, and Linux environments.
- Developer Support: Backed by complete documentation and support from a developer who has sold over 100,000 software products.
Getting Started
Launching MD DOCS
Launch the application by double-clicking the executable. You can also double-click any .md file directly if you have set up file associations.
Linux Installation
For Linux, download the portable ZIP and extract it. Then run the included install script to set up desktop integration:
bash install.sh
This sets execute permissions on the app binary, creates a launcher script, and adds MD DOCS to your application menu with its icon. See README_LINUX.txt in the ZIP for troubleshooting and uninstall steps.
Welcome Screen
When you first launch MD DOCS, a welcome screen appears.
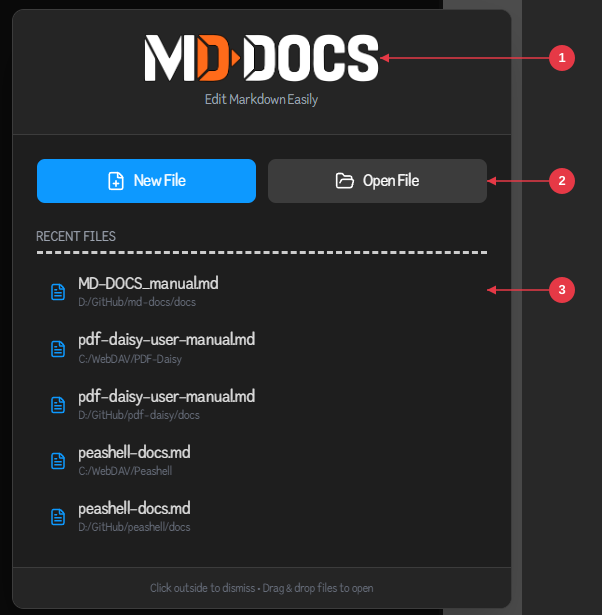
- MD DOCS logo — Confirms the app and its tagline, “Edit Markdown Easily.”
-
New / Open buttons — Start a new document or open an existing
.mdfile right away. - Recent Files — Your most recently opened files; click any entry to open it immediately.
The welcome screen appears whenever no documents are open.
Basic Operations
📂 Opening a File & Project
- Click the Open button in the toolbar.
-
Select any markdown (
.md) file. - Important: The folder containing your file becomes your Active Project. This is critical for features like the local server and image handling to work correctly.
The Open dialog reopens in the folder you last used, and remembers each kind of dialog separately — opening a CSV or picking an image doesn’t move where your documents open from. If a remembered folder has since been deleted, the dialog falls back to its default rather than opening somewhere random.
📄 Creating a New Document
- Click the New button in the toolbar.
- Choose a destination folder and filename.
- Your new document opens immediately, ready for editing.
The Workspace Layout
MD DOCS features a synchronous four-panel layout designed to keep your writing and preview in perfect sync.
┌─────────────────────────────────────────────────────────────┐
│  Toolbar: New, Open, Save, Save As, Refresh, Settings, Help │
├─────────┬───────────────────────────┬───────────────────────┤
│         │  Tab Bar                  │  Theme Selector       │
│  TOC    ├───────────────────────────┼───────────────────────┤
│   or    │                           │                       │
│  Files  │  Markdown Editor          │  Live Preview         │
│  Panel  │                           │                       │
│         │                           │                       │
├─────────┴───────────────────────────┴───────────────────────┤
│  Status Bar: Folder | Filename | Unsaved indicator | Log    │
└─────────────────────────────────────────────────────────────┘
-
Left Sidebar (Navigation)
- TOC (Table of Contents): Auto-generates a navigation tree from your document’s H1–H4 headings. Click to jump instantly to sections.
- Files: Displays your Active Project folder. Click any .md file to open it in a new tab, or right-click to copy paths.
-
Center Panel (The Editor)
- Monaco Editor: A professional-grade editor (powered by VS Code technology) featuring syntax highlighting and command shortcuts.
- Tab Bar: Manage multiple open documents. A blue dot on the tab indicates you have unsaved changes. Hover a tab to see the document’s full path. See Working with Many Open Documents.
-
Right Panel (The Result)
- Live Preview: Real-time rendering of your HTML output.
- Theme Selector: Instantly switch between built-in themes (like Altuit, GitHub, or Notion) to see your content in different styles.
- ####Status Bar
- Located at the bottom, this displays your current folder context, filename, and the View Log button for troubleshooting.
User Interface Overview
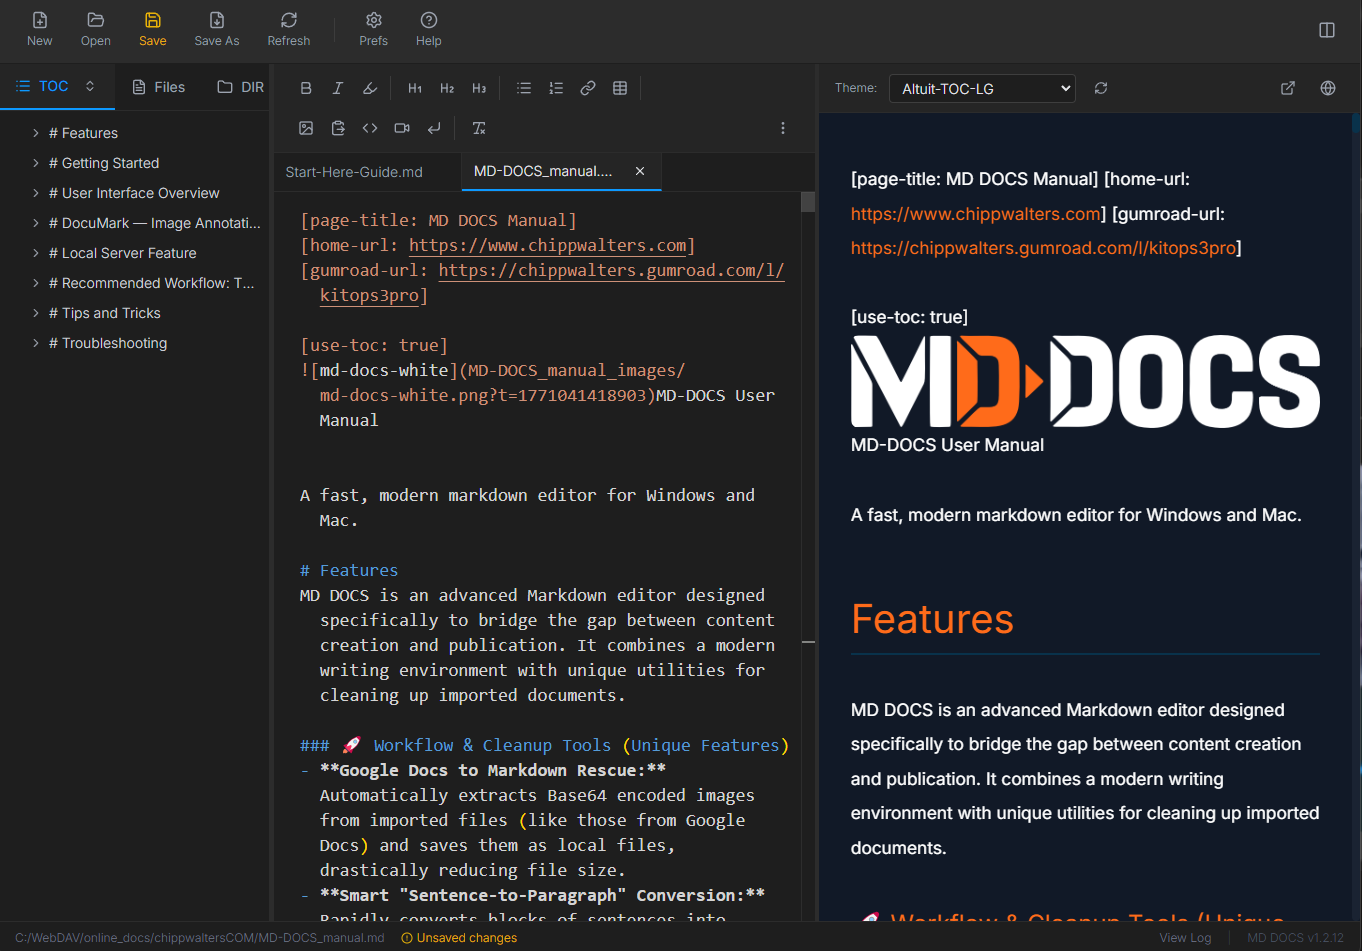
| Header | Description |
|---|---|
 |
Opens a new non-saved document in a new tab. |
 |
Opens an .md document in a new tab. Right-click to see the most recent open versions. The list only shows files that still exist — anything deleted, renamed, moved, or on a disconnected drive is dropped from it. |
 |
Saves existing tab. Will turn orange if there have been changes and it needs to be saved. |
 |
Saves As a different md file for the existing tab. |
 |
Refreshes .md from local storage. Will turn orange when the file has changed on disk since you opened it — MD DOCS checks each time the document gets focus (you switch to its tab, or you return to MD DOCS from another app), so an edit made by an AI agent, another editor, or a git checkout is flagged. Nothing is reloaded until you click it. |
 |
Opens the Settings dialog. The General tab covers app theme, editor font size, spell check, browser path, and file consolidation on Save As; the AI Agents tab picks the agent for AI chat. |
 |
About and Help dialog with link to documentation. |
| Left Panel | Description |
|---|---|
 |
Table of Contents shows H1, H2, H3 and H4 items for .md . Small button on right expands all and contracts all. |
  |
Files area that shows the folder the .md file resides in. Just below is the folder path and clicking on the folder icon opens the folder. |
| Toolbar | Description |
|---|---|
 |
Bolds selected text. |
 |
Italicized the selected text. |
 |
Highlights the selected text with <mark> and </mark>. Removed using Clear format button. |
 |
H1, H2, H3 headings for selected text. |
 |
Create bullet and numbered lists for selected paragraphs. |
 |
Create a URL link for the selected text. With text selected, opens a picker for pasting a URL or choosing an in-document anchor (heading or custom <a id="...">). See In-Document Anchor Links. |
 |
Create blank table markdown. |
 |
Loads an image from a file requestor. It then copies the image to a folder (with the same prefix) next to the .md file so that all referenced images are stored in the same place. |
 |
Paste image from clipboard: prompts for name (no extension) and then saves image to a folder it creates (if necessary) at the root directory of the original file. |
 |
Create a code block for the selected text. A code block using a monospaced font and has a dark region. Good for code, ascii tables, ascii diagrams. |
 |
Create blank YouTube video markdown. |
 |
Adds a hard return “<br>” so that you can force paragraphs in table cells. Also good for positiong in text like this new line. |
 |
Removes all markdown formatting and custom list HTML from selected text. |
| Special | Description |
|---|---|
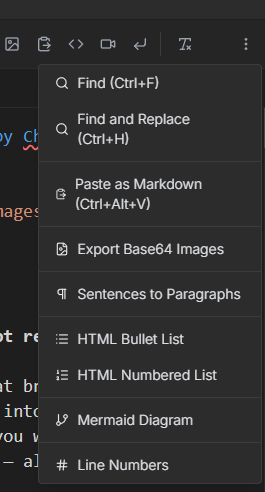 |
Special features menu:
|
| Themes | Description |
|---|---|
 |
MD DOCS comes with several themes that convert Markdown to HTML. These are handy for review purposes, and can also be hosted on file sharing systems like pCloud. Just send people the URL of the resulting HTML file and they will see a fully rendered version of the Markdown file. |
 |
The theme refresh button is used when modifying or creating your own CSS md theme. You can edit or add themes in your MD DOCS-win32-x64\resources\public\themes folder from where you install your MD DOCS application. Shift+click the refresh button in the preview panel to open the themes folder in File Explorer. |
| Preview | Description |
|---|---|
 |
Previews the rendered HTML in the default browser (or the browser specified in Settings). When pressed, it generates a same named .html file in the same directory as your .md document and then launches the browser window. If you want to share your html file on a server, you’ll need to make sure all of your images are referenced locally. |
 |
Toggles on and off a local server (if installed). This allows testing of javascript includes, links, and YouTube videos among other things. Only use this if you need this function, other wise the preview button should work just fine. When the server is on, the world icon is green— when off it is disabled. Note: server will automatically shutdown when the app is closed. To operarte:
|
 |
Locks and unlocks synchronized scrolling. |
| Footer | Description |
|---|---|
 |
The folder that the current .md file is in an the name of the current .md file. |
 |
Status messages. |
 |
View Log button. MD DOCS creates logs for each session and then erases them the next session. These are helpful for debugging purposes. |
 |
Version information. |
Recent Files
Right-click the Open button to see your 10 most recently opened files.
Multiple Tabs
- Open multiple files simultaneously
- Click a tab to switch files
- Middle-click or click the X to close a tab
- Blue dot on tab indicates unsaved changes
Editor Features
Monaco Editor
MD DOCS uses the same editor as VS Code, providing:
- Interactive spell checking (can be toggled in Settings)
- Syntax highlighting for markdown
- Find and Replace (Ctrl+F, Ctrl+H)
- Word wrap (enabled by default)
- Bracket matching
- Configurable font size
Scroll Sync
The editor and preview panels stay synchronized as you scroll. Toggle this feature with the lock/unlock button in the preview panel header.
Preview Panel
Theme Selector
Choose from several built-in themes:
- Altuit - Dark theme with orange accents (recommended)
- Altuit-TOC - Dark theme with collapsible sidebar table of contents
- Altuit-TOC-LG - Large-format TOC variant with bigger fonts and wider line-height for blog readability
- Altuit-TOC-Light - Light variant of the Altuit-TOC theme
- Altuit-TOC-Sketchnote - Hand-drawn sketchnote style using Comic Neue and Fredoka One fonts on a soft green background (light-only, no dark mode)
- Clean Light - Minimal light theme
- GitHub Dark - GitHub-style dark theme
- GitHub Light - GitHub-style light theme
- High Contrast - Pure black text on pure white for low vision, on the sidebar Contents layout: large hyperlegible type, wide spacing, underlined links, bordered code and tables, no grey and no italics. Toggle Theme flips the page to white on black
- Modern Dark - Sleek dark theme
- Notion - Notion-inspired styling
Jump to Source (Double-Click)
Double-click any word in the preview to jump straight to it in the editor. MD DOCS scrolls the editor to that word, selects it, and briefly flashes the line in blue so it’s easy to spot. When the same word appears more than once in a block, MD DOCS counts the occurrence under your cursor so it lands on the right one.
Preview Controls
| Button | Action |
|---|---|
| Refresh | Reload themes (Shift+click opens themes folder) |
| Export | Open preview in web browser |
| Lock/Unlock | Toggle scroll synchronization |
Export to Browser
Click the export button to:
- Generate an HTML file with your content
- Generate a CSS file with theme styling
- Open in your default browser (or configured browser)
Files are saved as {filename}.html and {filename}.css in your project folder.
Themes
Using Themes
- Select a theme from the dropdown in the preview panel
- Your selection is remembered between sessions
- Themes affect both the in-app preview and browser export
Theme Tag for Browser Export
You can set a default theme for browser export by adding a tag at the top of your markdown file:
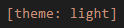
When this tag is present and you export to browser using the Altuit-TOC theme, the page will default to the light color scheme instead of dark. The whitespace after the colon is optional. Note: place the tag at the very top of your markdown file, before any content.
Home Button Tag for Browser Export
Add this tag at the top of your markdown file to give the published page a ⌂ Home button in its header:
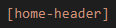
The button links to index.html in the same folder as the published page. Export a set of documents into one folder and every page points back to that folder’s home page, with nothing to configure — the same tag works for every site you build.
To send the button somewhere else, put the target after a colon:

The target can be another page in the same folder, or a full web address. Anything that is not an ordinary web or mail address is refused and the button falls back to index.html.
Like the theme tag, this works with the Altuit-TOC theme and other TOC-layout themes, and the tag itself is stripped from the published page. Place it at the very top of your markdown file, before any content.
Password Tag for Browser Export
Put a password tag at the top of a document and its published page opens behind a password curtain. Type the password in plain text; at publish time MD DOCS hashes it and builds the curtain into the page with only the hash in the HTML — the published page never contains the password itself.

To change the password, edit the tag and publish again. Each gated page remembers being opened in that browser, per site, so unlocking one client’s site never unlocks another’s.
A page can carry several password tags, and any one of the passwords opens it. Each password’s unlock is remembered separately, so a page two audiences share — a site’s table of contents, say — can open for both while each audience’s own pages stay behind their own password.
Honest limits: this is a curtain, not a lock. The page content ships inside the HTML behind the curtain, so anyone who knows how to read a page’s source can reach it. And the source
.mdsitting beside the published page contains the password in plain text, so deny web access to*.mdon your host — one.htaccessrule does it. Use this to keep a client’s draft out of casual view, not to protect anything that matters.
TOC-layout themes only.
Review Pages: the Backlot Header Tag
A document can be published as a review window onto a staged process: a numbered rail of stages across the header, live choices in the body, and a Save answers button. Put the tag at the top of the document:
The path names a small manifest file that lists the stages — their number, label, the page that shows each one, and its state (answered, accepted, waiting, or skipped). The manifest is read every time the page opens, so when a stage’s state changes the rail updates on every page without republishing any of them. With no path, the page looks for backlot.js beside itself. The manifest is a one-line script:
window.BACKLOT = { "title": "The Kettle", "stages": [
  { "n": 1, "label": "Story",  "href": "story/story-review.html",  "state": "answered" },
  { "n": 2, "label": "Script", "href": "script/script-review.html", "state": "waiting" } ] };
Inside the document, ordinary list items become choices:
-
- [ ] text— a checkbox (tick as many as apply).- [x]starts ticked. -
- ( ) text— a radio (one per list).- (x)starts selected. -
-
— a comment box;sets its placeholder.
If an item starts with inline code, that code is its saved value: - ( ) \gpt2` — ChatGPT candidate 2`. This keeps a stable identifier separate from the caption and picture shown to the reader. Otherwise the item’s text is its value; an image-only item uses the image’s alt text. Every answer records the heading it sits under, so the saved file reads like the document.
Click any image in a Backlot page to enlarge it against a dark field. Click outside the enlarged image, or press Escape, to return to the document. Clicking a choice’s thumbnail opens the image without changing that choice.
Save answers writes <page>.answers.json beside the page. The browser asks once for permission to write into the page’s folder; a browser that cannot write downloads the file instead. Nothing else is written — the page records answers, it does not act on them.
TOC-layout themes only. The tags are stripped from the published page.
Site Menu
Drop a site-menu.html file beside your published pages — nothing but a list of <a href="..."> links — and every page grows a collapsible Site Pages group at the bottom of its Contents panel, loaded when the page opens.
Add a page to the site by editing that one file; nothing needs republishing. No file, no group.
Pages opened straight from disk skip the menu — browsers only fetch it from a server. Use Local Server to see it before publishing.
There is a second way to build one. A heading that is entirely a link carries that link into the Contents panel, so ## [Status](Status.html) gives you a TOC entry that goes where the link goes rather than to its own place on the page. Wrap a run of such headings in <div style="display:none"> — with blank lines around the headings — and the page gets a site menu in its Contents panel with nothing visible in the body. Each document then lists exactly the pages it wants, in plain markdown, with no header or theme changes. Headings that merely contain a link among other words keep their normal in-page anchor.
Custom Themes
You can edit or add themes in your MD DOCS-win32-x64\resources\public\themes folder from where you install your MD DOCS application.
To create custom themes:
- Shift+click the refresh button to open the themes folder
-
Create a new
.cssfile following the existing theme format - Add metadata comments at the top:
/**
 * @name My Theme
 * @background #FFFFFF
 * @text #333333
 */
- Click refresh to load your new theme
Working with Images
Insert from File
- Click the Image button in the toolbar
- Select an image file — PNG, JPG, JPEG, GIF, WEBP, or SVG
-
The image is copied to a
{filename}_images/folder -
A markdown reference is inserted:

Paste from Clipboard
- Copy an image to your clipboard (screenshot, etc.)
- Press Ctrl+Shift+V or click the paste image button
- Enter a name for the image
- The image is saved as PNG and inserted
Drag and Drop
Drag one or more image files from Explorer or Finder straight onto the editor. Each one is copied into the document’s {filename}_images/ folder and a markdown reference is written at your cursor — the same result as Insert from File, without the dialog.
Accepted types are PNG, JPG, JPEG, GIF, WEBP, and SVG. If a file of the same name is already in the folder, the new one is renamed rather than overwriting it (diagram.svg becomes diagram-1.svg).
Dropping an SVG works exactly like a raster image, and once it’s in your document you can Ctrl+click it in the preview to open it in DocuMark for annotation.
You can also insert an image already in your project without dragging:
- Right-click an image in the Files panel
- Select “Insert in Document”
- The image path is inserted at your cursor position
Export Base64 Images
If your document contains embedded base64 images:
- Go to More Options (⋮) > Export Base64 Images
-
Images are extracted to
{filename}_images/ - Optionally replace base64 data with file references
Working with Tables
Insert a Table
Click the Table button to insert a 3x3 table template:
| Header 1 | Header 2 | Header 3 |
|----------|----------|----------|
| Cell 1   | Cell 2   | Cell 3   |
| Cell 4   | Cell 5   | Cell 6   |
Insert CSV as Table
You can turn CSV or TSV data into a markdown table in one step. Two commands live in More Options (⋮):
-
Insert CSV from File… — Opens a file dialog (
.csv,.tsv, or.txt) and inserts a markdown table at the cursor. - Insert CSV from Clipboard — Does the same using whatever CSV/TSV text is on your clipboard.
The converter:
- Auto-detects whether columns are separated by commas or tabs.
- Handles RFC 4180 quoting, so embedded commas, quotes, and line breaks inside a field are parsed correctly.
-
Escapes pipes (
|) and newlines so the resulting table always renders cleanly.
The first row becomes the table header.
HTML Lists in Table Cells
Standard markdown lists don’t work inside table cells. Use the HTML list options instead:
- Select your list items
- Go to More Options (⋮)
- Choose “HTML Bullet List” or “HTML Numbered List”
This generates:
<ul><li>Item 1</li><li>Item 2</li></ul>
Images in Tables
Images in tables are automatically sized to fit the column width. You cannot have paragraphs inside a cell of a table.
In-Document Anchor Links
Anchor links let you jump from one place in a document to another — like a clickable table of contents. Clicking an anchor link in the preview smooth-scrolls to the target heading.
How Anchors Work
Every heading in your document automatically gets a hidden id derived from its text — a “slug.” The slug rule:
- Lowercase
- Spaces become hyphens
-
Punctuation is stripped (letters, digits,
_,-are kept)
Examples:
| Heading | Auto-generated slug |
|---|---|
## Getting Started |
getting-started |
## Step 1: Install! |
step-1-install |
### FAQ |
faq |
Duplicate headings get a numeric suffix: two ## Setup headings become setup and setup-1.
Creating an Anchor Link with the Link Button
- Select the text in the editor that you want to be clickable.
- Click the Link button in the toolbar.
-
A picker opens with two ways to finish the link:
- URL field (focused on open) — paste any URL and press Enter. If you selected something that already looks like a URL, the field is pre-filled.
- Anchors in this doc — a scrollable list of every heading in the current document, indented by heading level, plus any custom anchors (shown with an ⚓ icon). Click one to insert.
-
The result is inserted as
[selectedText](#slug)or[selectedText](url), and the link label stays selected so you can keep formatting it.
Press Esc or click outside the picker to dismiss it without inserting.
If you click the Link button without any text selected, the picker is skipped and a [link text](url) placeholder is inserted at the cursor (legacy behavior).
Custom Anchors
When you want a stable target that isn’t tied to a heading’s text (so it won’t break if you later rename the heading), add an empty anchor tag where you want to land:
<a id="my-spot"></a>
Then link to it like any other anchor:
[Jump to my spot](#my-spot)
Custom anchors appear in the Link picker’s anchor list with an ⚓ icon.
Cross-File Anchors
Anchors aren’t limited to the current file. Paste a relative path with a fragment into the Link picker’s URL field:
[See the API doc](./api-reference.md#authentication)
These links work when the rendered HTML files are placed in the same folder structure (for example, after exporting to browser). For a faster way to create links to other documents — and to follow them inside the app — see Linking Between Documents.
Manual Typing
You can always type anchor links by hand using the slug rule above:
[Click here to jump](#getting-started)
If a link doesn’t scroll when clicked, open DevTools (Ctrl+Shift+I) in the preview panel, find the target heading, and copy its actual id attribute — that is the exact slug to use.
Linking Between Documents
Beyond jumping around inside one file with anchor links, MD DOCS lets you link between separate .md files that live in the same folder — so a set of related documents can cross-reference each other like a small wiki. A document link is just a normal Markdown link whose target is another .md file:
[Getting Started](getting-started.md)
[Install steps](setup.md#installation)
These links work two ways:
-
In the app — clicking the link in the live preview opens that document in a tab (or switches to it if it’s already open) and shows its preview. A link with a heading fragment (
setup.md#installation) opens the document and scrolls to that heading. -
In published HTML — when you Export to Browser, links to
.mdfiles are automatically rewritten to point at the matching.htmlfiles, so the published pages link to each other correctly.
Adding a Link with “Add as local link”
The quickest way to create one is from the DIR tab — the directory tree in the left sidebar that lists every file in your project folder:
- Open the DIR tab in the left sidebar.
-
Right-click the
.mdfile you want to link to. - Choose 🔗 Add as local link.
A Markdown link is inserted at your cursor, using the target document’s first # Heading as the link text (or its filename if it has no heading). For example, right-clicking getting-started.md inserts [Getting Started](getting-started.md). You can also type these links by hand, or paste a relative path into the Link button’s URL field (see Cross-File Anchors).
Navigating Links in the Preview
Click any link to another document in the live preview and MD DOCS loads that file and shows it. Use the tab bar (or Ctrl+Tab) to get back to where you were. Links that point to a specific heading — guide.md#installation — open the document and jump straight to that heading.
Same-folder scope: In-app navigation is designed for documents that sit in the same folder. A link that points into another folder (for example
../shared/notes.md) is left for the browser to resolve and is not followed inside the app.
Publishing Linked Documents
Each document is exported on its own, so to publish a set of linked documents, Export to Browser for each one. When you export, MD DOCS rewrites every same-folder .md link to the matching .html file (keeping any #heading fragment); external links (http://…), e-mail links, and in-document anchors are left untouched.
If you export a document that links to another document you haven’t exported yet, MD DOCS shows a warning listing the documents whose .html file doesn’t exist beside it. The current page is still exported — the warning is simply a reminder of which linked documents you still need to export before sharing, so you don’t end up with dead links.
YouTube Videos
Inserting Videos
- Click the YouTube button in the toolbar
-
Replace
VIDEO_IDwith the actual YouTube video ID -
Replace
Video Titlewith your description
The format is:
[](https://www.youtube.com/watch?v=VIDEO_ID)
How It Works
- In the preview, YouTube links display as clickable thumbnails
- The official YouTube play button overlay appears on hover
- Clicking opens the video in your default web browser
- This approach works in both the app and exported HTML
Finding the Video ID
The video ID is the 11-character code in YouTube URLs:
-
https://www.youtube.com/watch?v=dQw4w9WgXcQ→ ID isdQw4w9WgXcQ -
https://youtu.be/dQw4w9WgXcQ→ ID isdQw4w9WgXcQ
Mermaid Diagrams
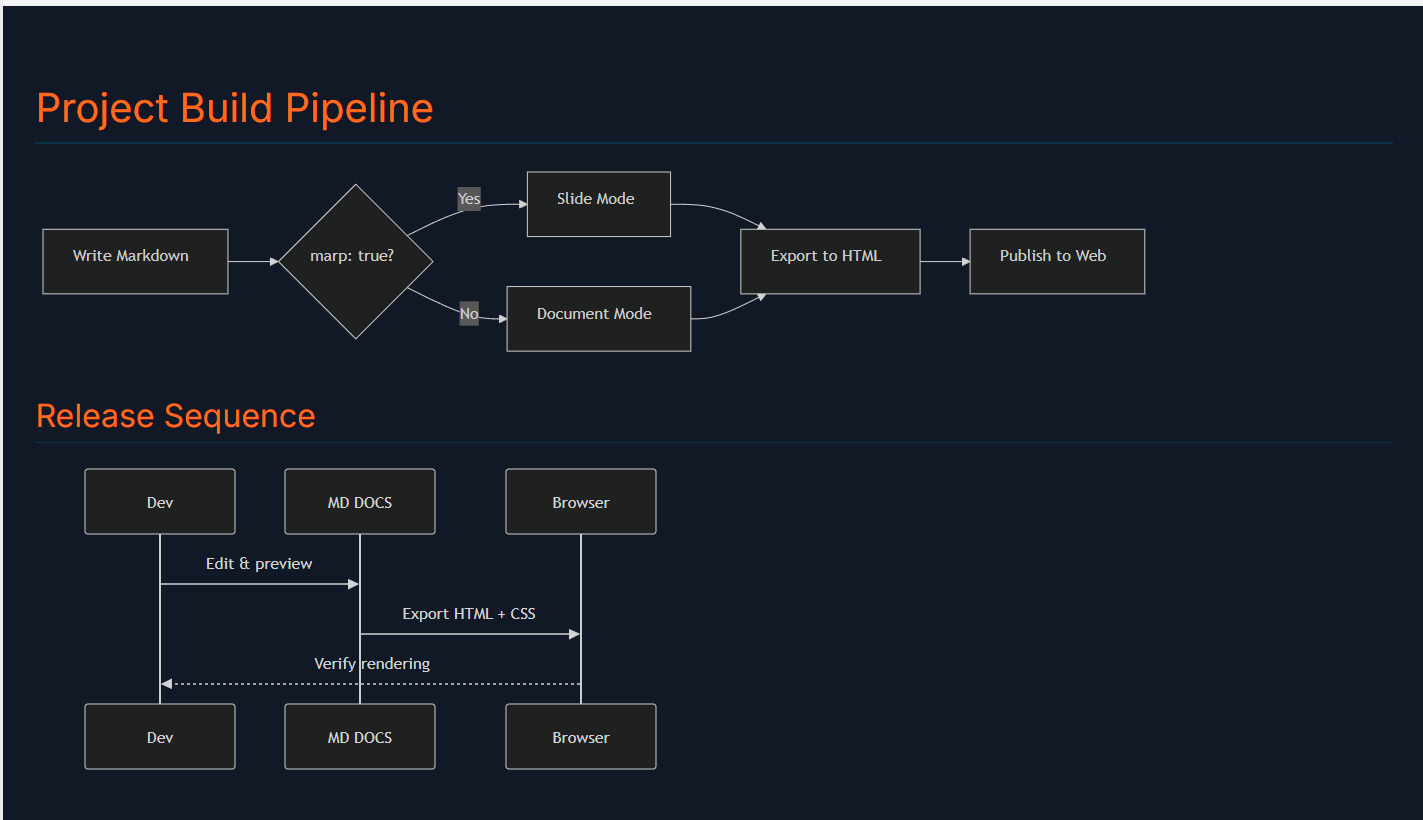
MD DOCS supports Mermaid diagrams in both the preview panel and browser export. Wrap your diagram code in a fenced mermaid code block:
```mermaid
flowchart LR
    A[Start] --> B{Decision}
    B -->|Yes| C[Do something]
    B -->|No| D[Do something else]
```
Diagrams render live in the preview panel (and in browser exports), with theme-aware colors:
Supported Diagram Types
-
Flowcharts —
flowchart LRorflowchart TD -
Sequence diagrams —
sequenceDiagram -
Class diagrams —
classDiagram -
State diagrams —
stateDiagram-v2 -
Gantt charts —
gantt -
Pie charts —
pie
Tips
- Diagrams automatically use theme-aware colors — dark themes get light diagram elements and vice versa
-
Line breaks in node text are converted automatically (
\nbecomes<br>) - Use the Mermaid Diagram option in the More Options (⋮) menu to insert a template
- Diagrams render in the preview panel and in all browser export themes
- Have a hand-drawn text diagram (box-drawing characters and arrows)? Ask your agent in the chat panel to “convert this text diagram to Mermaid” and it will replace it with a rendered flowchart in place
Marp Slide Presentations
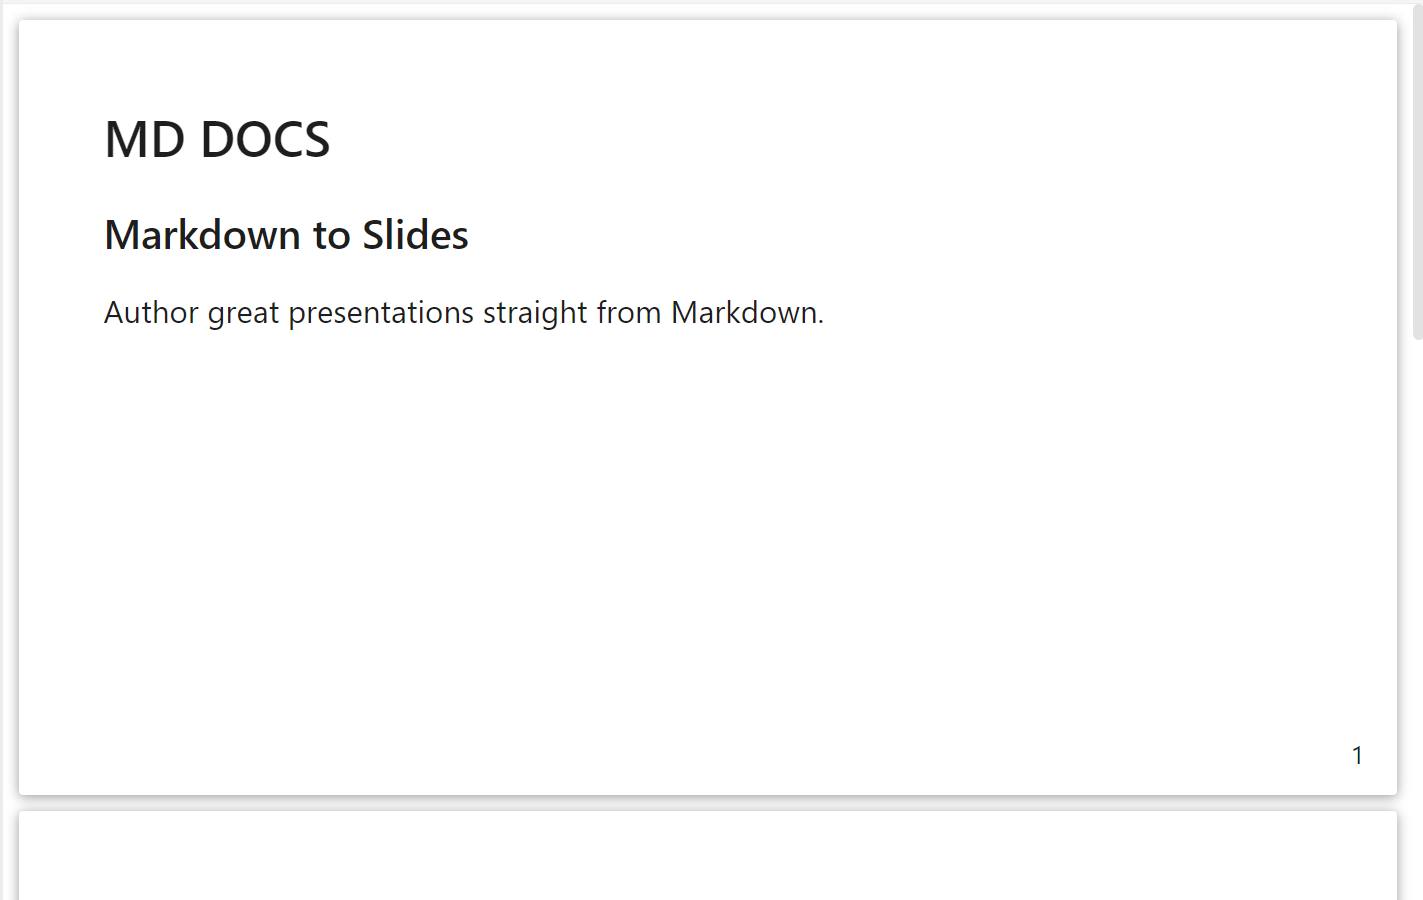
MD DOCS supports Marp for creating slide presentations directly from Markdown. Add marp: true to your document’s YAML frontmatter to activate slide mode.
Creating a Marp Document
Add a frontmatter block at the very top of your .md file:
---
marp: true
theme: default
paginate: true
---

# First Slide

Content for the first slide.

---

## Second Slide

- Bullet points
- Work as expected

---

## Third Slide

Use `---` (horizontal rule) to separate slides.
How It Works
When MD DOCS detects marp: true in the frontmatter:
- The preview panel switches from normal markdown rendering to slide mode
- Slides are displayed stacked vertically, scaled to fit the preview width
- Marp’s own theme CSS is applied instead of the MD DOCS theme selector
- Scroll sync is disabled (not applicable to slide content)
Built-in Marp Themes
Marp includes three built-in themes you can set in the frontmatter:
-
default— Clean white background with dark text -
gaia— Warm-toned theme with centered content -
uncover— Minimal theme with large typography
Marp Directives
Control slide appearance using HTML comment directives:
| Directive | Effect |
|---|---|
<!-- paginate: true --> |
Show page numbers on all slides |
<!-- _paginate: false --> |
Hide page number on this slide only |
<!-- class: invert --> |
Switch to dark color scheme |
<!-- _class: lead --> |
Center content on this slide only |
<!-- backgroundColor: pink --> |
Set background color |
<!-- backgroundImage: "linear-gradient(...)" --> |
Set gradient background |
<!-- header: 'Header text' --> |
Add a header to all slides |
<!-- footer: 'Footer text' --> |
Add a footer to all slides |
Directives prefixed with _ (underscore) apply only to the current slide. Without the underscore, they apply globally from that point forward.
Background Images
Use Marp’s image syntax for slide backgrounds:
 <!-- Full background -->
 <!-- Background on right half -->
 <!-- Background on left 40% -->
 <!-- Semi-transparent background -->
Auto-fit Text
Use the <!--fit--> comment inside a heading to scale text to fill the slide width:
# <!--fit--> This text fills the width
Math Equations
Marp supports LaTeX math via MathJax. Enable it in frontmatter with math: mathjax:
---
marp: true
math: mathjax
---

Inline: $E = mc^2$

Block:
$$\int_{-\infty}^{\infty} e^{-x^2} dx = \sqrt{\pi}$$
Exporting Marp Presentations
Click the Export button (top-right of the preview panel) to generate an HTML presentation file. The exported file opens in your browser with three viewing modes:
- Scroll mode (default) — All slides stacked vertically for easy review. Click any slide to select it as a starting point.
- Fullscreen (click “Fullscreen” or press F5) — One slide at a time, fills the entire screen.
- Window (click “Window” or press F6) — One slide at a time within the browser window.
Presentation Navigation
| Key | Action |
|---|---|
| Arrow Right / Down / Space | Next slide |
| Arrow Left / Up | Previous slide |
| Home | First slide |
| End | Last slide |
| Escape | Exit to scroll mode |
You can also tap or click the right half of a slide to go forward and the left half to go back — this works on touch screens (phones and tablets), so the exported deck is fully navigable on mobile without a keyboard. Tap Exit (top-right) to leave the presentation.
Tips
- Marp documents are standard Markdown — they render normally in any markdown viewer, just without slide separation
-
The
---separator must be on its own line with blank lines above and below for reliable slide breaks -
Images can be sized with Marp syntax:
or - Syntax-highlighted code blocks work the same as regular Markdown
Keyboard Shortcuts
File Operations
| Shortcut | Action |
|---|---|
| Ctrl+N | New file |
| Ctrl+O | Open file |
| Ctrl+S | Save current file |
| Ctrl+W | Close current tab |
| Ctrl+Tab | Next tab |
| Ctrl+Shift+Tab | Previous tab |
| F5 | Refresh file from disk |
Editing
| Shortcut | Action |
|---|---|
| Ctrl+F | Find |
| Ctrl+H | Find and Replace |
| Ctrl+B | Toggle bold on selected text |
| Ctrl+I | Toggle italic on selected text |
| Ctrl+Shift+V | Paste image from clipboard |
| Ctrl+Alt+V | Paste as Markdown (converts HTML/RTF to markdown) |
| Ctrl+Z | Undo |
| Ctrl+Y | Redo |
| Ctrl+A | Select all |
Navigation
| Shortcut | Action |
|---|---|
| Ctrl+G | Go to line |
| Ctrl+Home | Go to beginning |
| Ctrl+End | Go to end |
DocuMark
| Shortcut | Action |
|---|---|
| Ctrl+Click on image in preview | Open DocuMark annotation editor |
| Escape | Cancel placement mode or crop mode in DocuMark |
Settings
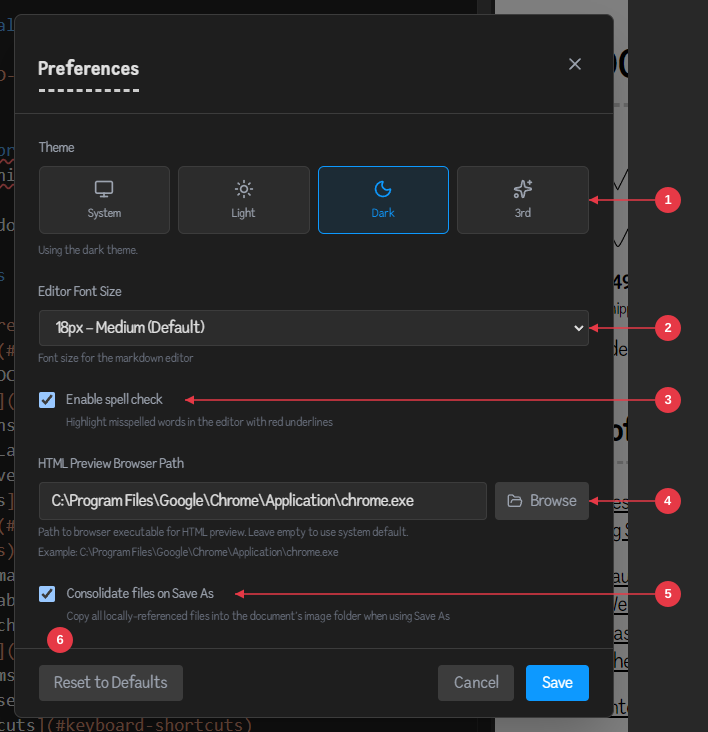
Open settings by clicking Settings in the toolbar. (This panel was previously named Preferences.)
Settings is split into two tabs: General, covering the editor and preview options below, and AI Agents, where you choose which AI agent MD DOCS chats with. It opens on General, and anything you’ve changed is kept if you switch tabs and come back.
General
- App Theme — Sets the look of the application chrome itself (the title bar and window background) — separate from the preview theme that styles your document. Choose System (follow your OS light/dark setting), Light, Dark, or 3rd. Your choice is remembered between launches and applied before the first paint, so there’s no flash on startup. Reset to Defaults restores Dark.
- Editor Font Size — Adjust the editor font size from 10px to 24px. Default is 18px.
- Enable Spell Check — Toggle the built-in spell checker on or off. When enabled, misspelled words are highlighted with red underlines in the editor. You can right-click misspelled words to see suggestions, ignore them, or add them to your custom dictionary. This setting takes effect immediately without restarting. Default is ON.
- HTML Preview Browser Path — Optionally specify a custom browser for the “Export to Browser” feature. Click Browse to pick an executable, or leave empty to use your system default browser.
-
Consolidate Files on Save As — When enabled, using Save As will automatically find all locally-referenced files in your document (images, links, etc.) that are stored outside the document’s
_imagesfolder, copy them into the new document’s_imagesfolder, and update all references in the markdown to point to the new locations. This makes your saved document fully self-contained and portable. If two files share the same name, the duplicate is automatically renamed (e.g.,photo.pngbecomesphoto_1.png). References inside code blocks are ignored. Default is ON. - Reset to Defaults — Click to reset all settings including font size, spell check, browser path, app theme, Consolidate on Save As, preview theme selection, and window size and position.
AI Agents
The AI Agents tab is where you pick the agent that powers AI chat:
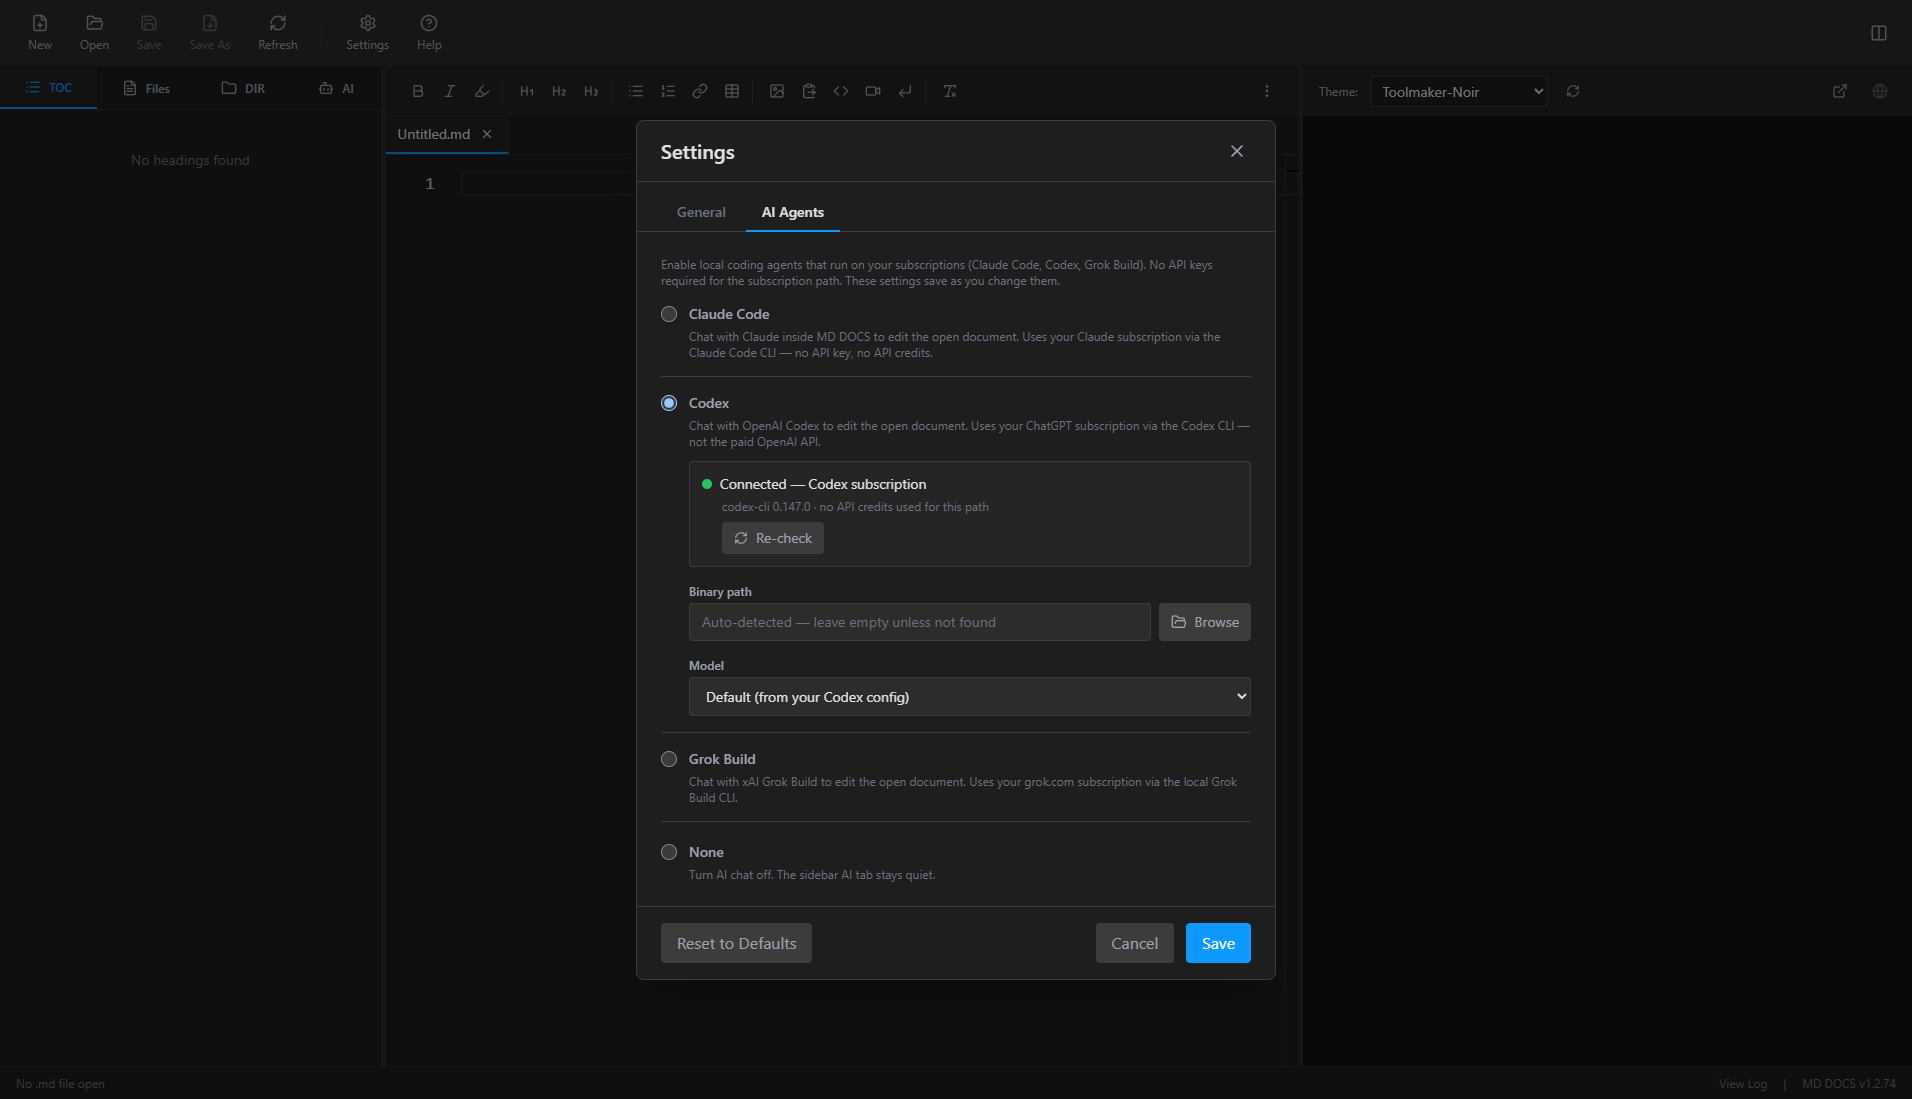
Choose one: Claude Code, Codex, Grok Build, or None. It’s a single choice — picking one sets it up and makes it your chat agent in one click, and turns off whichever you had before. Choose None to turn AI chat off entirely.
The agent you pick expands to show its details:
- Connection status — a green dot and “Connected” when it’s ready, with the version it found. Re-check runs detection again.
- Binary path — leave empty unless the program isn’t found automatically.
- Model — an optional default model, or the one from that tool’s own config.
- Advanced (Claude only) — store an OAuth token for headless or other machines.
Your binary path and model are remembered per agent, so if you go back to one you used before, its setup is still there.
Agent permissions
Below the agent picker, Agent permissions shows what your agent is allowed to do and lets you pull it back:
- Full access (the default) — the agent can read and edit files, run commands, and control MD DOCS itself: switching themes, opening files, exporting.
- No document tools — the agent keeps file editing and commands but can no longer drive the app.
There is deliberately no sandboxed option. A sandboxed agent cannot stop to ask your permission, so it declines silently — a request looks like it worked when nothing happened.
Chatting with an AI Agent
MD DOCS can chat with a coding agent already installed on your machine, so you can ask it to edit the document you’re working on — convert a diagram, tighten a section, fix tables, draft a summary — and it makes the change in place.
Three are supported, and you pick one in Settings → AI Agents:
| Agent | Runs on | Install |
|---|---|---|
| Claude Code | Your Claude subscription | claude.com/claude-code |
| Codex | Your ChatGPT subscription | npm install -g @openai/codex@latest |
| Grok Build | Your grok.com subscription | irm https://x.ai/cli/install.ps1 | iex |
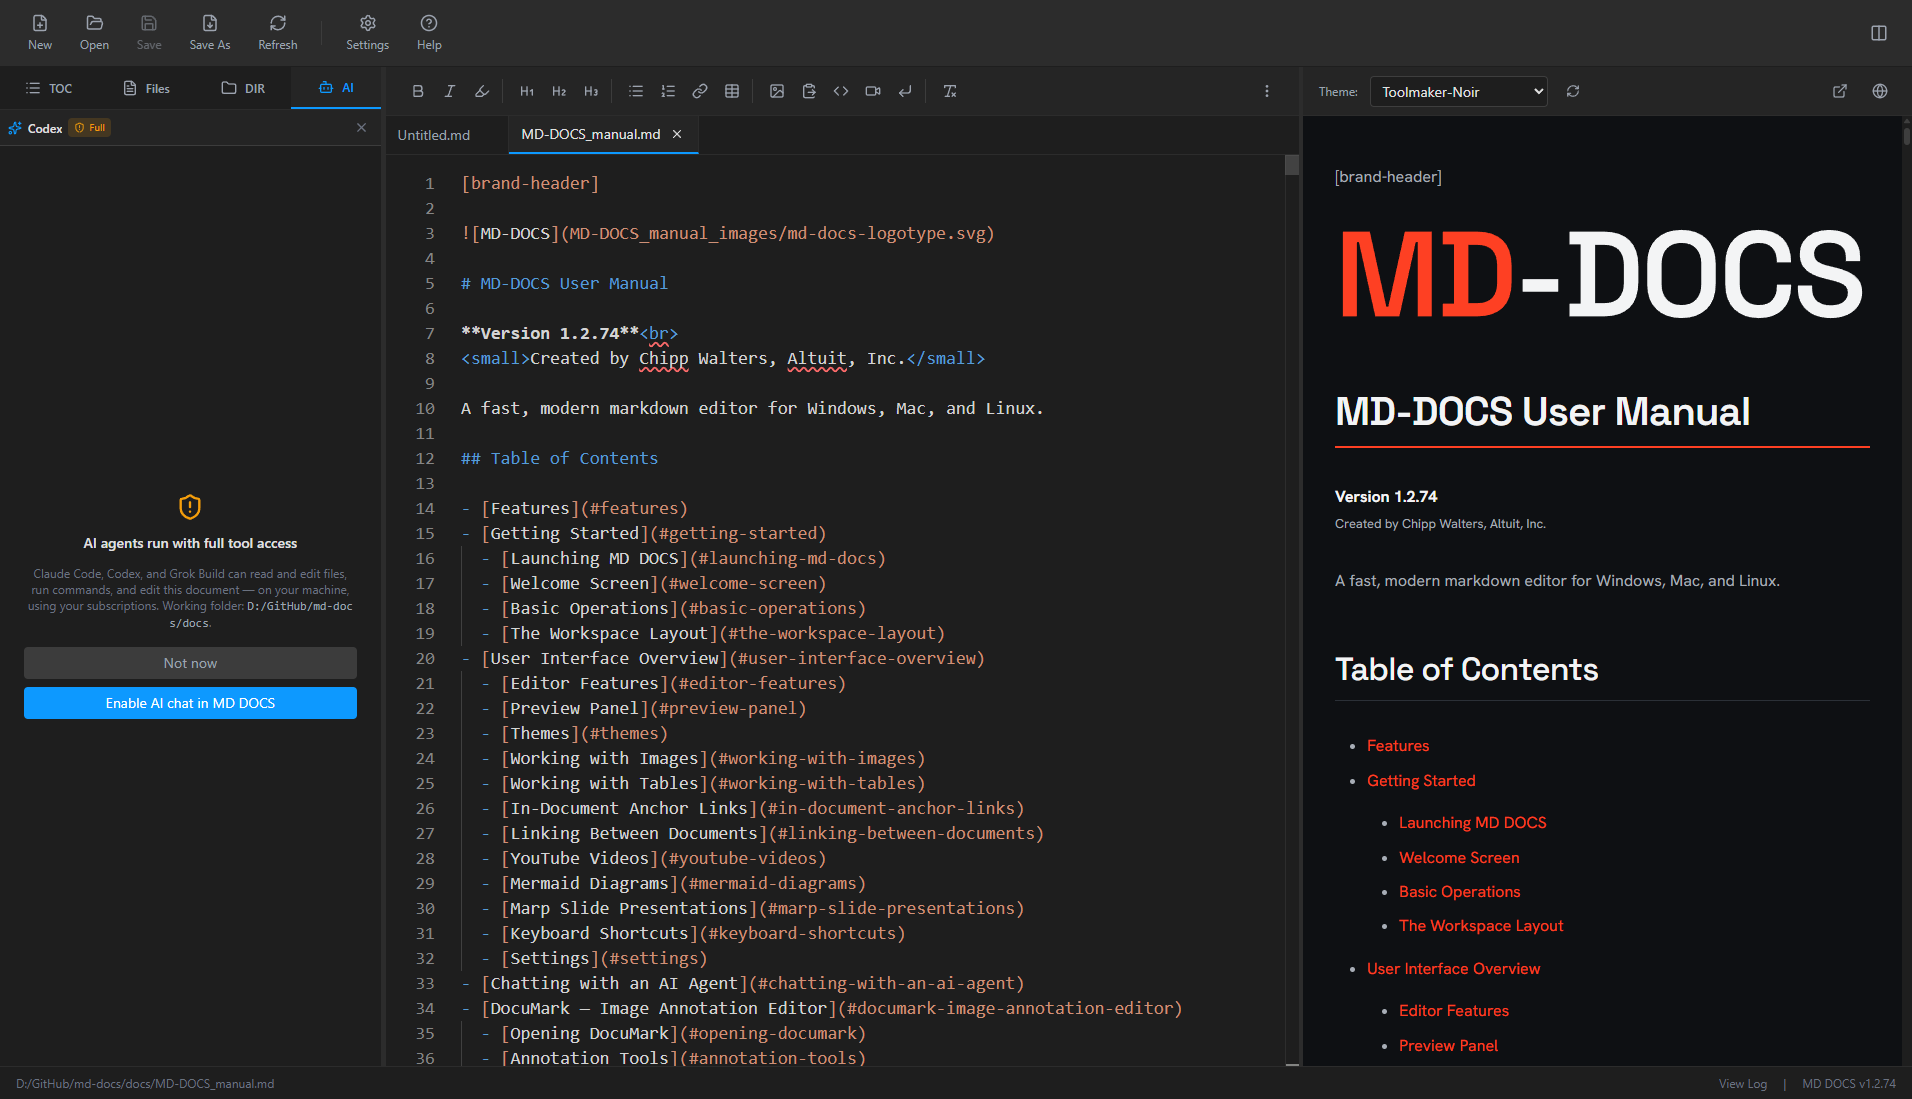
No API key, no API credits
Chat runs on your existing subscription through the agent’s own program already on your machine. MD DOCS launches that local program and deliberately ignores any API key in your environment, so you are never billed for API usage — it’s the same entitlement you get running the tool in a terminal.
Setting it up
- Install the agent you want, using the table above.
- Open Settings → AI Agents and select it.
-
Check the status line:
- Not found — install the tool, then click Re-check.
- Not signed in — click the sign-in button. A terminal opens and a browser handles the sign-in with your subscription; the status updates on its own when you’re done.
- Connected — a green dot confirms it’s ready.
Using the chat
- Click the AI tab in the left sidebar to open the chat panel, alongside TOC, Files, and DIR.
- The first time, confirm the one-time “runs as a full agent” notice.
- Type a request — for example “add a one-paragraph summary at the top” or “convert the ASCII diagram to Mermaid” — and press Enter. The reply streams in, and any edits appear directly in your open document.
- The tab is marked unsaved so you can review the change in the live preview before saving. Press Stop to cancel a run at any time.
The agent knows which document you mean
Each conversation opens by telling the agent which document is on screen, its full path, the project folder, and that “this doc”, “this file”, and “it” all mean that document — so “rewrite this doc” lands on the right file instead of a guess. If the document has unsaved edits, the agent is told the file on disk is behind what you see. The context is restated when you switch tabs, not on every message.
Watching it work
- The panel header shows a pulsing badge with what the agent is doing and how long it has been going, so a quiet stretch doesn’t look like a stall. The reply itself shows animated dots.
- The agent’s steps collapse to a single ⚙ N steps line you can click to expand. Without this, a dozen shell commands would push the reply off screen.
- The eraser at the top right of the panel empties the conversation and starts the agent on a fresh session, so it stops carrying over a conversation you can no longer see. Your next message re-introduces the open document.
Full agent: the agent runs with full tool access on your machine and edits inside the folder of the open document. It can read and change files there, so review its edits before saving — the same trust you’d extend to running that tool in a terminal.
DocuMark — Image Annotation Editor
DocuMark is a built-in SVG annotation editor for adding numbered callout dots, arrows, rectangles, and legends to screenshots and images. It opens in a separate window and saves annotations directly back into your document.
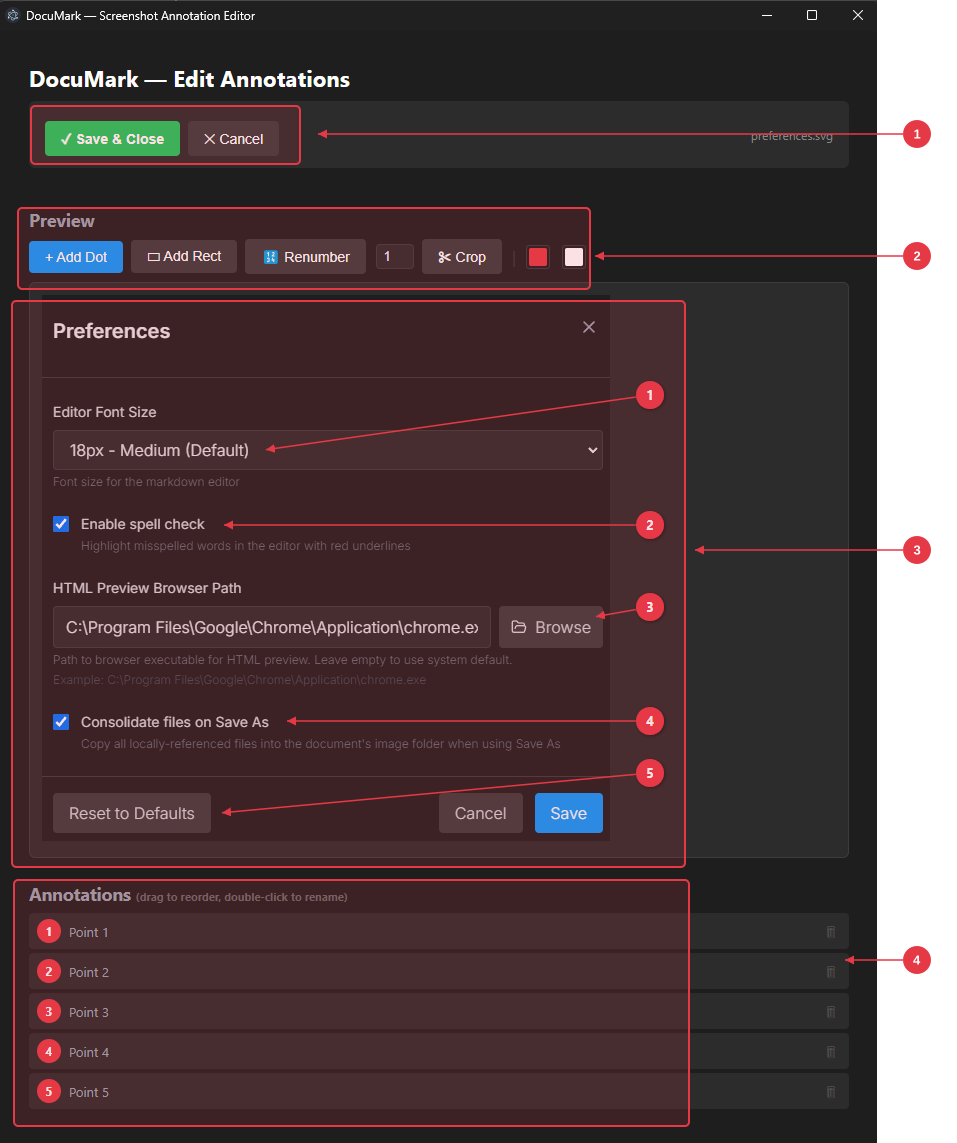
- Save & Close / Cancel — Save the annotated SVG back to your document, or cancel to discard changes.
- Annotation Toolbar — Add Dot, Add Rect, Renumber, dot size selector, Crop, and color pickers for annotations and text.
- Preview Canvas — The image being annotated, with numbered callout arrows pointing to key UI elements.
- Annotations Legend — Drag to reorder, double-click to rename, trash icon to delete. Shows all annotation labels.
Opening DocuMark
Ctrl+Click (Cmd+Click on macOS) on any image in the preview panel to open it in DocuMark, or right-click the image and choose Annotate image:
- SVG images — Opens the existing SVG for editing. Annotations are parsed and become editable.
- Raster images (PNG, JPG, WEBP, GIF, BMP) — Opens a new annotation layer over the image. On save, a new SVG file is created and all markdown references to the original raster image are automatically updated to point to the new SVG.
Annotation Tools
Add Dot
Click the + Add Dot button to enter placement mode (cursor becomes a crosshair). Click anywhere on the image to place a numbered marker. New dots are automatically labeled “Point N” — double-click the label in the legend to rename it.
Add Rect
Click the + Add Rect button, then click-and-drag on the image to draw a rectangular highlight region. Rectangles appear as semi-transparent outlined regions. They can be renamed via double-click in the legend.
Moving Rects
Click and drag anywhere on a rectangle to reposition it. The rect stays clamped within the image bounds.
Resizing Rects
A small handle appears at the bottom-right corner of each rectangle. Drag it to resize (minimum 20×20 pixels). The cursor changes to a diagonal resize arrow when hovering over the handle.
Dot/Arrow Toggle
Right-click any annotation dot to toggle between two styles:
- Dot — A numbered circle placed directly on the image
- Callout Arrow — A numbered circle in the margin sidebar with an arrow pointing to the target location on the image. The arrow tip and margin dot can be repositioned independently by dragging.
Dot Sizes
Right-click any annotation dot to choose a size preset:
- Small — Compact markers for detailed images
- Medium — Default size, good for most uses
- Large — Prominent markers for presentations or large screenshots
The size setting applies to all annotations at once — dots, arrows, rectangles, line weights, fonts, and margin width all scale together.
Color Pickers
Two color pickers in the toolbar let you customize:
- Annotation color — The color of dots, arrows, and rectangle outlines
- Text color — The color of numbers and labels
Changes apply immediately to all annotations.
Legend Panel
- Drag entries to reorder annotations
- Double-click a label to rename it inline (Enter to confirm, Escape to cancel)
- Delete button (trash icon) removes an annotation
- Renumber button re-sequences all annotations starting from 1
Replace Image
Click Replace Image to swap the picture underneath the annotations — for when the screen you documented has changed and you re-shot it. Pick the new image and every dot, arrow, rectangle and label stays, so you only fix what moved.
- Same size as the old image — nothing moves. The annotations sit exactly where they were.
- Different size — the annotations are scaled to the new image so they land near the same features and none end up off the edge, where you could not see or drag them. Nudge the few that missed.
Nothing is ever dropped, and the status line tells you which of the two happened. The new picture is written into the SVG when you save.
Crop Mode
Click the Crop button to enter crop mode:
- A crop rectangle appears with 8 resize handles (4 corners + 4 midpoints)
- Drag any handle to resize the crop area
- Drag inside the crop area to reposition it
- Use the numeric X, Y, W, H fields for precise values
- Click Apply to commit the crop, or Cancel (Escape) to exit
The crop area extends into the callout margin sidebar, and a darkened overlay shows what will be trimmed.
Saving and Exporting
- SVG — Saves the annotated image as SVG, overwriting the source file. The preview panel in MD DOCS refreshes automatically.
- PNG — Exports the annotated image as a PNG file.
When you save in DocuMark, the parent MD DOCS document is automatically marked as unsaved (the save button turns orange) so you remember to save your markdown file too.
Local Server Feature
MD DOCS includes a built-in local server that allows you to preview your HTML exports with full functionality, including embedded YouTube videos.
How to Use
- Open a project folder in MD DOCS
- Click the Globe button in the preview panel header
- A security warning will appear - click OK to continue
-
Your default browser opens to
http://localhost:8000 - Navigate to your exported HTML files
- Click the green Globe button again to stop the server
Benefits
Embedded Content Works
When you open HTML files directly from your file system (file:// protocol), browsers block certain features for security reasons. The local server uses http:// protocol, which allows:
- YouTube videos to play directly in the page
- External scripts and resources to load
- Iframe content to function properly
No Installation Required
The server is built into MD DOCS using Node.js - no external software needed. Unlike solutions that require Python or other tools, this works immediately.
Directory Browsing
When you start the server, you can browse all files in your project folder through the web interface.
Fast and Lightweight
The server runs in the same process as MD DOCS with minimal resource usage.
Risks and Security Considerations
Network Exposure
When the server is running, files in your project folder are accessible to any device on your local network. This means:
- Other computers on your WiFi can access your files
- On a shared network (office, coffee shop, hotel), others could potentially view your content
Mitigation
- Only run the server when you need it - Stop it when done previewing
- Avoid sensitive data - Don’t serve folders containing passwords, credentials, or private information
- Be cautious on public networks - Consider not using the server on untrusted networks
-
The server only runs on
localhost:8000by default, but other devices can still connect via your computer’s IP address
What the Server CAN’T Do
- It cannot access files outside your project folder (directory traversal is blocked)
- It cannot execute code or modify files (read-only)
- It cannot install software or make system changes
- It stops automatically when you close MD DOCS
Technical Details
- Port: 8000 (fixed)
- Protocol: HTTP (not HTTPS)
- Scope: Only serves files from the current project folder
-
Technology: Node.js built-in
httpmodule
Troubleshooting
“Port 8000 is already in use”
Another application is using port 8000. Close that application and try again, or restart your computer.
Server won’t start
Check the View Log for error messages. Common issues:
- Firewall blocking the port
- Antivirus software interference
Browser shows “connection refused”
The server may have stopped unexpectedly. Click the Globe button to restart it.
Recommended Workflow: The Google Docs Pipeline
Here is one use case of how MD DOCS can work in a Google Docs pipeline.
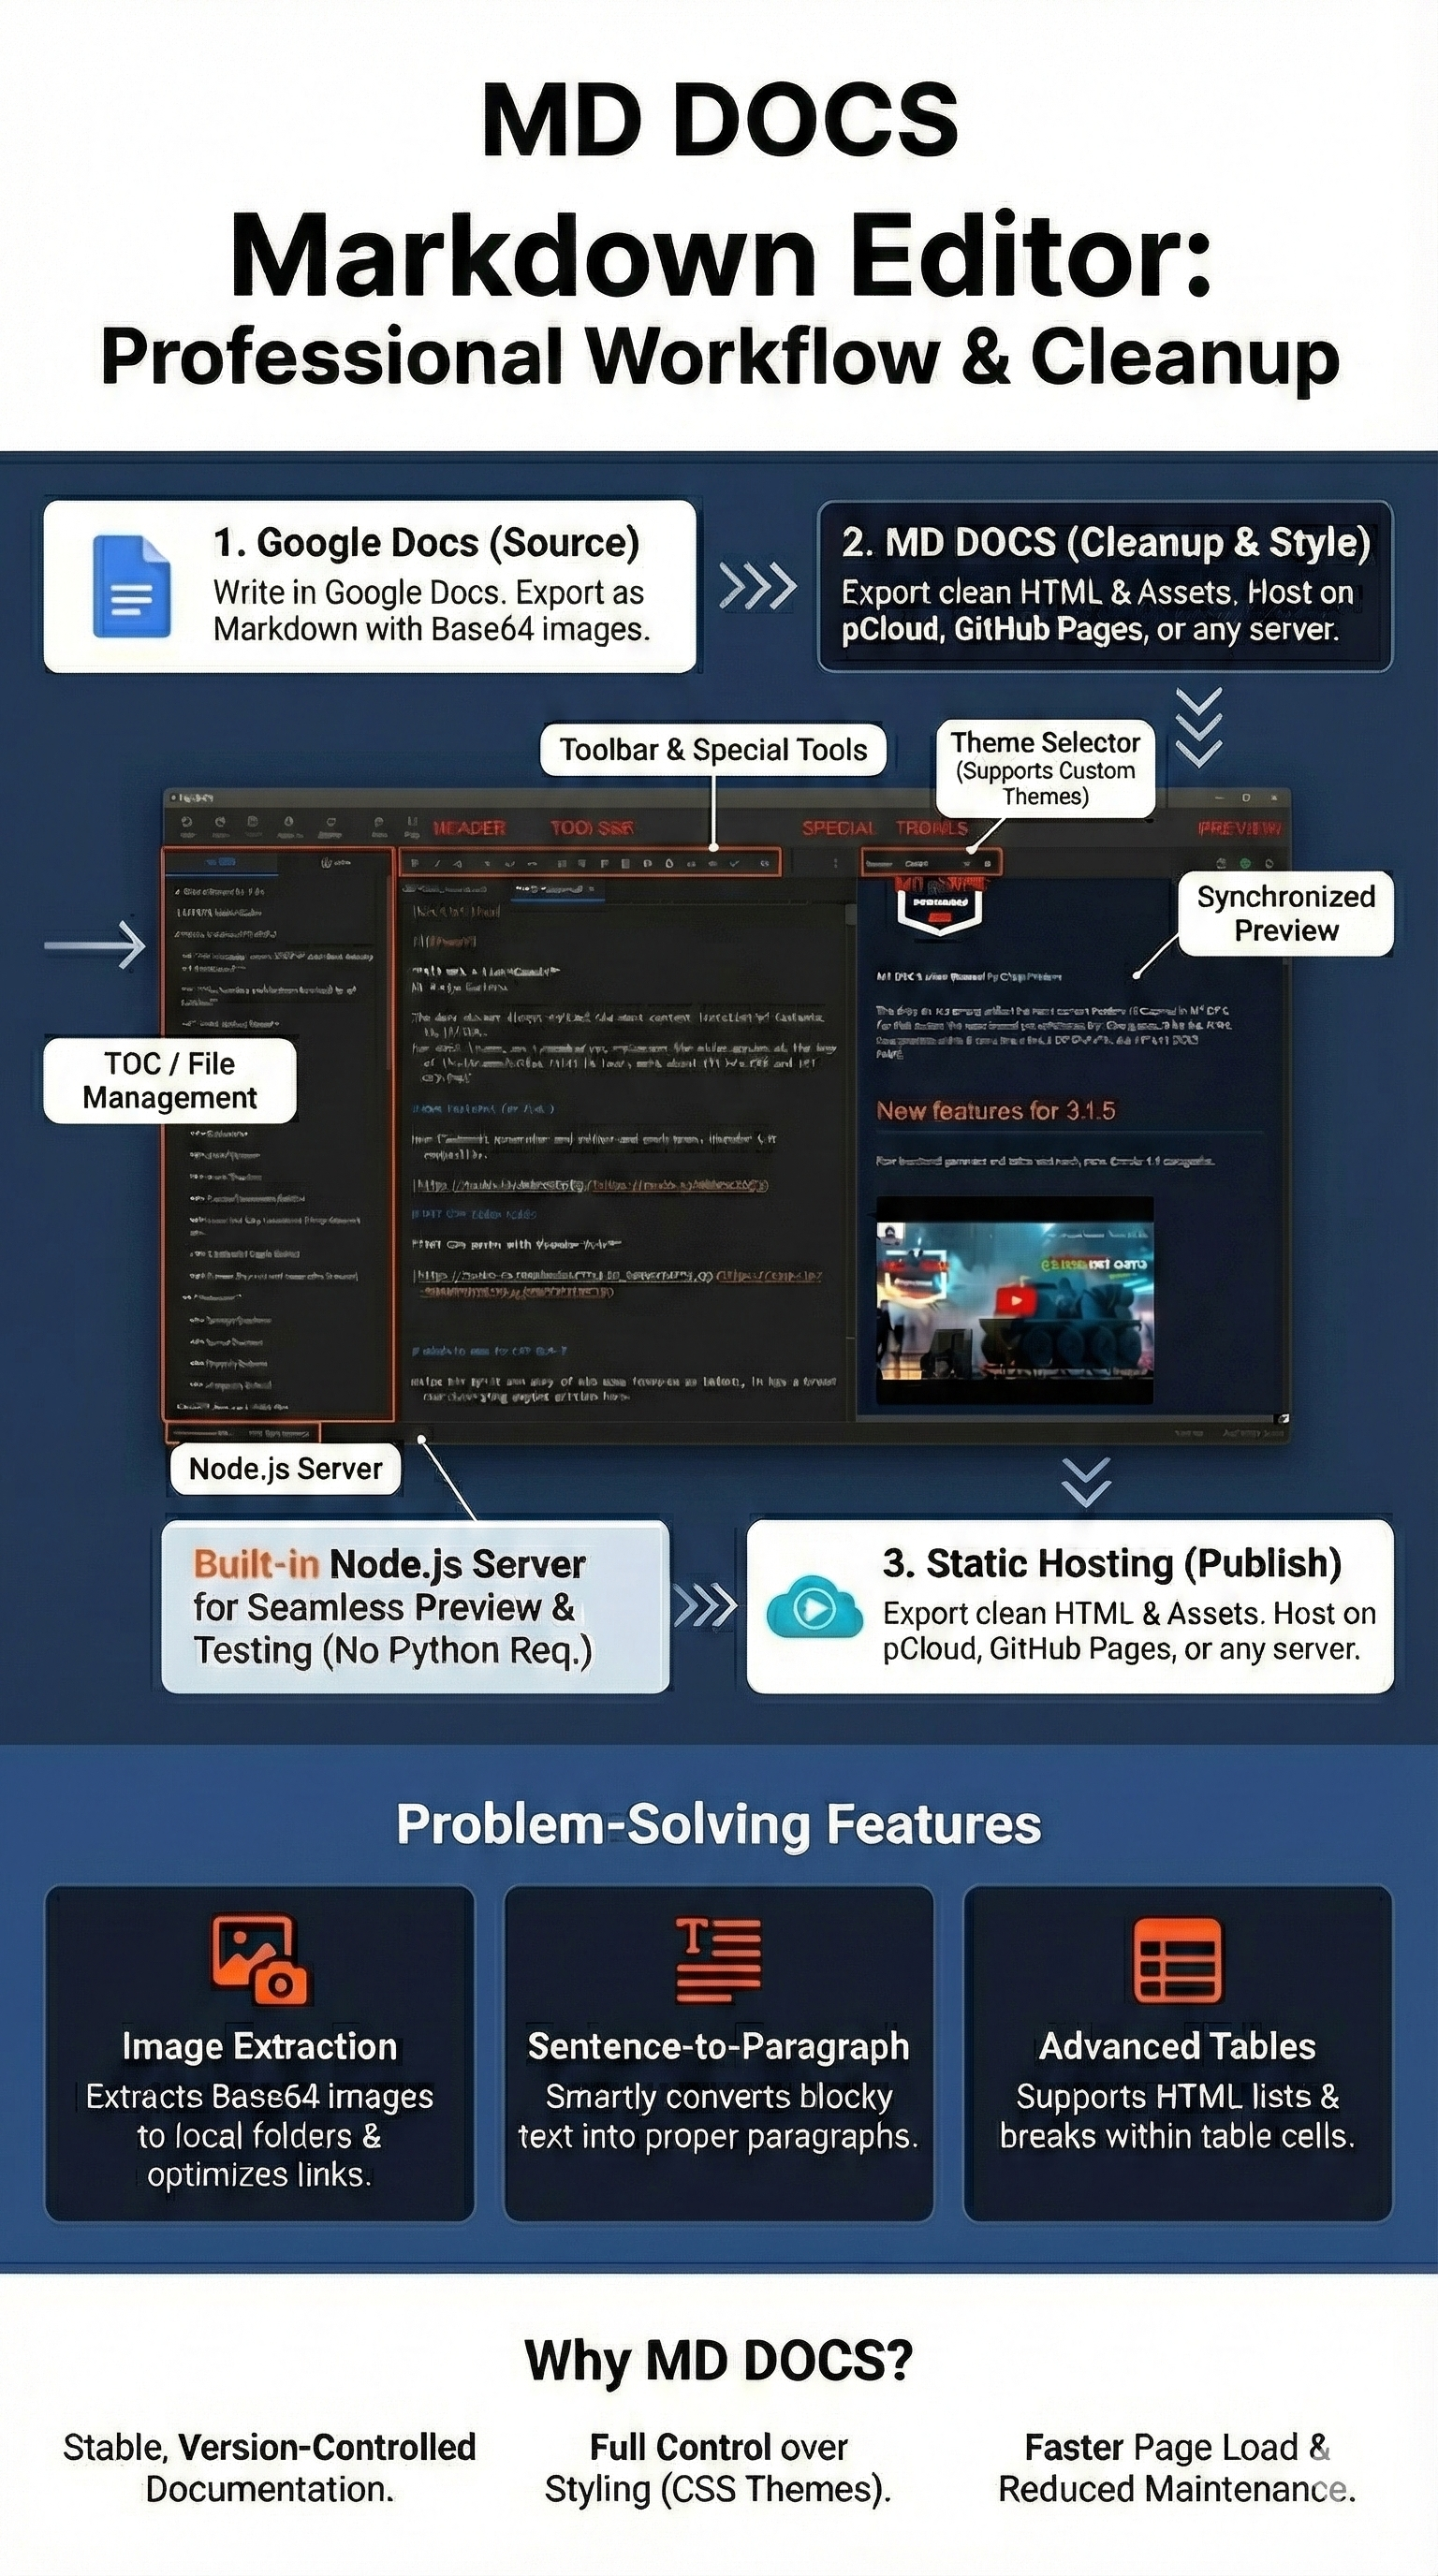
This workflow is the “Secret Weapon” of MD DOCS. It is designed for developers and content creators who manage multi-page documentation for products (such as software add-ons) and need a stable, professional way to publish to the web without building complex websites.
The Problem
Many creators write in Google Docs because it is excellent for drafting. However, publishing directly from Google Docs is fragile. Google frequently changes its internal HTML code, which breaks custom parsers and scripts. Relying on Google’s “Publish to Web” HTML often leads to broken formatting and constant maintenance headaches.
The Solution: The Stability Pipeline
MD DOCS acts as the stabilization engine between your writing and your website. It allows you to write in Google Docs but publish with the stability and control of Markdown.
Step 1: Author in Google Docs
Write your documentation in Google Docs. Enjoy the spell-check, collaboration, and familiarity. Even add in images and video links. When finished, export your document as Markdown (File > Download > Markdown).
Step 2: Ingest & Rescue (The Critical Step)
Google Docs exports images as “Base64 encoded text”—giant blobs of code that make files massive and hard to manage.
-
Open the exported
.mdfile in MD DOCS. - Go to More Options (⋮) > Export Base64 Images.
-
MD DOCS automatically extracts every image, saves them to a local
_imagesfolder, and rewrites the code to link to them correctly. - Result: A clean, lightweight Markdown file with standard image assets.
- An added bonus is that MD DOCS will also convert you YouTube links to playable videos in your published online docs.
Step 3: Clean & Format
Google Docs exports can sometimes strip paragraph formatting or mess up lists.
- Fix Text: Use the Sentences to Paragraphs tool to instantly fix blocky text exports.
- Fix Tables: If you have complex data, use MD DOCS’ unique HTML List feature to put bullet points inside table cells—something standard Markdown can’t do.
Step 4: Brand & Preview
Instead of relying on Google’s default look:
- Select the Altuit theme (or your own custom CSS) in the right panel.
- This applies your product’s specific branding, navigation styles, and colors immediately.
- Verify everything looks perfect in the synchronized Live Preview.
Step 5: Simple Hosting
Because MD DOCS generates standard HTML and CSS:
- Click Export to generate the final HTML file.
-
Move the HTML file and its
_imagesfolder to any public web folder (e.g., a pCloud Public folder or a basic web server). - Your documentation is now live.
Why This is Better
- Stability: Your documentation site will never break just because Google updated their code.
- Control: You control the styling via CSS themes, not Google’s limited options.
- Speed: Pages load faster because images are optimized files, not embedded code blobs.
Tips and Tricks
Quick Access to Recent Files
Right-click the Open button to see your 10 most recently opened files.
Open Themes Folder
Shift+click the refresh button in the preview panel to open the themes folder in File Explorer.
View Application Logs
Click View Log in the status bar to see application logs for troubleshooting.
Open Developer Tools
Shift+click the View Log button to open Chrome Developer Tools.
Working with Many Open Documents
You can open as many documents as you like, but only about nine tabs fit across the bar at once.
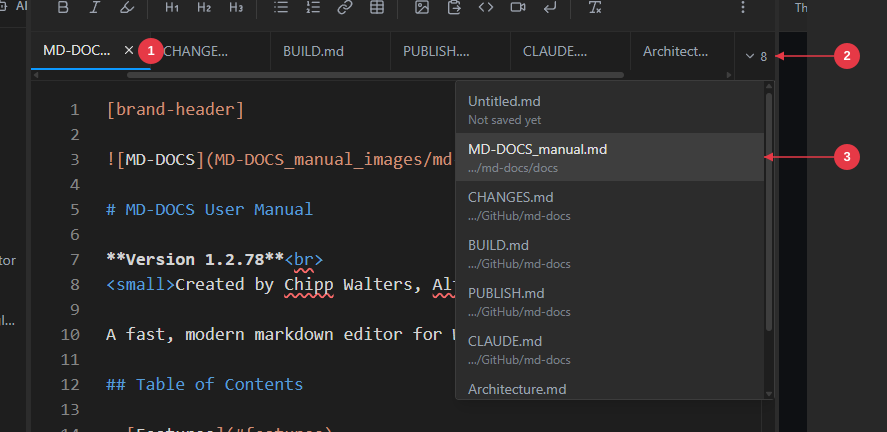
- The document you are on — its tab is scrolled into view automatically, so it and its ✕ are always reachable, however many documents are open.
- The ⌄ button and count — appears at the right end of the bar only once the tabs stop fitting. The number is how many documents are open.
- A document in the list — its name over its folder. Click the row to go to that document; hover it and a ✕ appears at the right of the row to close the document without going there first.
Past the point where the tabs stop fitting:
- The document you are on is always in view. Open a document or switch to one and its tab scrolls into view, so its close button is always reachable.
- The ⌄ button at the right end of the tab bar lists every open document, with a count beside it. Click a document in the list to go to it, or click the ✕ on its row to close it without going there first. The button appears only when the tabs stop fitting.
- Each row in the list shows the document’s folder, so two files with the same name are easy to tell apart. Hovering a tab or a row shows the full path.
Closing several documents in a row from the list leaves the list open. Closing one with unsaved changes closes the list first, so the save prompt is unobstructed.
Clean Format
Select text and use More Options > Clean Format to turn copy pasted out of an AI chat into plain readable prose. Chat copy arrives wrapped at whatever width the window happened to be, carrying markdown, curly quotes, and often a pair of quotes around the whole thing.
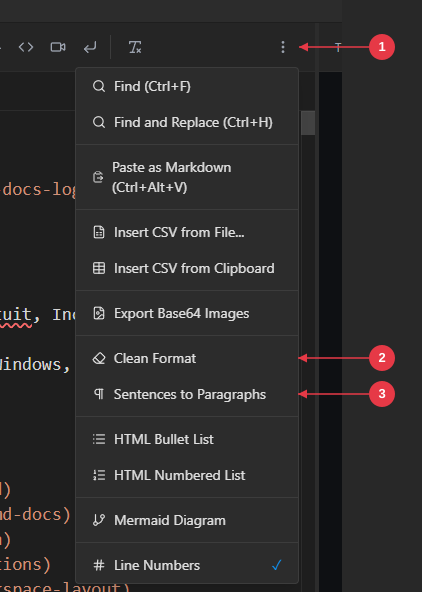
- More Options (⋮) — the toolbar button that opens the menu.
- Clean Format — the tool described here.
- Sentences to Paragraphs — its neighbour, covered below.
Clean Format:
- Strips markdown and HTML formatting — bold, italic, headings, list markers, links (keeping the text), inline code
- Drops HTML comments, horizontal rules, and code fences (what is inside a fence is kept)
- Rejoins hard-wrapped lines, so each paragraph becomes one line again
- Removes quotes that wrap a whole paragraph, while leaving a quoted phrase inside a sentence alone
- Straightens curly quotes and apostrophes, and removes non-breaking and zero-width characters
Separate list items stay separate — each becomes its own paragraph rather than running together into one sentence. Paragraphs stay separated by a blank line.
Ctrl+A first to clean a whole document. This is the tool to reach for when Clear Formatting leaves the text still broken across lines: Clear Formatting strips the markup but keeps every line break, and Clean Format also puts the lines back together.
Sentences to Paragraphs
Select text and use More Options > “Sentences to Paragraphs” to convert a block of text into separate paragraphs (splits on periods, question marks, and exclamation points while preserving common abbreviations like “Dr.”, “Mr.”, “etc.”).
Clear Formatting
Select formatted text and click the Clear Format button to remove:
-
Bold (
**) -
Italic (
*) -
Headers (
#) - Links (keeps text, removes URL)
- HTML tags
File Tree Context Menu
Right-click any file in the DIR tab (the directory tree) to:
- Copy its relative path
- Open its containing folder
- Insert the path in your document (for images)
-
Add as local link (for
.mdfiles) — inserts a link to that document at your cursor (see Linking Between Documents)
Troubleshooting
Preview Not Updating
- Check that scroll sync is enabled (lock icon)
- Try clicking the refresh button in the preview panel
- Check View Log for any errors
Images Not Displaying
- Ensure the image file exists at the referenced path
- Use relative paths from your markdown file’s location
-
Check that the
{filename}_images/folder exists
Theme Not Loading
- Click the refresh button in the preview panel
- Shift+click to open themes folder and verify the CSS file exists
- Check that the theme CSS has proper metadata comments
YouTube Videos Not Working
Videos display as thumbnails that open in your browser when clicked. This is by design for maximum compatibility.
Scroll Syncing Stops Working
Toggle the scroll sync lock icon (top right of the preview panel) off and back on to reset synchronization.
MD DOCS Web
MD DOCS Web is a lightweight, browser-based markdown editor that brings the core editing experience of the desktop app to any web browser. It requires no installation, no backend server, and runs entirely on the client side.
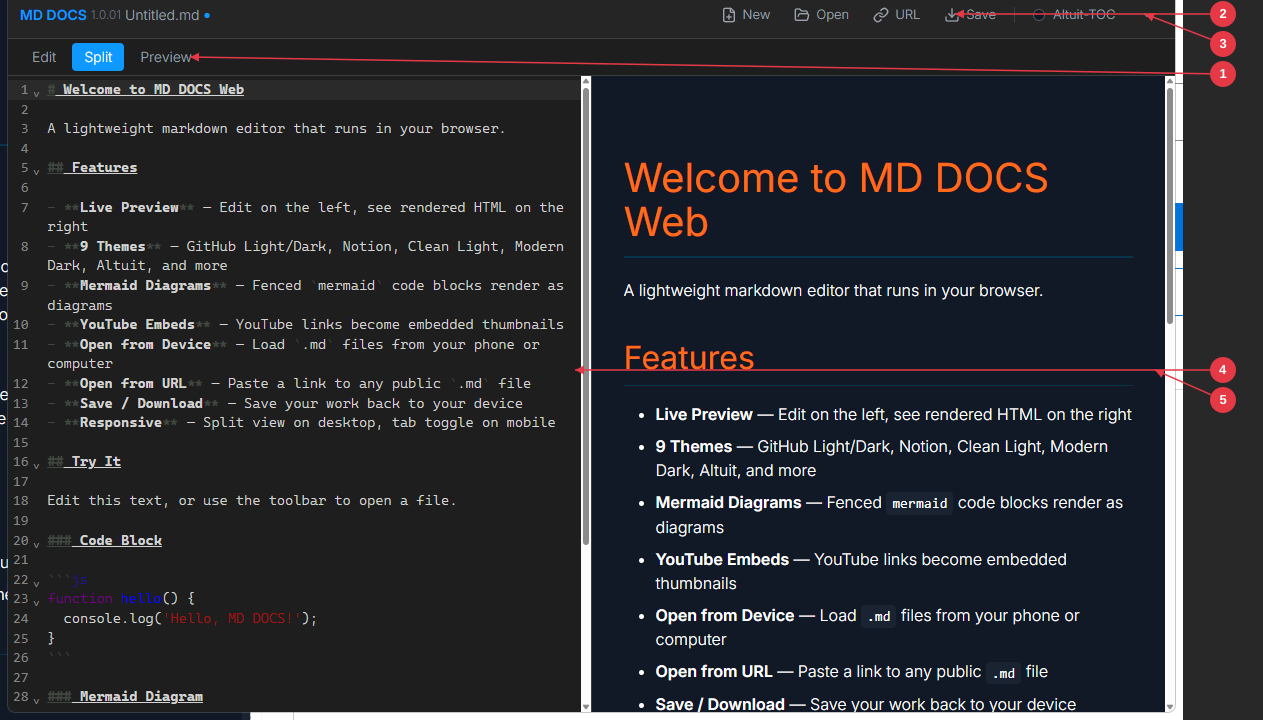
- Mode Tabs — Switch between Edit, Split, and Preview modes. On mobile (<768px), these become the primary navigation.
- File Operations — New, Open, URL (load from web address), and Save/Download buttons for managing documents.
- Theme Selector — All 10 desktop themes are available in the web version.
- Editor Panel — Full-featured text editor with syntax highlighting and line numbers.
- Preview Panel — Live-rendered HTML output using the same markdown-it engine as the desktop app.
Accessing MD DOCS Web
Open the hosted version in any modern browser, or serve the files from any static web host. The app also supports loading documents directly via URL parameter:
https://your-host/md-docs/?url=https://example.com/document.md
Features
MD DOCS Web shares the same markdown rendering engine and themes as the desktop version:
- Live Preview — Split-view editor with rendered HTML preview side by side
- 11 Themes — All desktop themes available: Altuit, Altuit-TOC, Altuit-TOC-LG, Altuit-TOC-Light, Altuit-TOC-Sketchnote, Clean Light, GitHub Dark, GitHub Light, High Contrast, Modern Dark, and Notion
-
Mermaid Diagrams — Fenced
mermaidcode blocks render as interactive diagrams -
Marp Slide Presentations — Documents with
marp: truefrontmatter render as stacked slide decks - YouTube Embeds — YouTube links convert to clickable thumbnail previews with inline playback
- File Management — Open from device, open from URL, or save/download
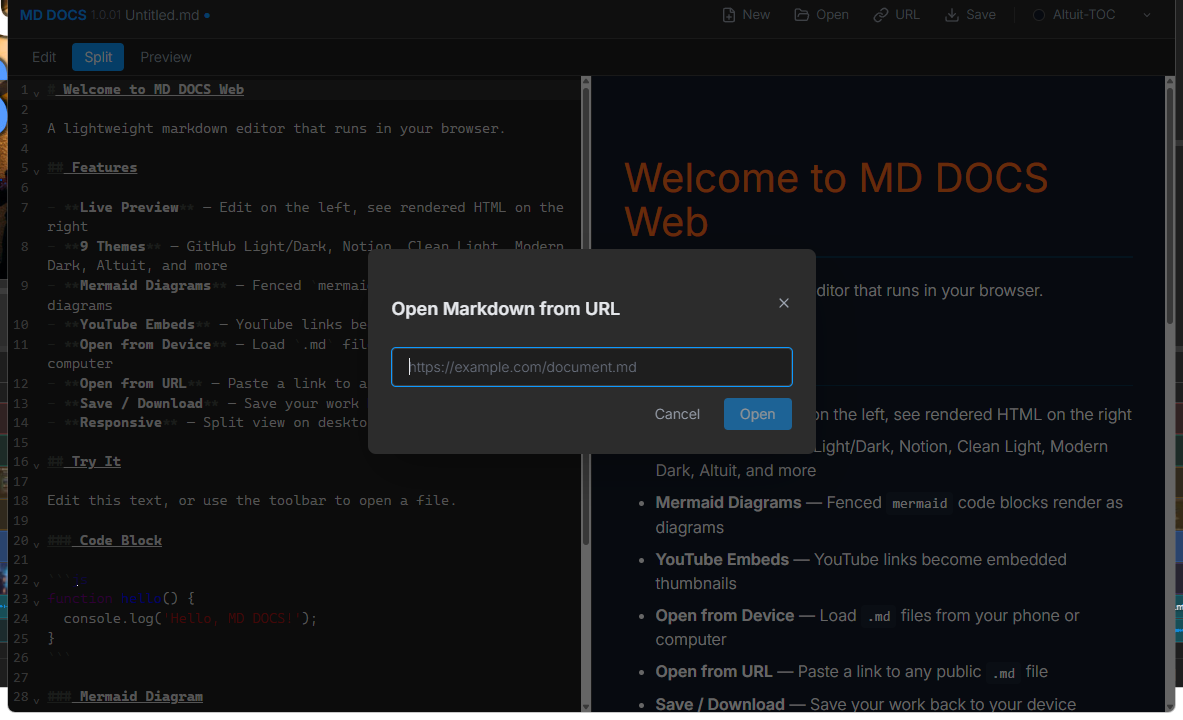
-
Open from URL — Load any public
.mdfile by pasting its URL:
- Auto-Save — Content, filename, and theme preference are saved to browser localStorage
- Keyboard Shortcuts — Ctrl+N (new file), Ctrl+S (save)
Responsive Design
- Desktop (768px+): Split view with editor and preview side by side
- Mobile (<768px): Tab toggle between Edit, Split, and Preview modes
- Hamburger menu collapses toolbar actions on small screens
- Supports iOS home screen “Add to Home Screen” for app-like experience
Desktop vs. Web Comparison
| Feature | Desktop | Web |
|---|---|---|
| Platform | Windows/Mac (Electron) | Any modern browser |
| File Access | Full file system read/write | Device picker + downloads |
| Installation | Required | None — open in browser |
| Themes | 10 themes | Same 10 themes |
| Markdown Engine | markdown-it | markdown-it (same) |
| Mermaid Diagrams | Yes | Yes |
| YouTube Embeds | Yes | Yes (inline playback) |
| DocuMark Annotations | Yes | No |
| MCP Server Integration | Yes | No |
| Multiple Tabs | Yes | Single document |
| TOC / File Tree Panel | Yes | No |
| Local Server | Yes | Not needed |
| Offline Support | Yes | Yes (runs locally) |
Appendix A: MCP Server — AI Assistant Integration
MD DOCS includes a built-in Model Context Protocol (MCP) server that allows AI assistants like Claude Code and Claude Desktop to programmatically control the editor. This enables AI-assisted documentation workflows such as creating, editing, and publishing markdown files without manual interaction.
What is MCP?
The Model Context Protocol (MCP) is an open standard that allows AI assistants to interact with external tools and services. MD DOCS implements an MCP server that exposes 33 tools and 7 resources, giving AI assistants full control over the editor.
Architecture
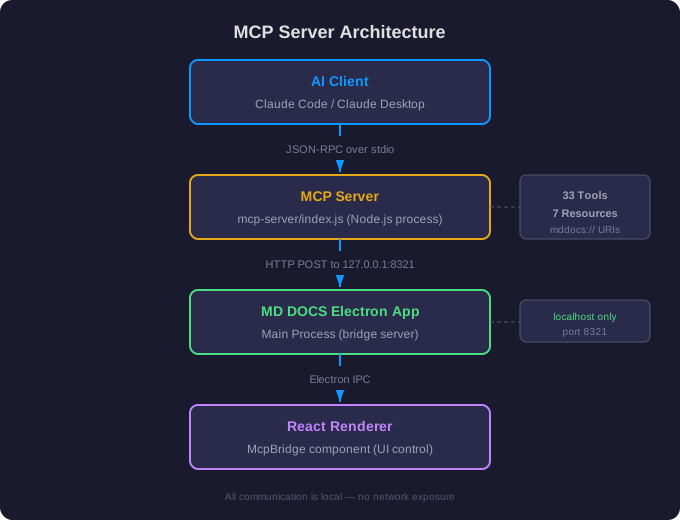
The MCP server runs as a separate Node.js process that communicates with the running MD DOCS app via a local HTTP bridge on port 8321. The bridge is localhost-only — there is no network exposure.
Installation
Step 1: Install MCP Server Dependencies
cd mcp-server
npm install
Step 2: Ensure MD DOCS Is Running
The MCP server requires the desktop app to be running:
npm start
Step 3: Configure Your AI Client
For Claude Code
Add to your .claude/settings.json (project or global):
{
  "mcpServers": {
    "md-docs": {
      "command": "node",
      "args": ["D:/GitHub/md-docs/mcp-server/index.js"]
    }
  }
}
For Claude Desktop
Add to %APPDATA%/Claude/claude_desktop_config.json (Windows) or ~/Library/Application Support/Claude/claude_desktop_config.json (macOS):
{
  "mcpServers": {
    "md-docs": {
      "command": "node",
      "args": ["D:/GitHub/md-docs/mcp-server/index.js"]
    }
  }
}
For Codex
Add to ~/.codex/config.toml:
[mcp_servers.md-docs]
command = "node"
args = ['D:\GitHub\md-docs\mcp-server\index.js']
Codex also needs its sandbox opened, or every call is refused. Codex’s sandbox gates the whole MCP channel, so at its default setting the MD DOCS tools appear in the list but each call fails immediately with:
user cancelled MCP tool call
Nothing was cancelled — that is how Codex reports a sandbox refusal. Add this
near the top of ~/.codex/config.toml, above the first [section]:
sandbox_mode = "danger-full-access"
Or pass --sandbox danger-full-access on a single run. Note the trade-off:
shell commands then run unsandboxed. There is no narrower setting that leaves
MCP working. Changing the approval policy does not help — the sandbox is
the gate, not approvals.
If a call returns
fetch failedinstead, the sandbox is fine and the call really ran — MD DOCS just isn’t open. Start the app.
This applies only to Codex used outside MD DOCS. The AI chat built into MD DOCS already launches its agent correctly; see Chatting with an AI Agent.
Available Tools (34)
File Operations
| Tool | Parameters | Description |
|---|---|---|
read_file |
path (string) |
Read a text file from disk |
write_file |
path (string), content (string) |
Write text content to a file |
list_directory |
path (string) |
List files recursively as a tree |
file_exists |
path (string) |
Check if a file or directory exists |
copy_file |
source (string), destination (string) |
Copy a file from source to destination |
Editor Operations
| Tool | Parameters | Description |
|---|---|---|
get_editor_content |
(none) | Get the markdown content of the active tab |
set_editor_content |
content (string) |
Replace the active tab’s content |
replace_range |
text (string), plus find (string) or startLine/endLine (numbers) |
Replace one span of the active tab in place — the rest of the document (and its line endings) is untouched, the edit is undoable, and the tab is marked unsaved |
load_file |
filePath (string) |
Open a file in a new editor tab |
save_file |
(none) | Save the active tab to its current path |
save_file_as |
filePath (string, optional) |
Save the active tab to a specific path |
new_document |
(none) | Create a new untitled document tab |
refresh_file |
(none) | Reload the active file from disk |
Tab Operations
| Tool | Parameters | Description |
|---|---|---|
list_tabs |
(none) | Get info about all open tabs |
switch_tab |
index (number) |
Switch to a tab by zero-based index |
close_tab |
index (number), save (boolean, optional) |
Close a tab, optionally saving first |
next_tab |
(none) | Switch to the next tab |
prev_tab |
(none) | Switch to the previous tab |
Project Operations
| Tool | Parameters | Description |
|---|---|---|
open_project |
folderPath (string) |
Open a folder as the active project |
get_project_info |
(none) | Get the project path, name, and file tree |
refresh_file_tree |
(none) | Re-scan the project directory |
UI State
| Tool | Parameters | Description |
|---|---|---|
set_panel_mode |
mode (“md”, “split”, or “preview”) |
Set the editor layout mode |
get_app_state |
(none) | Get current UI state as JSON |
set_status_message |
message (string) |
Display a message in the status bar |
dismiss_modal |
(none) | Dismiss any open modal dialog |
set_theme |
theme (string) |
Set the preview theme by name or ID |
list_themes |
(none) | List all available preview themes |
Export & Preview
| Tool | Parameters | Description |
|---|---|---|
export_html |
outputPath (string, optional) |
Export the current preview as an HTML file |
get_preview_html |
(none) | Get the rendered HTML preview content |
export_base64_images |
(none) | Extract base64 images from the markdown |
publish |
(none) | Export to HTML+CSS and open in browser |
Server Management
| Tool | Parameters | Description |
|---|---|---|
start_local_server |
directory (string, optional), port (number, optional) |
Start the local HTTP preview server |
stop_local_server |
(none) | Stop the local HTTP preview server |
get_server_status |
(none) | Check if the server is running and its port |
Available Resources (7)
Resources provide read-only access to MD DOCS state using the mddocs:// URI scheme:
| URI | Type | Description |
|---|---|---|
mddocs://active-file/content |
text/markdown | Markdown content of the active tab |
mddocs://active-file/info |
application/json | Active file metadata (name, path, dirty state) |
mddocs://tabs |
application/json | All open editor tabs |
mddocs://project/tree |
application/json | Project file tree structure |
mddocs://project/info |
application/json | Project metadata (path, name, version) |
mddocs://app/state |
application/json | Current UI state |
mddocs://app/log |
text/plain | Recent log entries (last 100 lines) |
Port Configuration
The MCP bridge runs on port 8321 by default. This can be changed in src/constants/config.js:
export const MCP_CONFIG = {
  PORT: 8321,
  HOST: '127.0.0.1',
  RENDERER_TIMEOUT: 10000
};
The MCP server auto-discovers the port via a file written by the Electron app:
-
Windows:
%APPDATA%\MD DOCS\mcp-bridge-port -
macOS:
~/Library/Application Support/MD DOCS/mcp-bridge-port -
Linux:
~/.config/MD DOCS/mcp-bridge-port
Troubleshooting
“MD DOCS does not appear to be running”
Start the desktop app first with npm start. The MCP server requires the Electron app to be running.
Port 8321 is already in use
Change MCP_CONFIG.PORT in src/constants/config.js. The MCP server will auto-discover the new port.
Tools time out (10-second timeout)
If the app is loading or a dialog is blocking the UI, tools may time out. Dismiss any open dialogs and wait for the app to be idle before calling tools.
Verifying the bridge is running
You can check the health endpoint directly:
GET http://127.0.0.1:8321/health
A successful response returns { "status": "ok", "version": "..." }.
About MD DOCS
MD DOCS - Edit Markdown Easily
© 2025-2026 Chipp Walters, Altuit, Inc.