Peashell User Guide By Chipp Walters
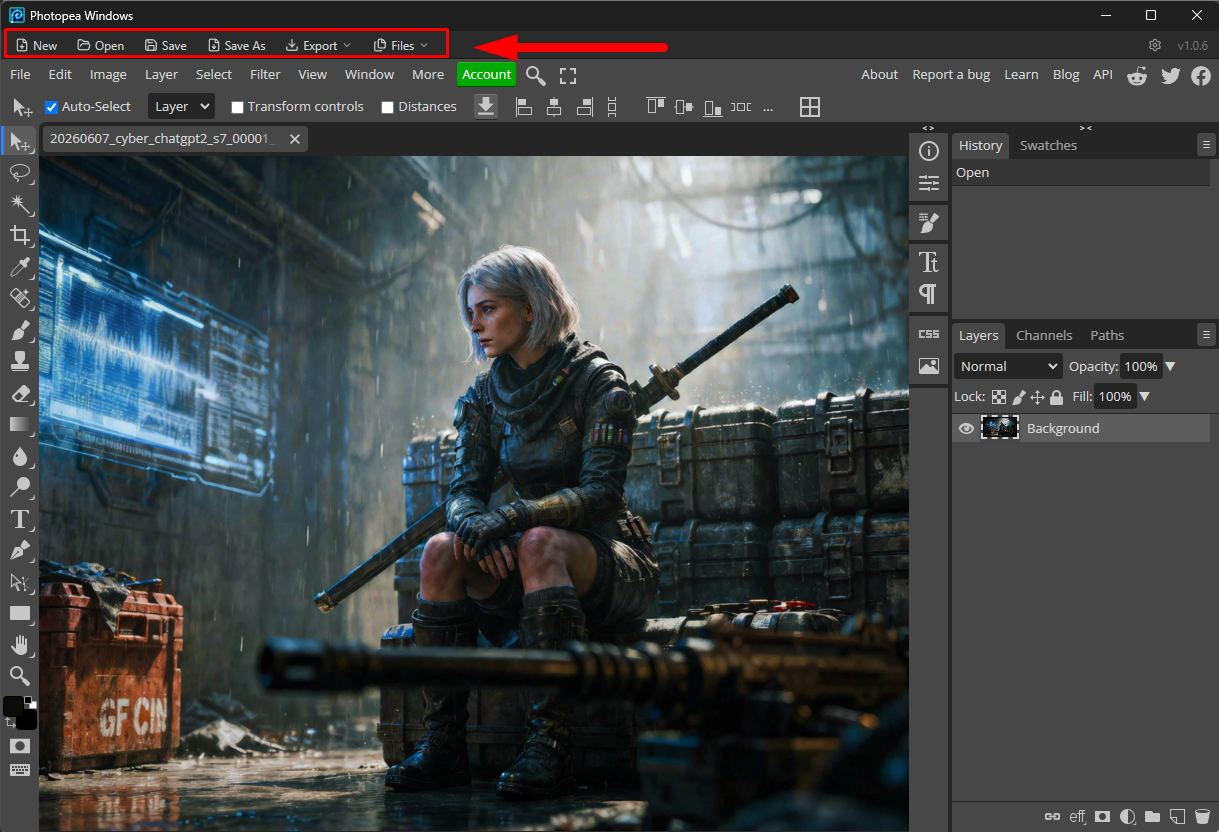
Peashell is a native Windows desktop app that wraps the Photopea image editor. It gives you the full Photopea editor in its own window, with a thin toolbar on top that adds native Windows file dialogs, file associations, and quick tab management.
The editor itself is the hosted Photopea web app running inside the window — so you always get the current version of Photopea, with no separate install.
Requirements
-
Windows 11, 64-bit (the build is
win32-x64). -
An internet connection. The app loads the hosted Photopea editor; it does
not work offline. On first launch, if there’s no connection (or a network/proxy
blocks
www.photopea.com), the editor area won’t load.
Installing / Running
This is a portable app — there is no installer.
-
Unzip
Peashell-win32-x64_v<version>.zipto any folder you like (for exampleC:\Apps\Peashell\, your Desktop, or a USB drive). -
Open the unzipped folder and double-click
Peashell.exe. - The window opens directly into the Photopea editor.
That’s it — nothing to configure on first run.
Moving the app: You can move or rename the unzipped folder at any time. The app re-points its file association to its current location automatically on the next launch, so a moved folder fixes itself.
The Window
- Top: a thin toolbar (New, Open, Save, Save As, Export, Files, AI, Other, plus the settings and version on the right).
- Below the toolbar: the full Photopea editor, including Photopea’s own menu bar (File, Edit, Image, Layer, …) and all of its tools, panels, and tabs.
Both work together: use the toolbar for native Windows file dialogs and quick actions, and use Photopea’s own menus for everything the editor offers.
The window remembers its position and size between launches.
Toolbar Actions
| Button | What it does |
|---|---|
| New ▾ | Creates a new blank document (a new tab). Click New for an instant blank document at your last-used size; click the small ▾ next to it for Blank document… (choose width, height, and DPI, with presets) or From Clipboard (see below). |
| Open | Opens a native Windows file dialog and loads the chosen image as a new tab. Right-click Open to see your recent files (the last 12, with full paths) and reopen one. |
| Save | Overwrites the original file of the active tab, in place. (For a tab that was never opened from disk, use Save As.) |
| Save As | Opens a native Save dialog so you can write the active document to a new file/location. |
| Revert | Discards all unsaved changes to the active tab and reloads it from the last version saved on disk (after a confirmation). Enabled only for tabs opened from / saved to a file. |
| Export | Drop-down to export the active document as PNG, JPG, WEBP, SVG, or PSD via a native Save dialog. It also has a quality slider (1–100) for JPG/WEBP exports (see below). |
| Files | Lists every open document. Click a name to switch to that tab; click the folder icon to reveal the file in Explorer (enabled only for documents saved to disk). |
| AI | Drop-down of on-device AI tools for the active document: Upscale (enlarge), Remove Background, and Straighten & Crop Photograph (see AI Tools below). |
| Other | Drop-down of image tools for the active document: Apply LUT…, Add Film Grain…, Color Grade…, and Prompt Metadata… (see Other Tools below). |
| ⚙ (settings) | Helps you make Peashell your default image editor. On Windows, it registers Peashell as a PNG handler and opens Settings → Default apps. On macOS, it opens a short guide to setting default apps on Mac (see below). |
| v |
The app version, shown at the far right. |
New documents — sizes and the clipboard
- Click New for an instant blank document. It uses the last size you chose (1920×1080 until you change it).
- New ▾ → Blank document… opens a small dialog to set the width, height, and DPI, with one-click presets (Full HD, Square, 4K, A4 print). The size you pick becomes the new default for the plain New button.
-
New ▾ → From Clipboard opens whatever image is currently on your clipboard as
a new tab — perfect after a screenshot (
Win+Shift+S) or copying an image from another app. The menu shows the image’s dimensions, and the item is greyed out when the clipboard doesn’t hold an image. The new tab starts unsaved, so Save asks where to put it.
Save vs. Save As vs. Export
- Save writes back to the same file you opened, in its original format. Use it for quick “keep editing the same file” work.
- Save As lets you pick a new name, folder, and format.
- Export is for producing a copy (PNG/JPG/WEBP/SVG/PSD) without changing what “the original file” is for that tab.
All three use native Windows dialogs rather than Photopea’s in-browser file
browser, so they behave like any other Windows app. And they honor the filename you
type: if the dialog suggests .png but you type photo.jpg, you get a real JPG.
JPEG / WEBP export quality
The Export drop-down has a quality control — a slider and a number box
(1–100, default 85) — that sets how much JPG and WEBP exports are compressed.
Lower values make smaller files with more compression artifacts; higher values keep
more detail at a larger file size. The setting is remembered between sessions and
also applies when you Save As to a .jpg or .webp file. It has no effect on
PNG, SVG, PSD, GIF, or BMP, which don’t use lossy quality.
Keyboard shortcuts
The standard file shortcuts work anywhere in the app — even while you’re working inside the editor — and always go to Peashell’s own Save/New (not Photopea’s in-browser versions, which would save a copy to your Downloads folder):
| Shortcut | Action |
|---|---|
| Ctrl+S | Save (overwrite the original file) |
| Ctrl+Shift+S | Save As |
| Ctrl+N | New blank document (last-used size) |
| Ctrl+Shift+N | New from Clipboard |
(On macOS, use Cmd instead of Ctrl.)
Saving from Photopea’s own File menu still works too — those saves go through a native Save dialog that starts in the original file’s folder, and the result is added to your recent files.
Revert to saved
Made a mess and want to start over from the last saved version? Revert discards every unsaved change in the active tab and reloads the file from disk. It asks you to confirm first, then reopens the saved version in the same tab — so Save still writes back to the same original file afterwards.
The button is enabled only when the active tab has a file on disk to revert to; for a brand-new document or an AI/Straighten result that hasn’t been saved yet, it’s greyed out (there’s nothing saved to go back to).
AI Tools
The AI button is a drop-down of image tools that run entirely on your PC —
nothing is uploaded. Each tool works on the active tab and opens its result as
a new tab (your original is left untouched), named so you can tell them apart
(…_upscaled, …_resized, …_nobg, …_straightened). A spinner shows while it
works.
| Tool | What it does |
|---|---|
| Upscale 2× / 4× (AI) | Enlarges using AI super-resolution, inventing detail for sharper results than a plain resize. Best for photos and detailed art. |
| Upscale 2× / 4× (Lanczos) | A fast, high-quality classic resize. It does not add new detail, but it’s quick and works on any PC. |
| Remove Background | Automatically cuts out the main subject and makes the background transparent, opening the result as a new PNG tab. |
| Straighten & Crop Photograph | Flattens a photo of a print, document, or whiteboard shot at an angle — detects the edges, lets you fine-tune the four corners, and opens the perspective-corrected result as a new tab. |
Which upscale should I use?
- AI gives the crispest enlargement but needs a graphics card (any modern built-in/integrated GPU is fine). It is not available over Remote Desktop or in a virtual machine, and needs up-to-date graphics drivers.
- Lanczos works everywhere (no GPU needed) and is nearly instant. Use it when AI upscale isn’t available or you just want a clean, larger copy.
If a tool can’t run on your machine, it tells you why rather than failing silently.
Straighten & Crop Photograph
Took a photo of a print, document, or whiteboard at an angle? This tool flattens
it into a clean, square-on image. You fit a box to the four corners of the item,
and Peashell removes the perspective distortion, opening the corrected result as a
new tab (…_straightened).
-
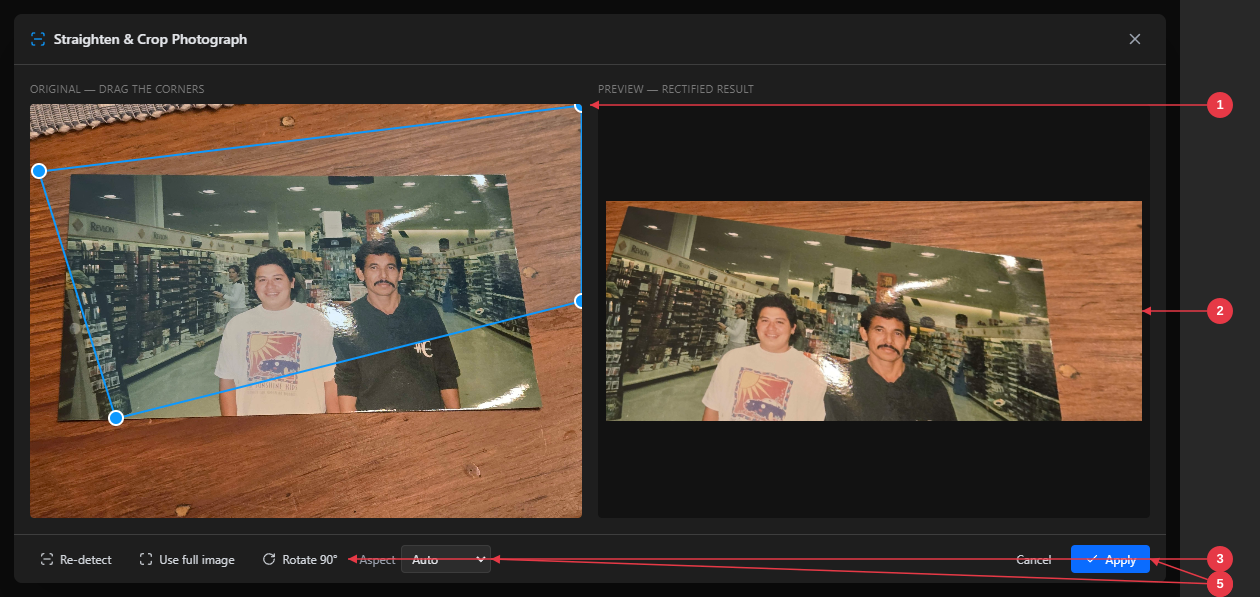
Draggable corners — Peashell auto-detects the photo’s edges and draws a box. Drag any corner to fit it exactly; a magnifier appears while you drag for precise placement.
-
Live preview — shows the flattened, perspective-corrected result and updates as you adjust the corners.
-
Adjust buttons — Re-detect (try auto-detection again), Use full image (reset the box to the whole photo), and Rotate 90°.
-
Aspect — keep the photo’s true proportions with Auto, or force a standard print ratio (3:2, 7:5, 4:3, 5:4, Square).
-
Apply — opens the straightened photo as a new tab.
-
Open the photo as a tab, then choose AI → Straighten & Crop Photograph…
-
Peashell auto-detects the four corners and draws a blue box over them. The right-hand panel shows a live preview of the flattened result.
-
Drag any corner to fine-tune it. A magnifier appears while you drag, so you can place each corner precisely on the edge; the preview refreshes when you let go.
-
Use the toolbar buttons as needed: Re-detect (try auto-detection again), Use full image (reset the box to the whole photo), and Rotate 90°.
-
Choose an Aspect ratio: Auto keeps the photo’s true proportions with no stretching, or force a standard print size — 3:2 (4×6), 7:5 (5×7), 4:3, 5:4 (8×10), or Square.
-
Click Apply to open the straightened photo as a new tab.
Auto-detect is a best guess. On low-contrast or glossy photos it may not land exactly on the edges — just drag the corners into place (the magnifier helps), or click Use full image and adjust from there.
Other Tools
The Other button holds tools that run inside Peashell itself — nothing is
uploaded. The three that change pixels (Apply LUT…, Add Film Grain…, and
Color Grade…) work on a copy of the active tab and open the result as a
new tab (…_lut, …_grain, …_graded), so the picture you started from is
never changed. Prompt Metadata… only reads.
Apply LUT
Grades a copy of the picture with a colour lookup table — a .cube file, the
format most LUTs ship in.
- Open the picture as a tab, then choose Other → Apply LUT…
-
Pick a
.cubefile in the Windows file dialog. Peashell applies it and opens the result as a new tab (…_lut).
Both 3D and 1D .cube files work, including ones with DOMAIN_MIN /
DOMAIN_MAX range lines, and transparency is kept. If a file can’t be read,
Peashell says what is wrong with it instead of half-applying it.
Add Film Grain
Adds photographic grain to a copy of the picture (…_grain).
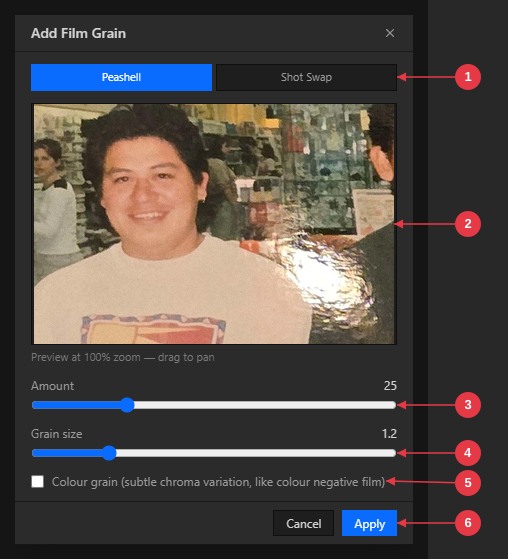
- Peashell / Shot Swap — two grain models (see below).
- Preview — the middle of the picture at 100% zoom, because grain judged on a shrunken preview looks wrong. Drag inside it to look around the image.
- Amount — how strong the grain is.
- Grain size — how coarse it is. Size is judged against the whole picture, so the same setting looks the same on a small file and a large one.
- Colour grain — adds a subtle colour variation, like colour negative film. Leave it off for monochrome grain.
- Apply — opens the grained copy as a new tab.
Grain is strongest in the mid-tones and eases off towards black and white, the way grain behaves on a print.
The Shot Swap tab offers Shot Swap’s own two settings instead — Stock (35mm or 16mm) and Amount — and lays down the same grain Shot Swap renders. Find a look on a still here, type the same stock and amount into Shot Swap’s Project Settings, and the render matches. In this mode the preview is exact.
Working on a still captured from Shot Swap? Set its grain to Off in Shot Swap before capturing — Shot Swap bakes grain into captured frames, and grain on top of grain doesn’t look right.
Color Grade
Color Grade sets the colour and tone of a picture, either by matching a
reference image or by hand, and opens the graded copy as a new tab
(…_graded).
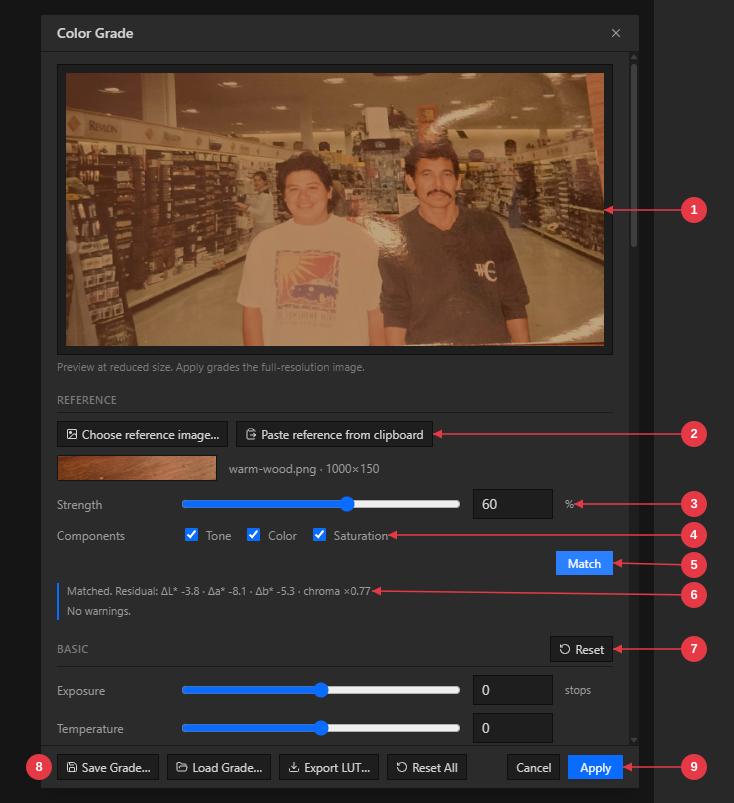
- Preview — the whole picture with the current grade, drawn at a reduced size so it keeps up while you work. Apply grades the full-resolution image.
- Choose reference image… / Paste reference from clipboard — the picture whose look you want. A thumbnail with its name and size confirms it loaded.
- Strength (0–100%) — how far the match goes.
- Components — untick Tone, Color, or Saturation to leave that part of the picture alone.
- Match — sets the controls so the picture takes on the reference’s tones and colours.
- Match report — how close the match got, plus any warnings.
- Reset — each control group has its own Reset button.
- Save Grade… / Load Grade… / Export LUT… / Reset All — keep a look for later (see the table below).
- Apply — opens the graded copy as a new tab. Cancel closes without changes.
To grade a picture:
-
Open the picture as a tab, then choose Other → Color Grade…
-
(Optional) Match a reference. Choose or paste a reference image, set Strength and Components, and click Match. The match only sets the controls — every one stays editable afterwards. Lower the strength if the result goes too far.
-
Adjust by hand. Scroll down to the controls. They are grouped, each group with its own Reset button:
- Basic — Exposure, Temperature, Tint, Contrast, Pivot, Saturation, Vibrance.
- Tone — Shadows, Highlights.
- Lift, Gamma, Gain, Offset — each with Master, Red, Green, and Blue sliders (shadows, midtones, highlights, and an overall shift).
Double-click a control’s name to reset just that control.
-
Draw curves at the bottom of the window (below).
-
Click Apply.
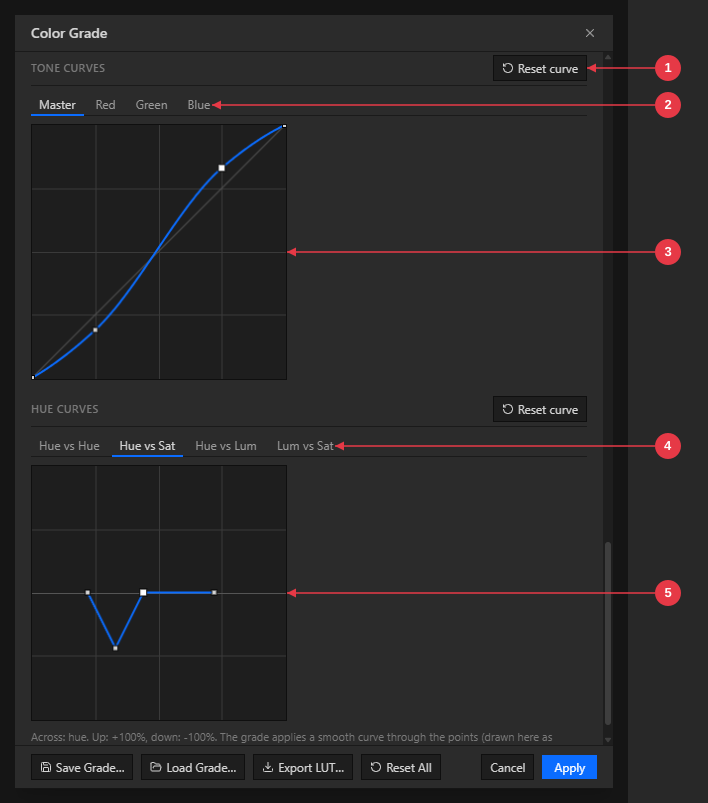
- Reset curve — puts the curve you’re looking at back to neutral. The hue curves have their own.
- Tone curve tabs — Master (all channels), Red, Green, Blue.
- Tone curve — here a gentle S-curve that adds contrast.
- Hue curve tabs — Hue vs Hue (shift one colour towards another), Hue vs Sat and Hue vs Lum (make one colour more or less saturated, or brighter or darker), and Lum vs Sat (saturation by brightness).
- Hue curve — here Hue vs Sat pulling the greens down to tame a green cast.
Click on a graph to add a point, drag a point to move it, and drag it off the graph (or select it and press Delete) to remove it.
The buttons along the bottom keep a look for later:
| Button | What it does |
|---|---|
| Save Grade… | Saves every setting as a .json file. |
| Load Grade… | Loads a saved .json grade back into the controls. |
| Export LUT… | Writes the whole grade as a .cube LUT for use in other apps — for example as a Shot Swap Look. |
| Reset All | Returns every control and curve to neutral. |
If a grade file can’t be read, or a value is out of range, the dialog says what is wrong and keeps your current settings.
Prompt Metadata
Shows the AI prompt that made the picture you have open, and the render record stored with it. Nothing is changed or written.
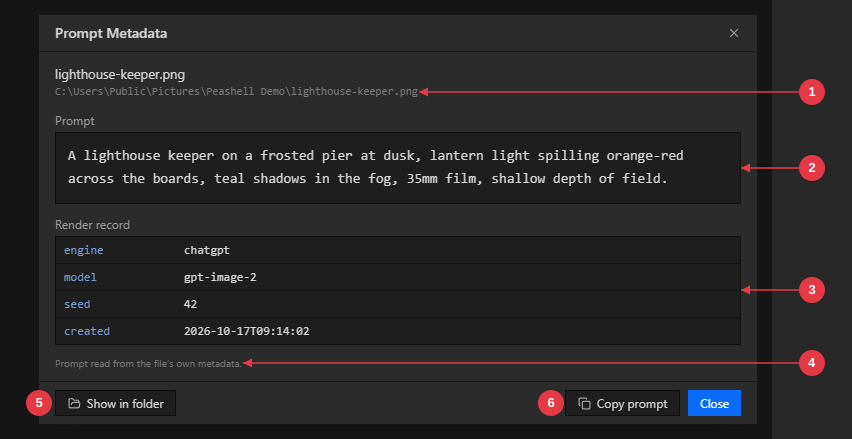
- File — the image’s name and full path.
- Prompt — the prompt, exactly as stored.
- Render record — how it was made: engine, model, seed, source image, reference sheets, and when, as far as they were recorded.
-
Source — where the prompt was found: inside the file itself, or in the
<name>.prompt.txtfile beside it. - Show in folder — opens the image’s folder in File Explorer.
- Copy prompt — puts the prompt on the clipboard.
Peashell looks inside the file first (PNG text chunks, JPEG comments), then for
a <name>.prompt.txt file next to it — that’s where formats that can’t hold a
prompt keep theirs.
- The tab must have a file on disk — open the image with Open (or by double-clicking it). New documents and unsaved results from the AI or Other tools have nowhere to read a prompt from, and Peashell says so.
- If nothing is stored, it says so plainly and shows no prompt at all.
Opening PNGs by Double-Clicking (File Association)
You can make Windows open .png files in Peashell when you double-click
them in File Explorer. Double-clicked files open as a new tab in the single
running window — it won’t launch a second copy of the app.
Because the operating system controls which app owns a file type, this is a one-time setup. Click the ⚙ settings button in the toolbar:
-
Windows: Peashell registers itself as a PNG handler and opens
Settings → Default apps. Choose Peashell as the default for
.png. - macOS: the button opens a short guide to setting default apps on Mac, since macOS sets default apps through Finder’s Get Info rather than from inside the app.
After that, double-clicking a PNG opens it straight into the editor.
Multiple Files & Tabs
-
Opening several images at once (multi-select in the Open dialog, or
double-clicking multiple files) gives each tab its real filename. Duplicate
names get a
(2)suffix so they stay distinct. - Save always targets the correct original file for the active tab, even with many tabs open.
- Use the Files menu to jump between open documents or to reveal any saved file in Explorer.
Closing the App
- If the editor thinks you have unsaved changes, closing the window shows a confirmation (Cancel / Close Anyway). It also reminds you which file you last saved and when.
- If nothing is open, or your documents have no unsaved edits, the window closes immediately with no prompt.
Why does it say I may have unsaved changes after I just saved? Photopea tracks its own “modified” flag and doesn’t know when Peashell’s toolbar Save writes your file to disk. If you’ve saved everything with the toolbar, it’s safe to close — the prompt shows your last save so you can double-check.
Note: Photopea’s own “reopen last documents on launch” feature is not available in this wrapper (a side effect of enabling Photopea’s embedding API). Save your work before closing.
Troubleshooting
The editor area is blank or won’t load.
The app needs internet access to www.photopea.com. Check your connection, VPN,
or any proxy/firewall that might block it, then relaunch.
Double-clicking a PNG doesn’t open it in the app (or opens something else).
Click the ⚙ settings button and set Peashell as the default .png app. On
Windows this opens Settings → Default apps (Windows requires this confirmation
manually); on macOS it opens a
guide to setting default apps on Mac.
“Show in folder” is greyed out in the Files menu. That document hasn’t been saved to disk yet. Use Save As first; then the folder icon will reveal it.
AI → Upscale (AI) says it can’t run / failed. AI upscale needs a working graphics card (Vulkan). This is normal in Remote Desktop sessions or virtual machines, or with very old/missing graphics drivers. Update your graphics drivers, or use Upscale (Lanczos) instead — it runs on any PC.
I moved the app folder and file associations broke. Just launch the app once from its new location — it re-registers itself automatically.
Where are the logs?
Runtime logs are written to %APPDATA%\Peashell\. They’re recreated
fresh on launch and are useful when reporting a problem.
Quick Reference
-
Run: unzip →
Peashell.exe(portable, no installer). - Needs internet (hosted editor).
- New ▾ = blank at last-used size · custom size with presets · From Clipboard.
- Save = overwrite original · Save As = new file · Export = PNG/JPG/WEBP/SVG/PSD copy.
- Shortcuts: Ctrl+S save · Ctrl+Shift+S save as · Ctrl+N new · Ctrl+Shift+N new from clipboard.
- Revert = discard unsaved changes, reload the active tab from its saved file.
- Right-click Open = recent files (last 12).
- Files menu = switch tabs / reveal in Explorer.
- AI = Upscale (AI needs a GPU · Lanczos works anywhere) + Remove Background + Straighten & Crop Photograph; runs on-device, opens a new tab.
-
Other = Apply LUT (
.cube) + Add Film Grain + Color Grade (match a reference, save grades, export LUTs) — each works on a copy and opens it as a new tab · Prompt Metadata shows the AI prompt stored with the open file. - ⚙ = set as default PNG editor (Windows: Settings → Default apps · macOS: how-to guide).