# Landing Page Process Notes
By Chipp Walters, 6/2026
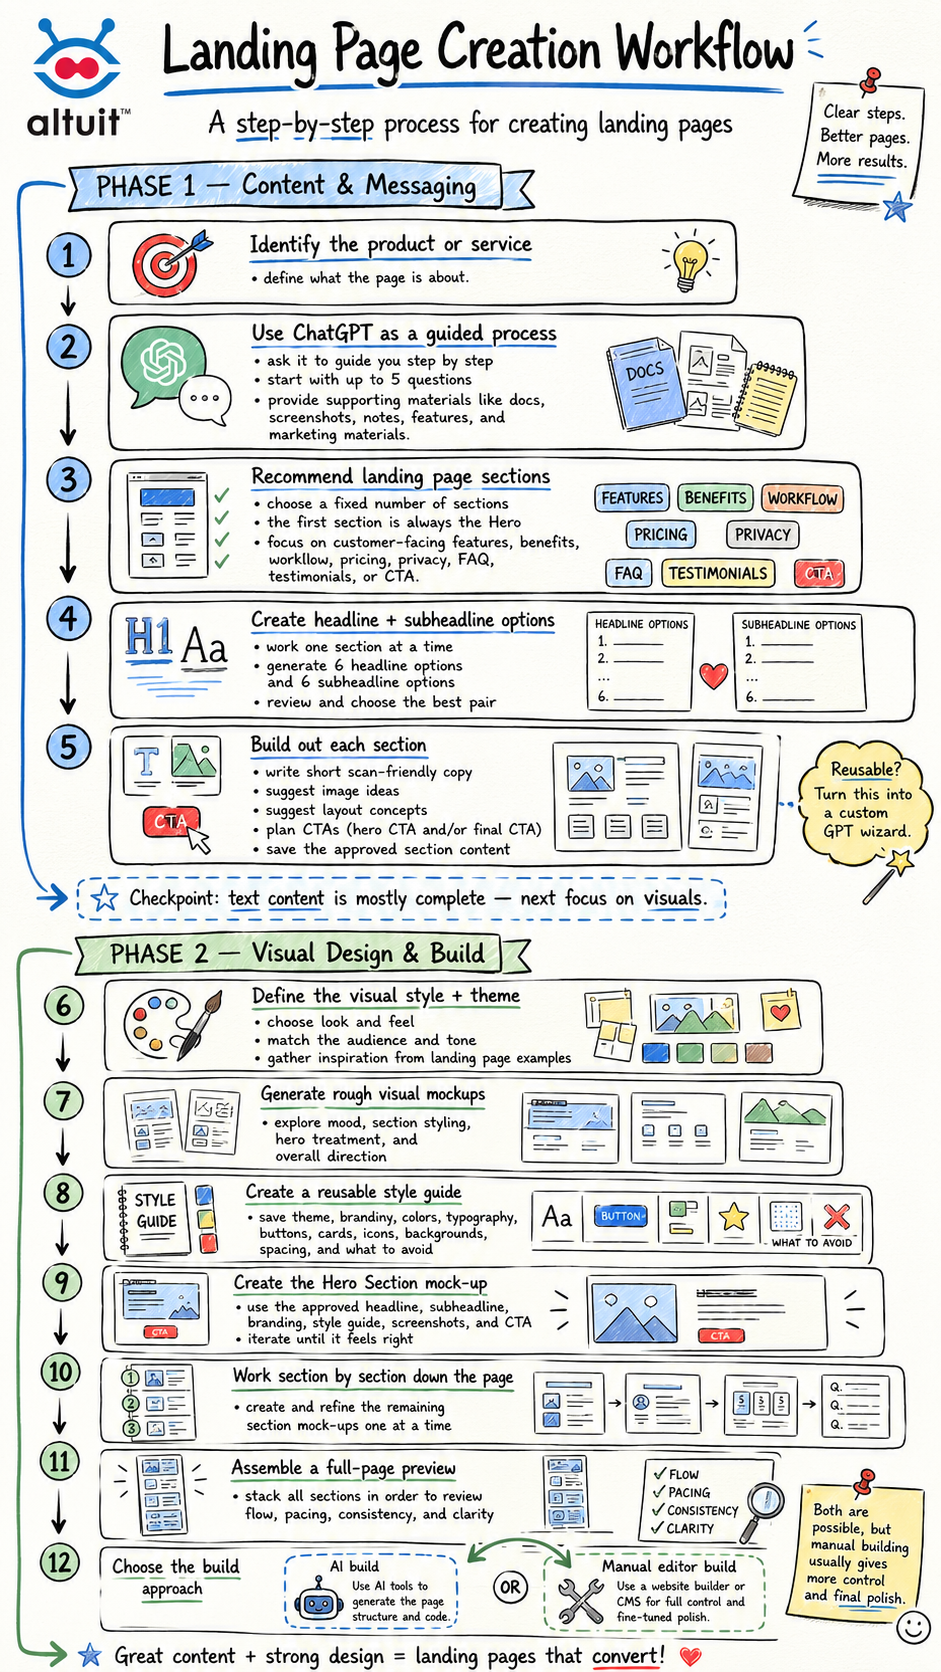
### Below you will find a workflow that walks you through how to use AI to help you create a landing page. Or, if you have access to ChatGPT, you can use the landing page wizard, which encapsulates this workflow.
ChatGPT Landing Page Wizard available at:
https://chatgpt.com/g/g-6a27bf4505a8819183f3d3450f67331b-landing-page-wizard
----
## Overview
### Scope
Focus landing pages on either:
- A **product**
- A **service**
A landing page can also be for a person, such as a portfolio, but that is outside the scope of this process for now.
## Phase 1 — Content & Messaging
### Step 1: Identify What the Landing Page Is About
The first step is to clearly identify the product or service the landing page is being created for.
### Step 2: Use ChatGPT as a Guided Process
Open ChatGPT and ask it to walk through the landing page creation process **one step at a time**.
The first request should be for ChatGPT to ask specific questions about the product or service.
#### Initial ChatGPT Prompt Idea
Ask ChatGPT something like:
> Help me build a landing page for a product or service. Walk me through the process one step at a time. Start by asking me no more than five specific questions to help identify and understand the product or service.
#### Supporting Materials
If there is any existing documentation, provide it to ChatGPT at this stage.
Examples of useful materials:
- Brochures
- Product documentation
- Source code
- Existing website copy
- Notes
- Feature lists
- Internal docs
- Screenshots
- Marketing materials
The goal is to give ChatGPT enough context to understand the product or service before moving into messaging, structure, copy, or design.
### Step 3: Ask ChatGPT to Recommend the Landing Page Sections
Once ChatGPT has enough information about the product or service, the next step is to ask it to break the landing page into a specific number of sections.
The number of sections should be defined by the user.
Examples:
- 5 sections
- 6 sections
- Any fixed number needed for the page
#### Important Rule: The First Section Is Always the Hero
The top section of the landing page should always be the **Hero Section**.
This is the first thing the visitor sees and should introduce the product or service clearly.
#### What ChatGPT Should Provide
Ask ChatGPT to list the recommended sections in order.
These sections should represent the most important marketing points for the product or service.
The sections may include things like:
- Hero section
- Key features
- Product benefits
- Services offered
- Pricing
- Security
- Privacy
- Workflow
- Use cases
- Testimonials
- Comparison
- FAQ
- Call to action
#### Clarification: Features vs. Functions
The sections should focus more on **features and marketing points** than raw technical functions.
A function is what the product technically does.
A feature or marketing point is what matters to the customer and helps explain why the product or service is valuable.
#### Goal
The goal is for ChatGPT to recommend a fixed number of the most important sections that should appear on the landing page, based on the product or service information already provided.
#### Prompt Idea
> Based on the product/service information I’ve provided, break this landing page into \[NUMBER\] sections. The first section must be the Hero Section. Recommend the remaining sections in the best order for marketing the product/service. Focus on the most important customer-facing features, benefits, pricing, security, workflow, or other key marketing points.
### Step 4: Create Headline and Subheadline Options
Once the landing page sections have been chosen and the section list feels correct, the next step is to develop strong headlines and subheadlines for each section.
This includes the **Hero Section** and every other section in the landing page outline.
#### Work One Section at a Time
Do not ask ChatGPT to create headlines and subheadlines for every section all at once.
That can become too heavy and difficult to evaluate.
Instead, go section by section.
For each section, ask ChatGPT to create:
- 6 headline options
- 6 subheadline options
#### Purpose of the Headline
The headline should capture attention and make the visitor want to keep reading.
It should be interesting, clear, and compelling.
The headline is the hook.
#### Purpose of the Subheadline
The subheadline should explain, support, or justify the headline.
It should make the case for why the section matters.
The subheadline is more like the argument.
For example:
- If the headline asks a question, the subheadline can answer it.
- If the headline makes a bold claim, the subheadline can explain why the claim is true.
- If the headline creates curiosity, the subheadline can provide the practical explanation.
#### Selection Process
For each section:
1. Ask ChatGPT for 6 headlines and 6 subheadlines.
2. Review the options.
3. Discuss which ones are strongest.
4. Combine or revise options if needed.
5. Choose one final headline and one final subheadline for that section.
6. Move on to the next section.
#### Save the Final Set
Once each section has a selected headline and subheadline, copy and paste the complete set into the working document.
This should include:
- Section name
- Final headline
- Final subheadline
This saved set becomes the core messaging framework for the landing page.
### Step 5: Build Out Each Section One at a Time
Once the landing page sections, headlines, and subheadlines are finalized, the next step is to go through each section individually and have ChatGPT generate the actual section content.
Do this one section at a time, just like with the headlines and subheadlines.
#### What to Ask ChatGPT for Each Section
For each section, ask ChatGPT to generate:
- Section copy
- Suggested image ideas
- Suggested layout concept
- Optional image prompt notes, but not final image prompts yet
#### Copy Style
The copy should usually be short and easy to scan.
Prefer:
- Bullets
- Short sentences
- Brief supporting phrases
- Clear benefit statements
Avoid:
- Long paragraphs
- Dense explanations
- Overly formal copy
- Too much technical detail too early
The copy should help a visitor quickly understand the section without slowing down the page.
#### Image Suggestions
For each section, ask ChatGPT to suggest one or two images that would support the message.
These could be:
- Product screenshots
- Feature illustrations
- Before/after visuals
- Workflow diagrams
- Simple icons
- UI mockups
- Customer-use examples
- Comparison graphics
#### Layout Suggestions
Also ask ChatGPT to suggest a simple layout concept for the section.
This should not focus on color, typography, or visual style yet.
Instead, it should describe the basic arrangement, such as:
- Image on the left, copy on the right
- Copy on the left, image on the right
- Large image above, text below
- Three cards in a row
- Two-column comparison
- Step-by-step horizontal flow
- Stacked mobile-first layout
- Screenshot with callout labels
#### Image Prompt Notes
At this stage, you may ask ChatGPT to write rough notes for the image prompts or describe what each image should show.
But do not generate the final image prompts yet.
The goal is to document the visual needs, not to create final production prompts too early.
#### Save the Final Section Content
Once the section feels correct, copy and paste the finalized section content into the working document.
For each section, save:
- Section name
- Section headline
- Section subheadline
- Section copy
- Suggested image ideas
- References to any existing images
- Rough notes for future image prompts, if useful
- Layout concept
#### Plan the Calls to Action (CTAs)
When building out each section, also decide where the landing page should include a **call to action**.
At minimum, consider whether the page needs:
- A call to action in the **Hero Section**
- A call to action as the **final section** of the landing page
- Or both
The Hero CTA is usually the primary action you want the visitor to take right away, such as:
- Download the app
- Join the beta
- Sign up
- Get started
- Buy now
- Watch the demo
- Join the Patreon
- Contact us
The final CTA gives the visitor another chance to act after they have read through the page and understand the offer.
When generating section copy, ask ChatGPT to also recommend whether that section should include a CTA, and what the button text should be.
For each CTA, save:
- CTA location
- Button text
- Supporting line, if needed
- Destination or action, if known
This should be added to the saved section content along with the section name, headline, subheadline, copy, image ideas, image references, prompt notes, and layout concept.
This becomes the detailed landing page content plan.
#### Side Note: Turn This Process into a Custom GPT Wizard
If this process will be used for more than one landing page, the instructions can be turned into a reusable ChatGPT wizard.
To do this:
1. Go into ChatGPT.
2. Click **Explore GPTs**.
3. Create a custom GPT.
4. Tell ChatGPT you want to create a landing page wizard.
5. Paste in these instructions as the wizard’s process.
The wizard should then walk the user through creating landing pages step by step, using this same structure.
### Phase 1 Checkpoint
#### Current Status of the Process
At this point, the **text content portion** of the landing page is mostly complete.
The process has already covered:
- Identifying the product or service
- Supplying supporting documentation
- Breaking the landing page into sections
- Creating headlines and subheadlines
- Writing section copy
- Suggesting image ideas and layout concepts
- Saving the good outputs into the working document
#### Next Major Phase
The next phase is focused on the **aesthetics and visuals** of the landing page.
This includes:
- Look and feel
- Visual style
- Compelling graphics
- Section imagery
- Design direction
- Overall visual presentation
## Phase 2 — Visual Design & Build
### Step 6: Define the Visual Style and Theme
After the text content is mostly complete, the next step is to identify the landing page’s visual style and overall theme.
This includes the general look and feel of the page.
The style should support the product or service and make the landing page feel appropriate, compelling, and trustworthy.
#### Use ChatGPT for Style Exploration
Continue working with ChatGPT to discuss what kind of style or theme might work best for the landing page.
Ask ChatGPT to suggest visual directions based on:
- The product or service
- The intended audience
- The overall tone
- The type of offer
- The brand personality
- The seriousness or playfulness of the product
- Whether the page should feel premium, friendly, technical, creative, bold, minimal, etc.
#### Use Internet Inspiration
It is also useful to browse examples from other landing pages to gather inspiration.
Good sources for landing page inspiration include:
- **Lapa Ninja** — one of the largest collections of landing page screenshots, with filtering and examples across SaaS, e-commerce, and more.
- **Landingfolio** — curated landing page examples, templates, and components, with a focus on real-world designs.
- **Dribbble landing page search** — useful for more experimental, visual concepts and UI exploration.
- **Unbounce landing page examples** — a curated swipe file of high-performing examples.
- **Adobe landing page examples** — useful for examples tied to conversion and marketing strategy.
#### Suggested Research Approach
Use a mix of sources:
- Use **Lapa Ninja** or **Landingfolio** for broad browsing.
- Use **Dribbble** for more creative or experimental visual directions.
- Use **Unbounce** or **Adobe** when looking for examples focused specifically on conversion.
#### Goal
The goal is to choose a visual direction before generating final graphics or designing the full landing page.
This visual direction should help guide:
- Color choices
- Typography direction
- Image style
- Section layouts
- Graphic style
- Overall tone
- How polished, playful, technical, or premium the page should feel.
### Step 7: Generate Rough Visual Mockups
Once a look and feel has been chosen, there are a couple of ways to begin implementing it.
One option is to have ChatGPT or another AI generate a few different landing page-style images based on the chosen style and theme.
These images do not need to be fully accurate.
At this stage, the purpose is exploration, not production.
#### Purpose of These Early Images
The goal is to get a better visual sense of what the website could look like before committing to the final design.
These rough AI-generated mockups can help evaluate:
- Overall visual direction
- Mood and tone
- Section styling
- Hero treatment
- Graphic language
- Whether the style feels appropriate for the product
- Whether the page feels premium, friendly, technical, creative, bold, etc.
#### Important Note
The generated images are not meant to be final landing page assets.
They are visual concept explorations that help clarify the direction before building the actual page.
### Step 8: Create a Reusable Theme, Style, and Branding Guide
Once you have a visual mock-up that you like, ask ChatGPT to create a **theme and style guide** for the landing page.
This should be saved as a Markdown `.md` document so it can be reused with different AIs and tools throughout the landing page process.
#### Purpose of the Style Guide
The style guide becomes the reusable visual reference for the rest of the landing page.
It helps keep everything consistent across:
- Hero graphics
- Section layouts
- Section images
- Icons
- Cards
- Backgrounds
- Buttons
- Typography
- Image prompts
- Future design revisions
#### Include Existing Branding
When creating the style guide, include any branding that already exists for the product, service, or company.
This may include:
- Logos
- Brand colors
- Typography
- Existing website styles
- Product UI colors
- Icon styles
- Illustration styles
- Mascots or brand marks
- Taglines
- Voice and tone guidelines
- Screenshots
- Previous marketing graphics
The style guide should not invent a totally new visual identity unless that is the goal. It should build from the existing brand and combine it with the chosen landing page visual direction.
#### What the Style Guide Should Include
The Markdown style guide should describe:
- Overall visual theme
- Mood and tone
- Existing brand assets and rules
- Color palette
- Typography direction
- Graphic style
- Illustration or image style
- Layout principles
- Button style
- Card style
- Icon style
- Background treatment
- Spacing and density
- What to avoid
#### Prompt Idea
> Based on this landing page mock-up, the visual direction we’ve chosen, and the existing branding materials I’ve provided, create a reusable theme, style, and branding guide for this landing page. Format it as a Markdown document. Include the overall style, mood, existing brand assets, color palette, typography direction, layout principles, image style, icon style, button style, card style, spacing, background treatment, and things to avoid. The goal is to reuse this guide with other AIs to generate consistent landing page sections and graphics.
### Step 9: Create the Hero Section Mock-Up
Once the style guide is complete, use it along with the chosen visual mock-up direction to create the **Hero Section**.
The Hero Section is the most important section of the landing page.
It should be created first because it establishes:
- The first impression
- The main message
- The visual tone
- The product positioning
- The primary call to action
#### Ask ChatGPT to Create a Hero Mock-Up
Ask ChatGPT to create a mock-up of the Hero Section using:
- The selected headline and subheadline
- The chosen style guide
- Existing branding
- The selected visual direction
- Any relevant product screenshots or image references
#### Iterate Until It Feels Right
Edit and modify the Hero Section mock-up until it is exactly the way you want it.
This may involve adjusting:
- Main headline
- Subheadline
- Button text
- Layout
- Image placement
- Product screenshot
- Background treatment
- Visual hierarchy
- Trust notes
- Overall tone
The Hero Section should feel polished before moving on.
### Step 10: Work Section by Section Down the Page
After the Hero Section is approved, continue creating mock-ups for the remaining landing page sections.
Work one section at a time, using:
- The saved section name
- Final headline
- Final subheadline
- Section copy
- Suggested image ideas
- Layout concept
- Style guide
- Existing branding
Each section should be developed and refined before moving to the next one.
### Step 11: Assemble the Mock-Ups into a Full Page Preview
After the mock-ups are created and saved, ask ChatGPT to create a web page that places them in order.
This page should include:
- All finalized landing page text
- The section mock-ups
- The images or image placeholders
- The sections stacked one after another
The purpose is to get a feel for how the full landing page will look when assembled.
This does not have to be the final production website yet.
It is a full-page visual preview to evaluate:
- Flow
- Pacing
- Visual consistency
- Section order
- Repetition
- Messaging clarity
- Whether the page feels complete
- Whether any section feels too weak or unnecessary
### Step 12: Choose the Landing Page Build Approach
Once the content, section structure, visual mock-ups, and style guide are complete, the next step is to decide how the landing page will actually be built.
There are two main approaches.
#### Approach 1: Automated AI Build
You can take the full landing page package and hand it off to an AI design or website-building tool.
Examples include:
- Claude Design
- Lovable
- Other AI website builders or design tools
This package may include:
- Landing page brief
- Section list
- Headlines and subheadlines
- Section copy
- Visual mock-ups
- Style guide
- Branding
- Image references
The benefit of this approach is speed. The tool may be able to generate a working version of the page quickly.
The downside is that it is very difficult for an AI tool to get the entire landing page exactly right in one shot. Even with strong inputs, the result may still require the same kind of back-and-forth iteration used earlier in the process.
#### Approach 2: Manual Landing Page Editor Build
The preferred approach is to use a landing page editor and manually build the page using all of the approved materials.
This usually gives more control over:
- Layout
- Visual hierarchy
- Spacing
- Image placement
- Section rhythm
- Brand accuracy
- Final polish
- Matching the approved mock-ups
#### Practical Recommendation
Both approaches can be tried.
The automated approach may create something quickly, but it may be off from the intended direction.
The manual landing page editor approach is more likely to produce exactly what you want, because you are building directly from the approved content, section structure, mock-ups, image references, and style guide.