Unreal Engine Proof of Concept: The Museum in Real Time
Status: 6 November 2026. Working notes; numbers and images will change as the lighting is tuned.
Summary
The complete museum interior, designed and lit in Blender, now runs inside Unreal Engine 5.8. All nine rooms, their lights, artwork, sculptures, benches and plants came across automatically, and every room was photographed from the same camera positions as the Blender renders.
- The lighting carries over accurately. Unreal’s reference renderer (its path tracer) lands within a few percent of the Blender images in the rooms we measured.
- Unreal’s real-time lighting is already close. This is the mode visitors will walk through. It is currently slightly darker and flatter than the reference, with softer floor reflections. Closing that gap is the next phase of work.
- The view outside the windows is a placeholder. The park around the museum needs a more realistic treatment and is on hold until then; the windows show sky only.
Walkthrough film
A 1 minute 40 second walk through the museum in Unreal: the entrance, the rotunda and its
sculpture, and every gallery. Play it here, or open it on YouTube: https://youtu.be/0L3BmLJVdCA
The film uses the same model and lights as the room images below, with a warm colour grade and camera moves added. It was rendered frame by frame at full quality, so it looks a little smoother than the museum will look while walking through it live. What we learned about the lighting while making it is on the Lighting in Unreal page.
How to read the comparisons
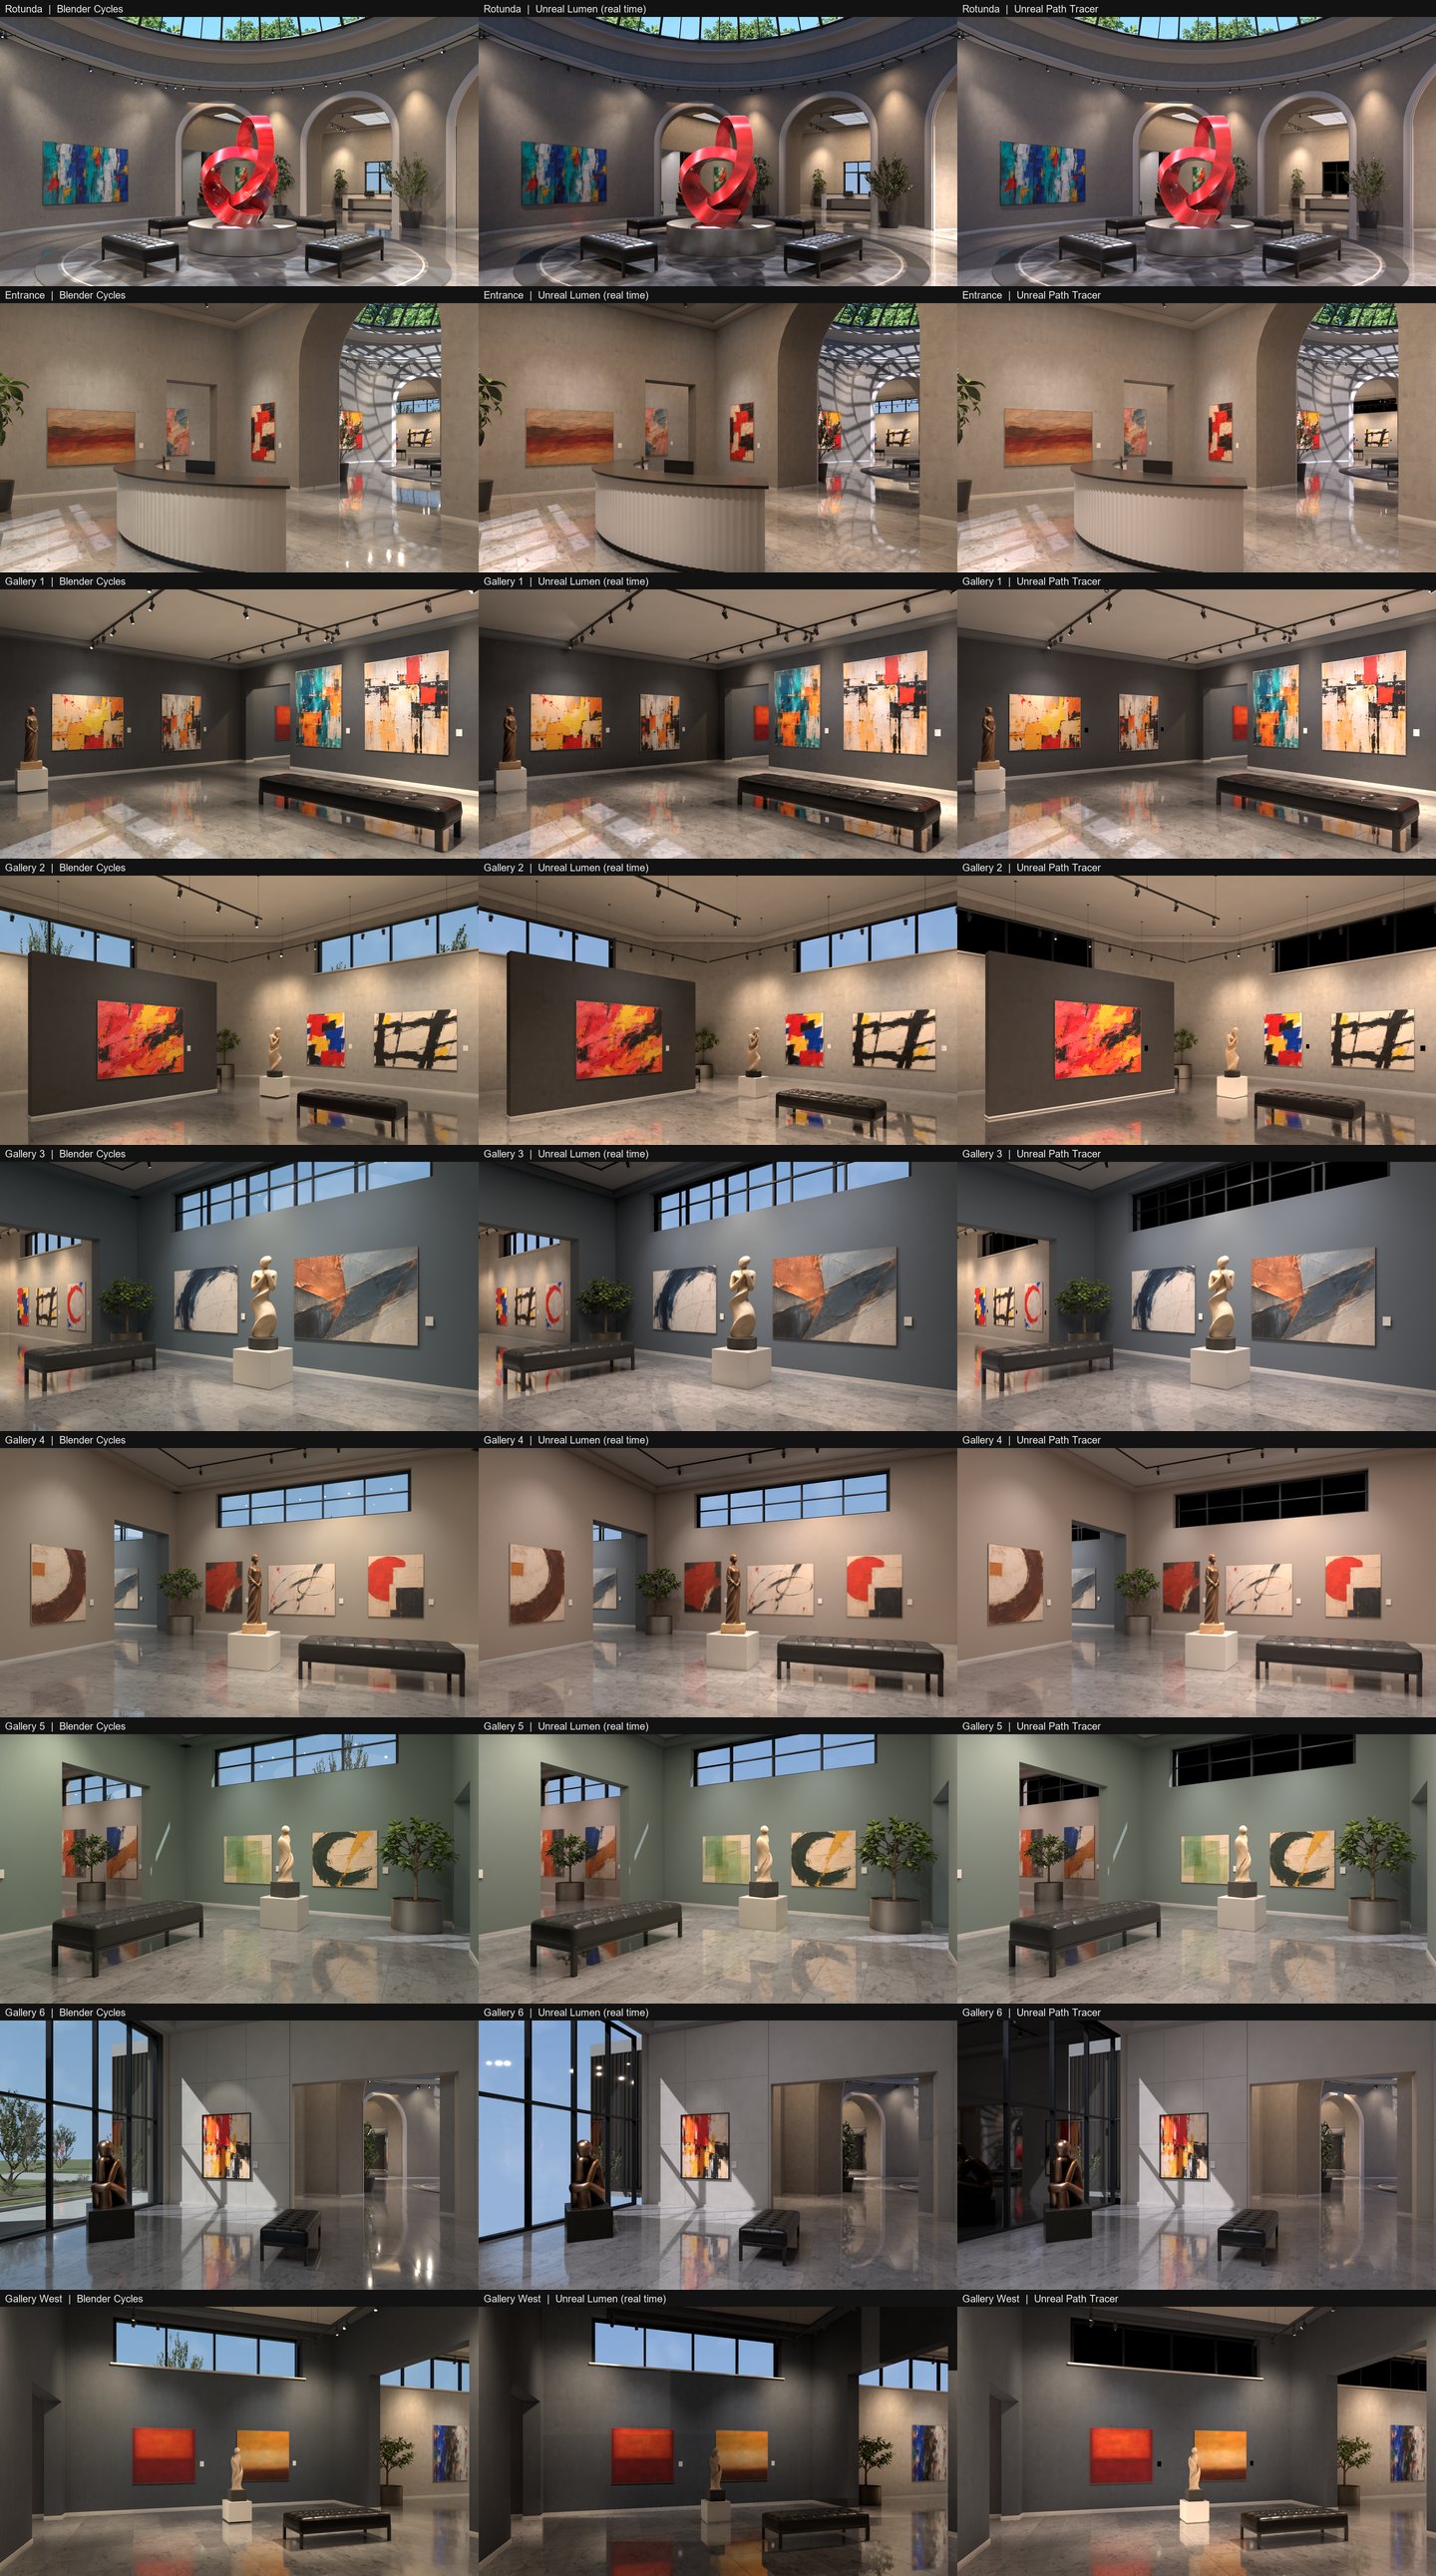
Each room image has three panels, left to right:
| Panel | What it is |
|---|---|
| Blender Cycles | The original design render (before colour grading). This is the target. |
| Unreal Lumen (real time) | What a visitor would see while walking through, at interactive frame rates. |
| Unreal Path Tracer | Unreal’s slow, offline reference render. It shows how closely the scene itself was transferred. |
All rooms at a glance
Room by room
Rotunda

Entrance

Gallery 1

Gallery 2

Gallery 3

Gallery 4

Gallery 5

Gallery 6

Gallery West

A closer measurement: Gallery 1
Gallery 1 was the first room rebuilt, from the same viewpoint as the original reference photograph. Top to bottom: Blender, Unreal real time, Unreal path tracer.
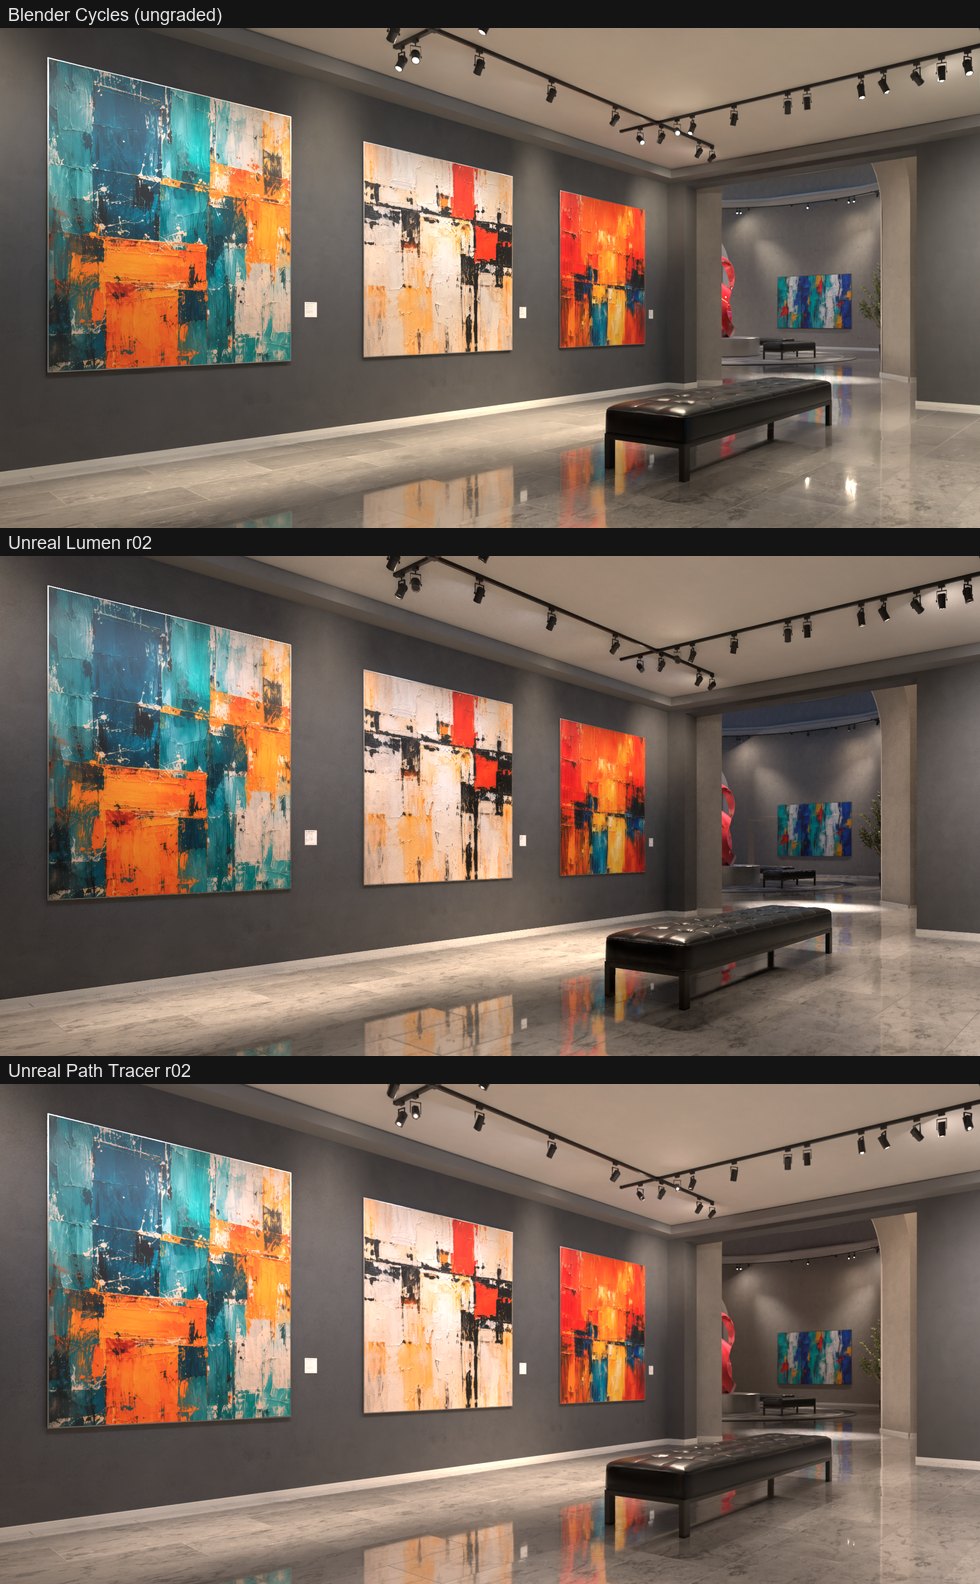
Average brightness of the same areas of the picture (0 = black, 255 = white):
| Area | Blender | Unreal path tracer | Unreal real time |
|---|---|---|---|
| Large painting, left | 121 | 127 | 114 |
| Middle painting | 177 | 184 | 170 |
| Charcoal wall | 102 | 104 | 98 |
| Stone floor | 129 | 130 | 132 |
| Floor reflections | 132 | 136 | 125 |
| Ceiling | 108 | 117 | 103 |
Development state
Working now
- Complete interior: 398 objects and 232 lights across the Rotunda, Entrance, Galleries 1–6, Gallery West, the two vestibules and the restrooms (as placeholders).
- Lights use the same brightness, colour temperature and beam shapes as in Blender, including the oval wall washes and floor accents.
- The polished stone floor is a native Unreal material that recreates the Blender design exactly: 1.2 × 0.6 m slabs, grout lines, per-slab tone and shine, and a clear polished coat. It stays sharp at any distance.
- Artwork, frames and wall labels at full resolution; sculptures, benches and plants at full detail.
- Glass in the windows, doors and dome; daylight from the sun and sky; the rotunda’s sky dome.
- Real-time lighting runs entirely live: no light baking, so changes are visible immediately.
- The transfer is automated. A change in the Blender model can be re-exported and rebuilt in Unreal in about half an hour.
Known differences
- Real-time lighting is about 5–10 % darker than the reference, a little flatter in the corners and high in the rotunda, and the floor reflections are softer than in Blender.
- The park outside the windows is not built yet (on hold for a more realistic treatment), so Gallery 6 and the clerestory windows show sky only.
- Blender’s final colour grade (the warm photographic look of the design renders) is not applied in Unreal yet.
- Walls and most surfaces other than the floor use baked images of their Blender materials. Good enough for this comparison; they will be rebuilt as native Unreal materials for full sharpness.
Next steps
- Close the real-time gap. Tune Unreal’s real-time lighting room by room against the reference: overall brightness, light in corners and ceilings, and sharper floor reflections.
- Apply the photographic look. Recreate the colour grade of the Blender renders in Unreal.
- Walk-through test. Move through the museum in real time: collisions, door openings, smoothness and frame rate on desktop hardware.
- Native materials for walls and plaster. Replace the baked surfaces with sharp, repeating Unreal materials, as already done for the floor.
- Artist art spots. Set up the designated wall positions where artists place their own images (up to 2K), lit by the fixture aimed at each spot. Once an artist has hung their exhibition, the museum stays fixed for visitors.
- The park outside. Resume once a more realistic park image or model is chosen.
- Later: baked lighting and VR. After the photoreal look is approved, prepare a lighter version with precomputed lighting for headsets and lower-end devices.