render-scribe user manual
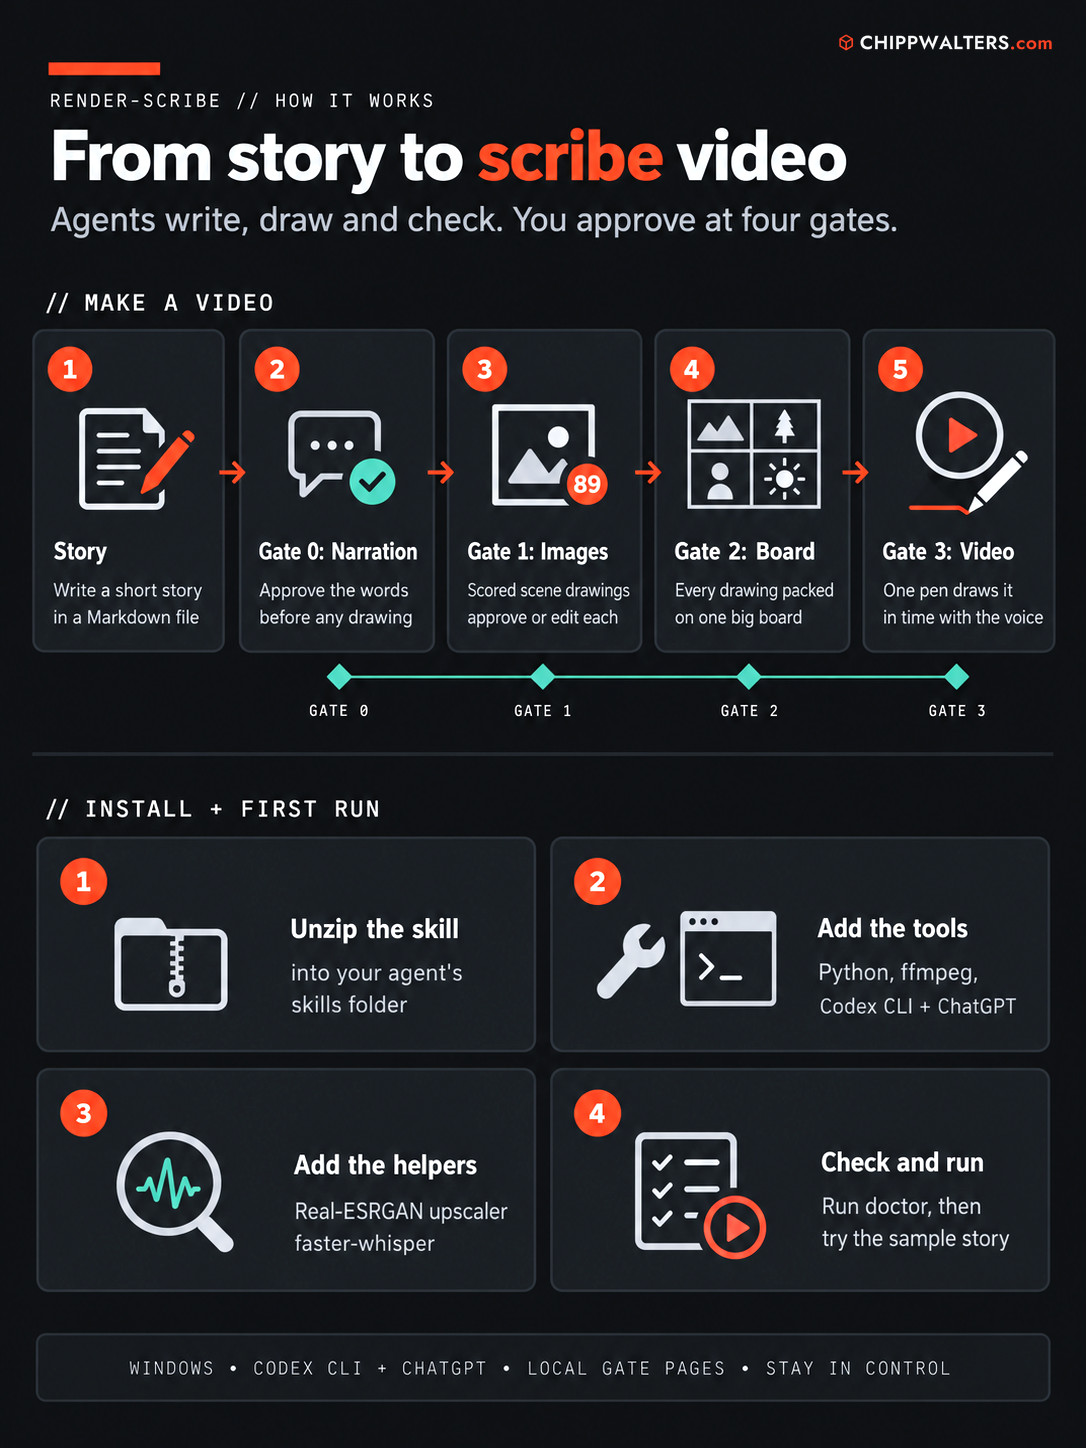
This manual walks you through making a narrated whiteboard video with the render-scribe skill, from a short story to the finished MP4. It is written for creators, not developers. You write the story, read the narration aloud (or pick a synthetic voice), and approve the results on four review pages. Agents and scripts do the rest.
The install steps are in the README. This manual points to them instead of repeating every detail.
Every screenshot here comes from a real run on the bundled sample story, “How a Paper Airplane Flies”. Section 4 follows that run step by step.
Contents
- What it makes
- What you need
- Install
- Your first video
- Narration options
- Styles and colours
- Settings reference
- How scoring and attempts work
- Files in a run folder
- Troubleshooting
- Updating and cleaning up
1. What it makes
You give it a short story. You get back a whiteboard (“scribe”) video: hand-drawn marker pictures appear stroke by stroke on a white board while a narrator tells the story.
- One board, one pen. Every drawing of the story sits on one large board. A single pen draws them in story order, in step with the narration.
- A calm camera. The camera holds still on a group of up to two or three related drawings while they are drawn, then glides once to the next group. Drawings that sit far apart on the board get a shot each (the sample run had 6 shots for its 6 drawings); a Gate 3 note such as “use bigger groups” asks for more drawings per shot. Hand-drawn flow arrows between the drawings are drawn during the glide. The video opens on the hand-lettered title and ends with a zoom-out to the whole board.
-
Black ink and one accent colour. Two looks ship,
rsa_animateandsketchnote(see Styles and colours).
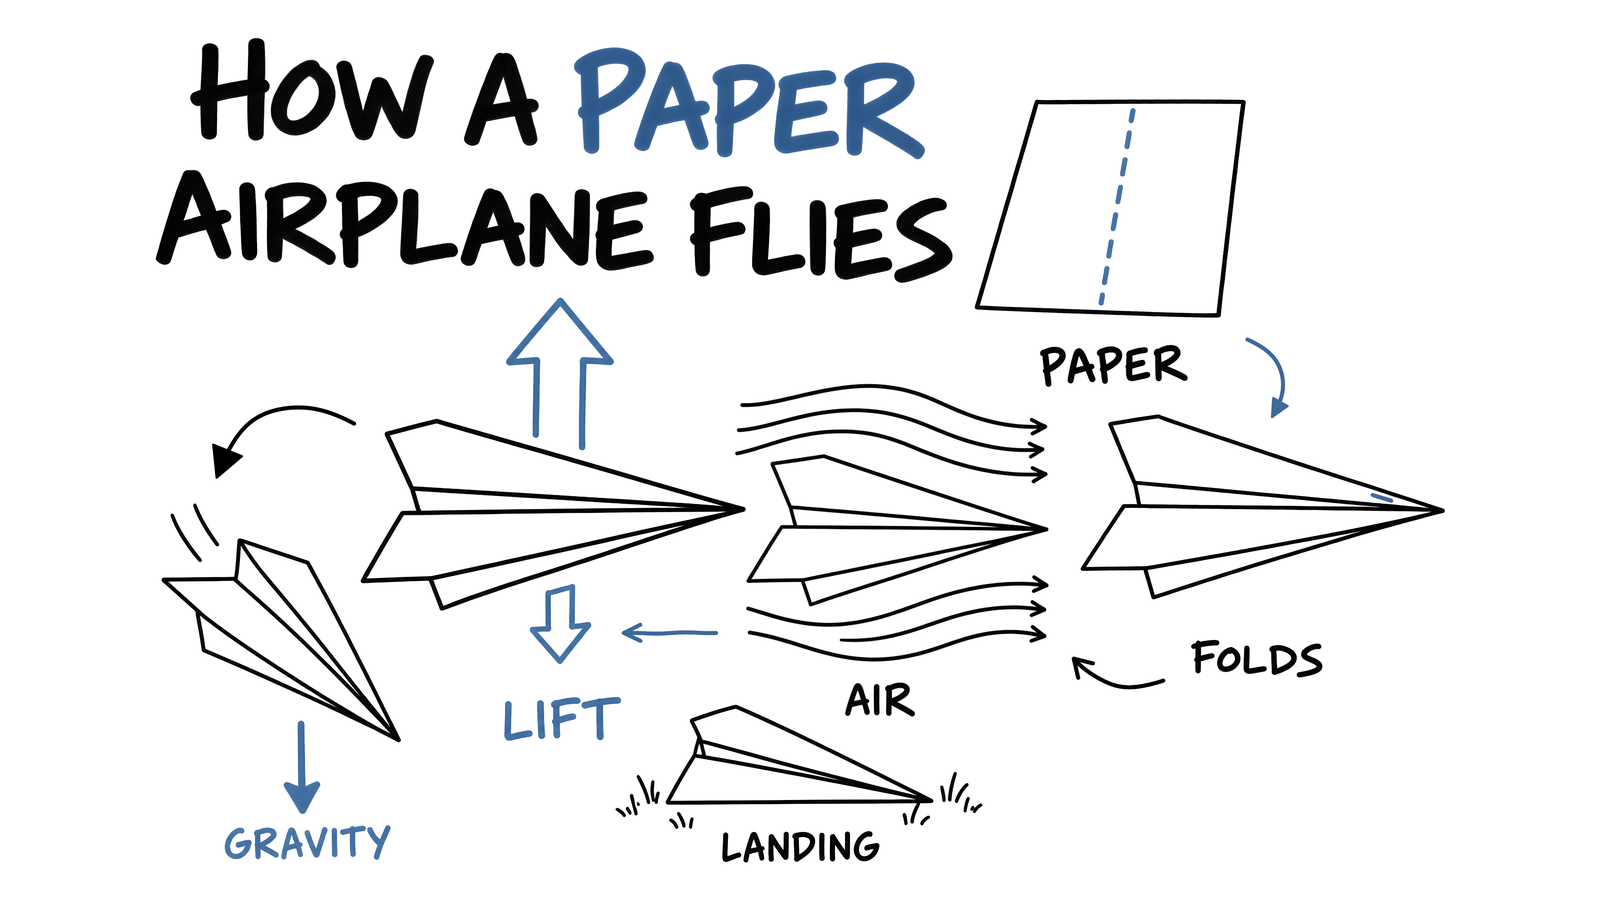
The finished board of the sample run. The video draws it piece by piece and ends on this view:
What ends up in your run folder:
| File | What it is |
|---|---|
videos\final.mp4 |
The finished video, 1920×1080, 30 fps, with the narration |
videos\Scene-01.mp4, Scene-02.mp4, … |
The same video cut into one clip per scene, cut between sentences |
videos\board.png |
The whole finished board as one 3840×2160 picture (good as a poster or thumbnail) |
narration\narration.wav, narration.mp3 |
The narration track on its own |
scenes\_contact.png |
A contact sheet of every scene picture |
Who does what. Each step is done by a different worker:
-
You write the story, record the narration (with the default
recordedvoice) and approve or correct the work at four gates. - A writer agent turns your story into narration sentences in the voice of a voice profile, and later plans the pictures.
- A voice review agent (a different one) checks the narration’s voice and facts against your story.
- Render agents have ChatGPT draw one picture per scene through the Codex CLI.
- Review agents (always a fresh one, never the one that drew) check every picture against a checklist that the script turns into a score.
- The scripts do everything that can be computed: upscaling, scoring, packing the board, timing the pen and camera, and cutting the video.
A driver script, scribe.py, looks at the run folder and always names the one next step. The agent follows it, so no stage is skipped and none is done twice.
2. What you need
The full list is in the README under What you need. In short:
- Windows 10 or 11 with an NVIDIA graphics card (used to enlarge each picture to 4K).
- Python 3.12, ffmpeg and ffprobe.
-
Node.js (for
npm), from nodejs.org. - The Codex CLI, signed in with a ChatGPT plan that includes image generation. Every picture is made on your ChatGPT sign-in.
- Claude Code, Codex or omp. The harness must be able to start sub-agents.
- About 3 GB of disk for the tools, plus room for your runs.
- For the default narration: a microphone and any app that records WAV, MP3, M4A or FLAC (Windows Sound Recorder works; it saves M4A).
3. Install
Follow the README’s Install section step by step. It has six steps:
-
Copy this repository’s
render-scribefolder (the same files as the release zip) into your harness’s skills folder. If you were given the release downloadrender-scribe-<version>.zipinstead, unzip it there. The newrender-scribefolder is called SKILL_DIR below. -
Make a Python venv for the scripts and install
requirements.txtinto it. This venv’spython.exeis “the scripts’ Python”. - Download and check Real-ESRGAN (the upscaler).
- Make a second venv for faster-whisper and download its speech model.
-
Create
SKILL_DIR\settings.local.jsonwith your paths: the scripts’ Python (python),realesrgan_dirandasr.whisper_python. - Run the two checks.
The commands in this manual are for PowerShell and use the venv paths from the README. To save typing, set this once per PowerShell window:
$py = "$env:USERPROFILE\venvs\scribe\Scripts\python.exe"
The agent finds the scripts’ Python the same way the scripts do, from your settings. To see which one it will use, run this with any Python:
python "SKILL_DIR\scripts\settings.py" python
It prints the python setting, or the Python you ran it with when that setting is not set. If it doesn’t print your venv’s python.exe, fix python in settings.local.json.
The two checks from README step 6:
& $py "SKILL_DIR\scripts\render_scenes.py" doctor --style rsa_animate
& $py "SKILL_DIR\scripts\narrate.py" doctor
Both must exit without a FAILED line. The first lists every setting with the file it came from, checks that the Codex CLI is installed and signed in, and ends with doctor: all prerequisites present. When something is missing, it ends instead with one FAILED doctor: line followed by one indented line per problem. The second checks what your narration engine needs, marks each check ok or FAIL, and ends with a NARRATE_JSON {...} line holding "ok": true (or a FAILED doctor: ... line naming the failed checks). Troubleshooting lists every problem with its fix.
4. Your first video
This section follows one run from start to finish, in the order the pipeline runs it. The run uses the bundled sample, a short story about how a paper airplane flies. Every screenshot is from that run, and the examples are what really happened in it.
The sample run at a glance:
| Step | What happened |
|---|---|
| Narration text | 3 paragraphs, 6 sentences; voice review score 100 |
| Gate 0, round 1 | Paragraph 1 edited: drop the opening “Now,” in sentence 1.2 |
| Gate 0, round 2 | The rewritten narration (reviewed again: 100) approved |
| Narration | Read aloud from reading.md; all 6 sentences matched the first time; 22.2 s |
| Pictures | 3 scenes, each passed with 100 on its first attempt (with density warnings) |
| Title card | Passed with 100 |
| Gate 1, round 1 | Title, narration and all 3 scenes approved |
| Gate 2, round 1 | Edit: “More space between the pieces” |
| Gate 2, round 2 | The board with wider gaps approved |
| Video and Gate 3 | 32.2 s, 1920×1080; approved in round 1 |
4.1 Make a run folder and write the story
Every video gets its own folder, the run folder. Everything the pipeline makes for that video goes into it. Put your story in it as a Markdown file:
New-Item -ItemType Directory "$env:USERPROFILE\Videos\scribe\paper-airplane"
Copy-Item "SKILL_DIR\samples\paper-airplane\story.md" "$env:USERPROFILE\Videos\scribe\paper-airplane\"
For your own story, write story.md in any text editor. Some guidance:
-
Plain prose. Tell the story the way you would explain it to a friend. A
# Titleline on top is fine. - The facts you care about. The writer keeps your facts, names, order of events and numbers, and invents nothing. Whatever is not in the story will not be in the video.
- Short. Each narration paragraph becomes one scene (one picture), and the scene lasts as long as its paragraph takes to speak. The writer may split a long paragraph of your story into two scenes: the sample story has two paragraphs (two and three sentences), which became three narration paragraphs of 8.1, 8.3 and 5.7 seconds and a 32-second video. A story of a few longer paragraphs makes a video of a minute or two.
- Recurring characters (the same person in several scenes) are fine. The writer declares them, and each gets a character sheet so it looks the same in every picture. You may name a photo or portrait to draw a character from.
4.2 Ask the agent
Start your harness and ask for a video of the story:
-
Claude Code:
/render-scribe make a scribe video of %USERPROFILE%\Videos\scribe\paper-airplane\story.md -
Codex:
$render-scribe make a scribe video of ... -
omp:
/skill:render-scribe make a scribe video of ...
In the same message, say anything that differs from the defaults:
-
The style.
rsa_animateis the default; say “in the sketchnote style” for the other look. The writer records it asstylein the run’s script. Choose it now: the style is fixed once the pictures start (see 4.8). - An opening greeting or a sign-off (off by default).
- Your voice profile, if you made one (see Narration options).
The agent first runs the two doctor checks, then starts the writer. From here on it tells you when it needs you. You can ask it at any time where the run stands. It answers from this command:
& $py "SKILL_DIR\scripts\scribe.py" status --run "$env:USERPROFILE\Videos\scribe\paper-airplane"
It prints the run’s style, the current stage and the one next step (NEXT:), with the command to run when there is one.
4.3 The narration text and the voice review
The writer agent turns your story into narration.json: paragraphs, one per future scene and each with a short title, of numbered sentences such as 1.1, 1.2 and 2.1. Every sentence is one sentence of at most 25 words, and numbers are spelled out the way they are spoken.
A separate voice review agent then checks it against the voice profile and your story: natural cadence, short spoken beats, no hype or corporate phrasing, no “AI polish”, nothing invented, facts kept, numbers as words. If it flags sentences, the writer fixes them and a new review follows. After three failed reviews in a row the narration is flagged: the run goes on, and Gate 0 shows you the open flags so you can decide.
In the sample run, the writer split the story’s two paragraphs into three (“From flat sheet to plane”, “Air under the wings”, “A gentle landing”) of two sentences each, and the voice review passed with 100.
You do nothing in this step.
4.4 Gate 0: approve the narration text
Gate 0 is the first of four review pages. It opens in your browser as a local HTML page. It is text only, with no audio and no pictures yet: nothing visual is made until you approve the words.
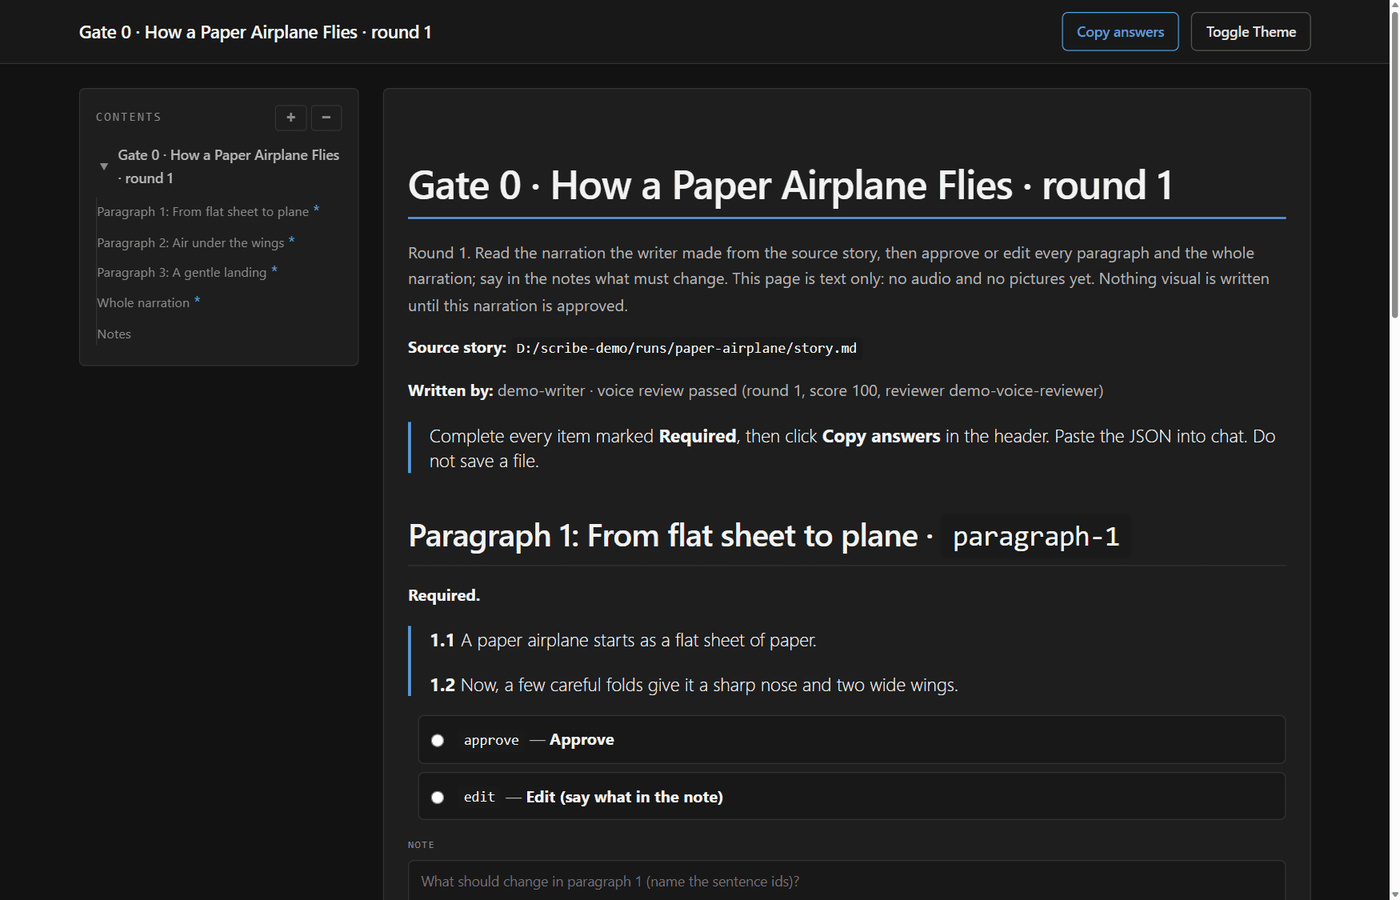
What the page shows
- The path of the source story, who wrote the narration and the result of the voice review.
- One question per paragraph: its title and its sentences with their ids.
- One question for the whole narration (it lists the voice review’s open flags, if any).
- A Notes box for anything else.
How to answer. For every paragraph and for the whole narration, pick Approve or Edit (say what in the note). An edit needs a note. Name the sentence ids so the writer knows where to look.
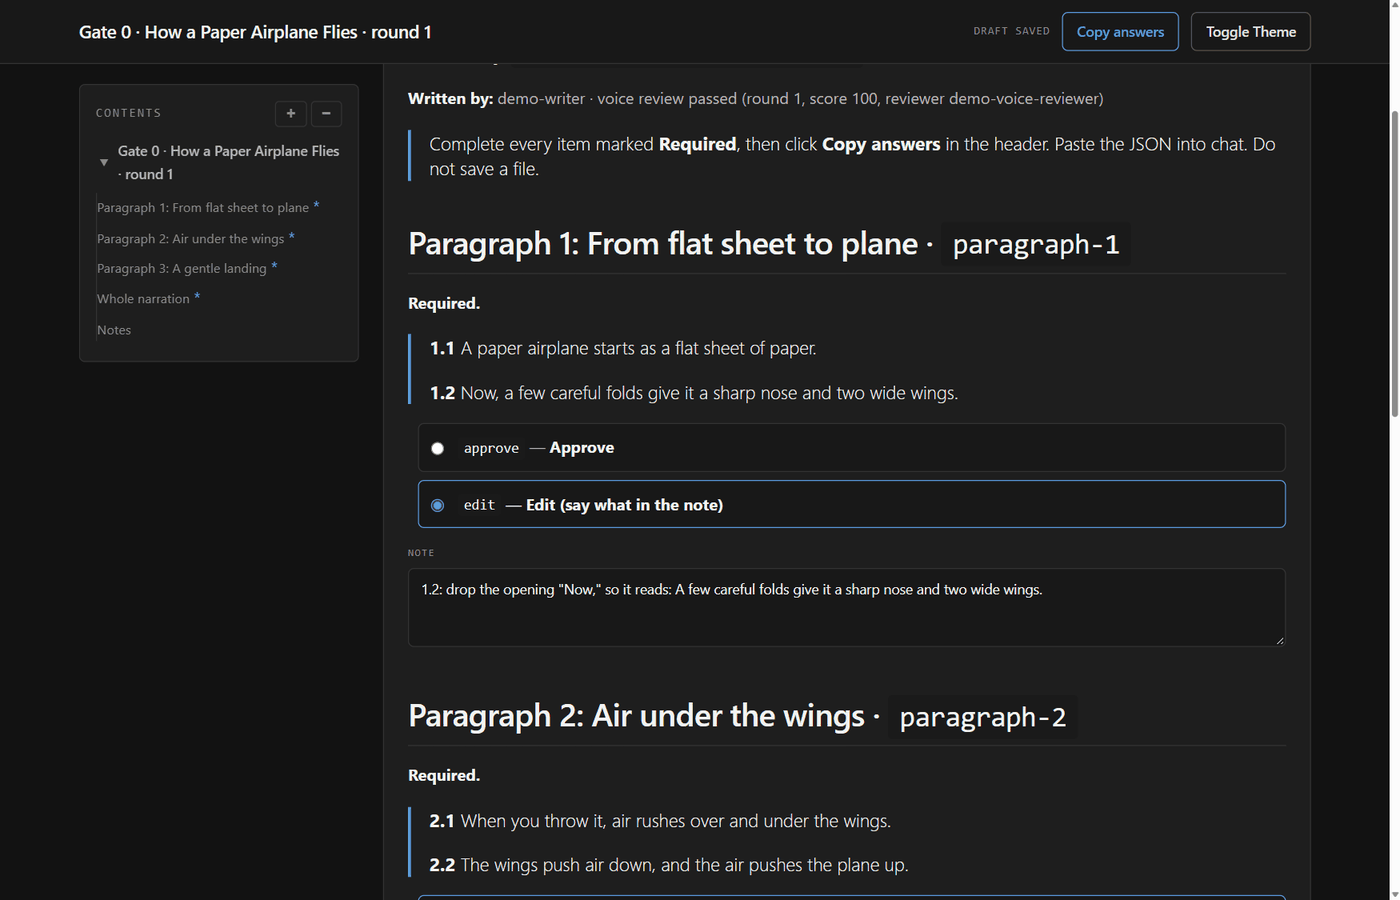
In the sample run, sentence 1.2 began with a filler. Paragraph 1 was answered with an edit (the header shows “draft saved”: the page keeps your answers while you work):
Notes that work well:
-
1.2: drop the opening "Now," so it reads: A few careful folds give it a sharp nose and two wide wings.(the note from the sample run) -
3.1 is too long, split it into two sentences. -
Paragraph 2 explains lift twice; keep only the second explanation. -
Whole narration: sounds too formal, use shorter, plainer sentences.
What happens next. Any edit goes back to the writer, then through a new voice review, then to a new Gate 0 round. The new round lists what the last one asked for (“Round 1 asked for”) and shows the rewritten text:
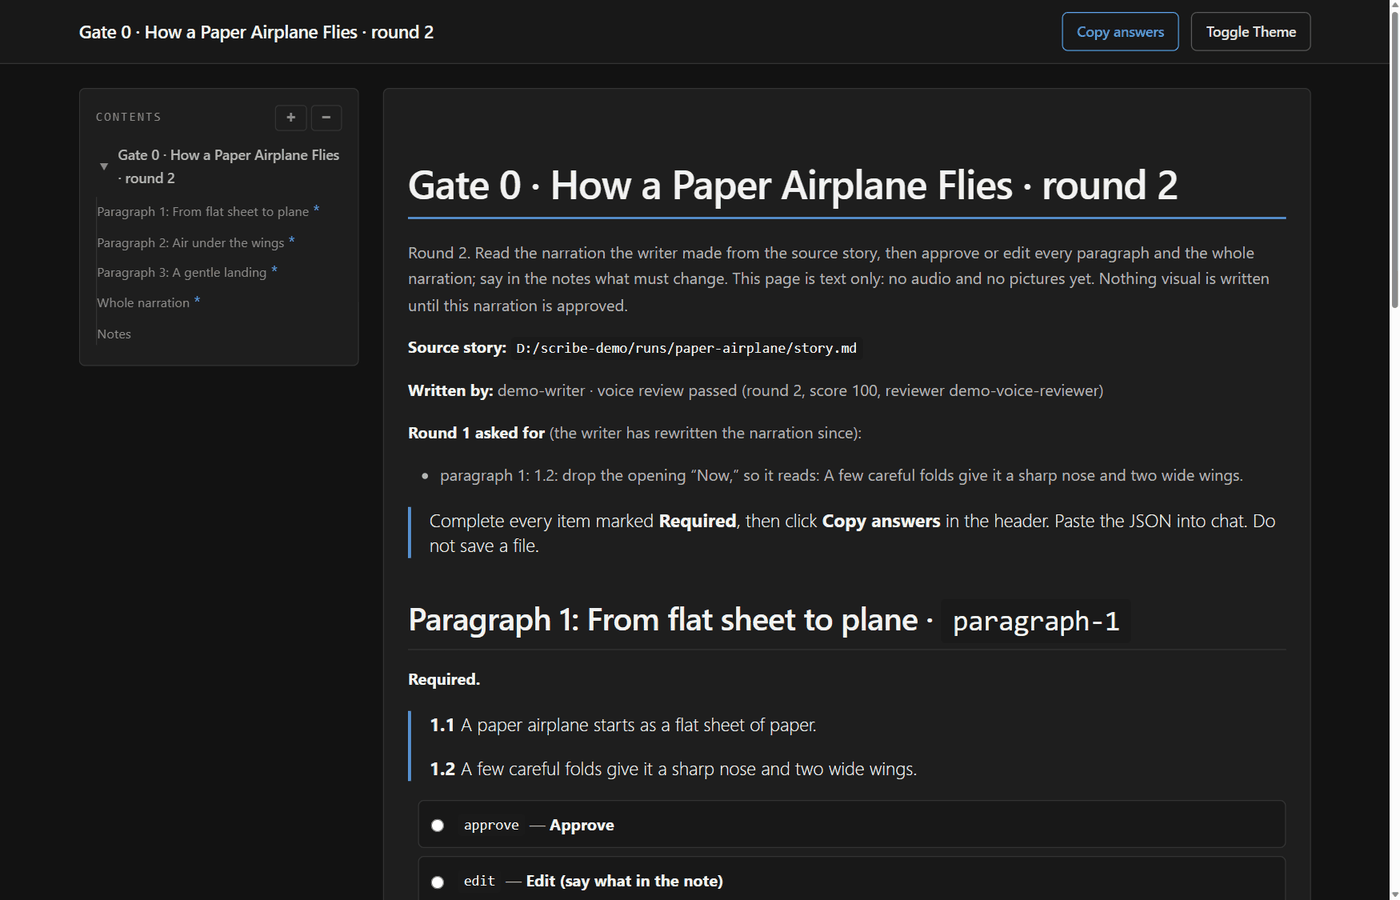
When you approve every paragraph and the whole narration, the narration is approved and the writer plans the pictures. In the sample run, round 2 was approved.
Once a narration has been approved, later changes (for example after a note at Gate 1) bring a shorter Gate 0 page. It asks only about the paragraphs that changed and shows the old and new sentences side by side. The unchanged paragraphs keep their approval and are listed collapsed at the top.
Two versions side by side. If you want to compare, for example, a shorter version, ask the agent for one. The next Gate 0 page then shows each version in full and adds a required version question: keep the current narration, pick an alternative (alt:<name>), or merge them (say how in the note).
How to send your answers (the same on every gate) is in 4.14 Answering a gate page.
4.5 The script
The writer agent’s second pass builds script.json from the approved narration. For each scene it lists the drawings needed (each with an optional short label), where they go, and which sentence reveals which drawing. It also records the title text and the style. The sentences are copied exactly, so the approved narration stays approved. You do nothing here.
4.6 Record the narration
With the default narration engine, recorded, you read the narration yourself. (To use a synthetic voice instead, see Narration options.)
-
The agent writes the reading script,
narration\reading.md, in the run folder:& $py "SKILL_DIR\scripts\narrate.py" reading --run "$env:USERPROFILE\Videos\scribe\paper-airplane"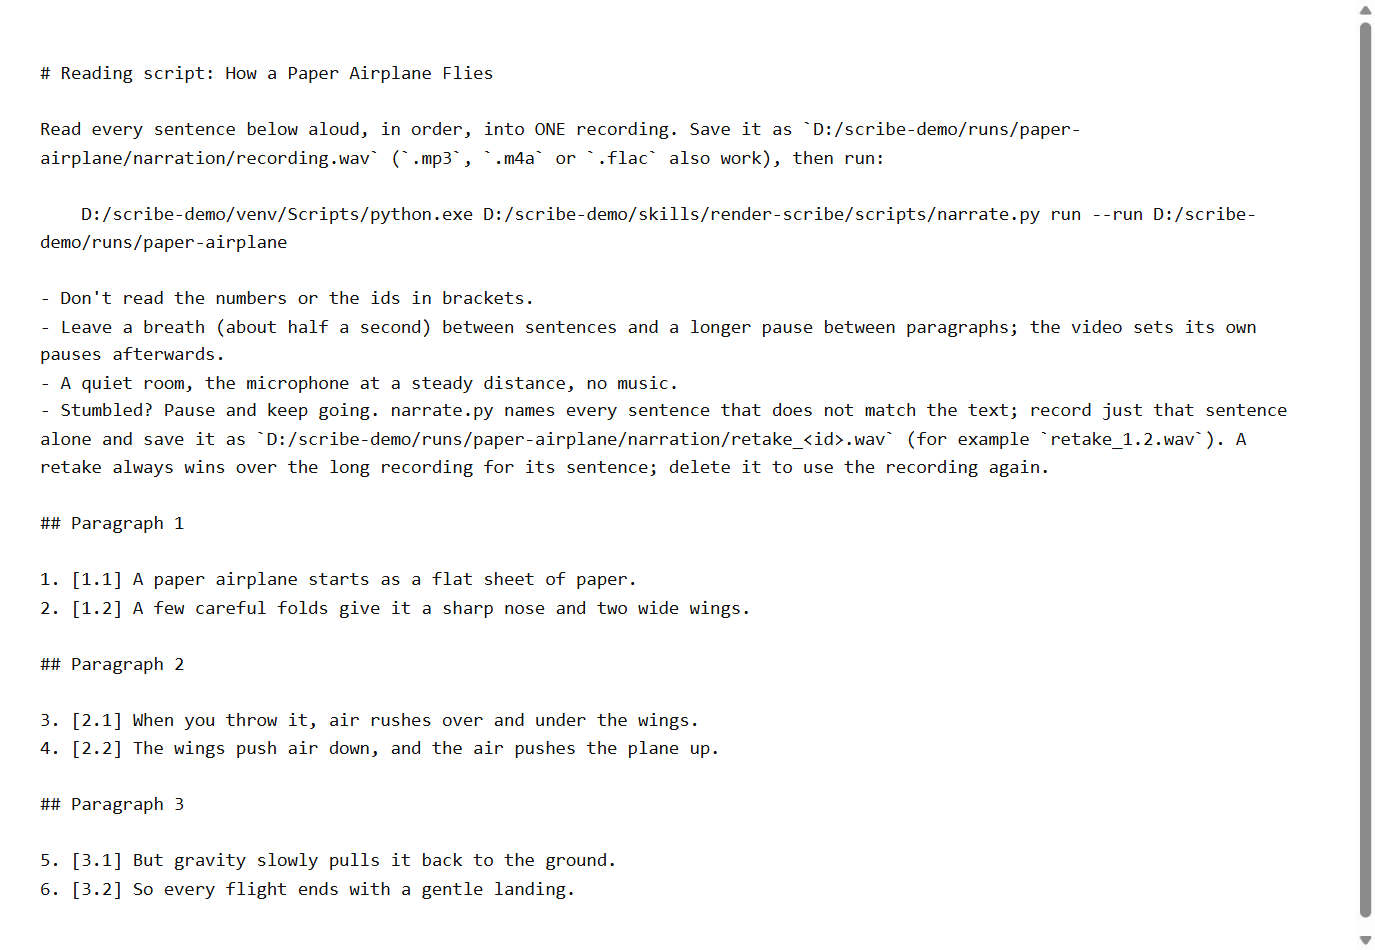
-
Read every sentence aloud, in order, into one recording. Don’t read the numbers or the ids in brackets. Leave a breath (about half a second) between sentences and a longer pause between paragraphs. Record in a quiet room, at a steady distance from the microphone, with no music.
-
Save it in the run folder as
narration\recording.wav.recording.mp3,recording.m4aandrecording.flacwork too. Keep only onerecording.*file in the folder. -
Tell the agent the recording is there. It runs
narrate.py run, which finds every sentence in your recording, cuts it out and checks it.
The check. Each sentence is transcribed by faster-whisper and compared with its text. It passes when the transcript matches closely (at most 15% of the words differ, or at most 5% of the letters) and the pace is between 1.2 and 6 words per second.
In the sample run, all six sentences matched their text word for word the first time, and the narration came to 22.2 seconds. (The demo’s reading was spoken by the Windows built-in voice, standing in for a person.)
Retakes. If you stumble, pause and keep going. Every sentence that fails the check is named, and reading.md lists it at the top under “Re-record these sentences, each alone”. Record just that sentence on its own and save it as narration\retake_<id>.wav, for example retake_1.2.wav (.mp3, .m4a and .flac work too). Then tell the agent. A retake always wins over the long recording for its sentence; delete the retake file to use the long recording again. Saving a new recording.wav re-cuts every sentence that has no retake.
You can retake a sentence that passed, too, if you don’t like how it sounds (for example after hearing the narration at Gate 1). Save its retake_<id>.wav and tell the agent. The narration track is rebuilt, and so is anything already made from its timing.
When every sentence passes, the pipeline joins them into narration\narration.wav (and .mp3) with even pauses and writes alignment.json, the timing of every sentence. That timing decides how much each scene may hold: a long sentence gets more drawing time than a short one.
4.7 Character sheets
This step runs only when your story has recurring characters (the sample has none). Each character gets a character sheet: one picture with six views of the character and no text. The sheets are attached to every picture that shows the character, and the reviewer checks the likeness. You see them at Gate 1.
4.8 Image rounds
Now the pictures are drawn, one per scene. You wait; the agent reports when they are done.
-
The style is fixed here. The pictures are drawn in the style the script names. From now on that style is the run’s style for everything. If the script later names another style,
scribe.pystops and the agent asks you which one you want. To keep the first, the script is set back. To switch, you start a new run folder (or start the pictures over, which throws away every picture of the run). - Scene 1 goes first and alone. Its picture becomes the style reference for every other scene, so it must pass before the rest start. Then all other scenes render at the same time.
- Each attempt: ChatGPT draws the picture from the scene’s prompt (through the Codex CLI on your sign-in). The script enlarges it to 3840×2160 and stamps its prompt into it. Then a fresh review agent checks it item by item: every drawing present, every label spelled right, no hand or pen, nothing cut off, a plain white background, and so on. The script turns the answers into a score.
- Up to five attempts per scene. A failed attempt’s “required fix” goes into the next attempt’s prompt. After five attempts without a pass, the best one is kept and flagged so you can judge it at Gate 1. Details: How scoring and attempts work.
- Segments. The reviewer also draws a box around each drawing. The script uses the boxes to split each scene into segments, one per sentence, so that each sentence’s drawings are drawn while that sentence is spoken. Connector arrows that ChatGPT draws between groups are erased; the board gets its own flow arrows later.
When all scenes pass, scribe.py has the agent write a contact sheet of every scene, scenes\_contact.png, and a table of scores and attempts, scenes\run_summary.md.
In the sample run, all three scenes passed with 100 on their first attempt:
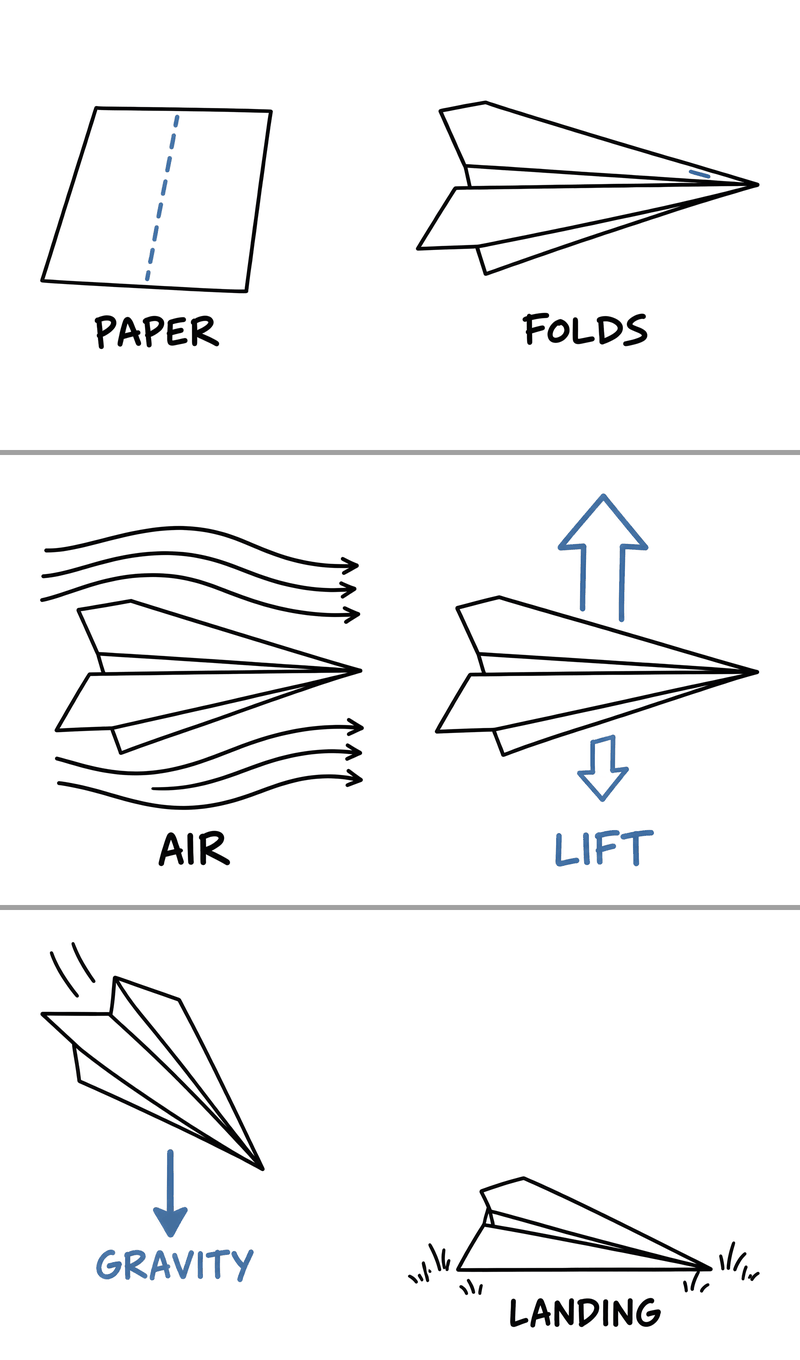
They also got density warnings: four of the six drawings were quicker to draw than their sentences are to speak. Drawing time as a share of the sentence’s time was 41% for 1.1, 47% for 1.2, 110% for 2.1, 53% for 2.2, 67% for 3.1 and 77% for 3.2; the target band is 75% to 125%, so 1.1, 1.2, 2.2 and 3.1 were warned. A density warning is only a note; see Density warnings. The video absorbs the difference, and nothing had to be redrawn.
4.9 The title card
The story’s title is hand-lettered in the same style, in its own render and review loop of up to five attempts, with scene 1 as the style reference. The video opens on it. In the sample run it passed with 100:
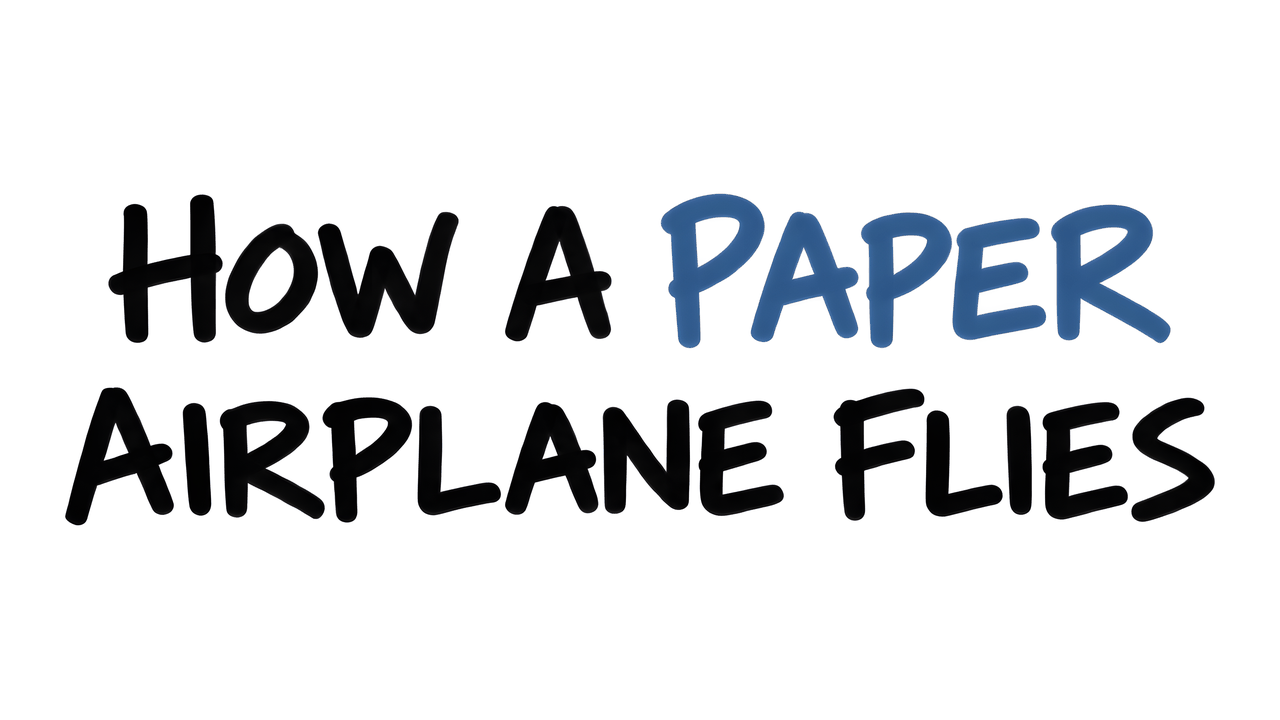
You approve it at Gate 1.
4.10 Gate 1: approve the pictures
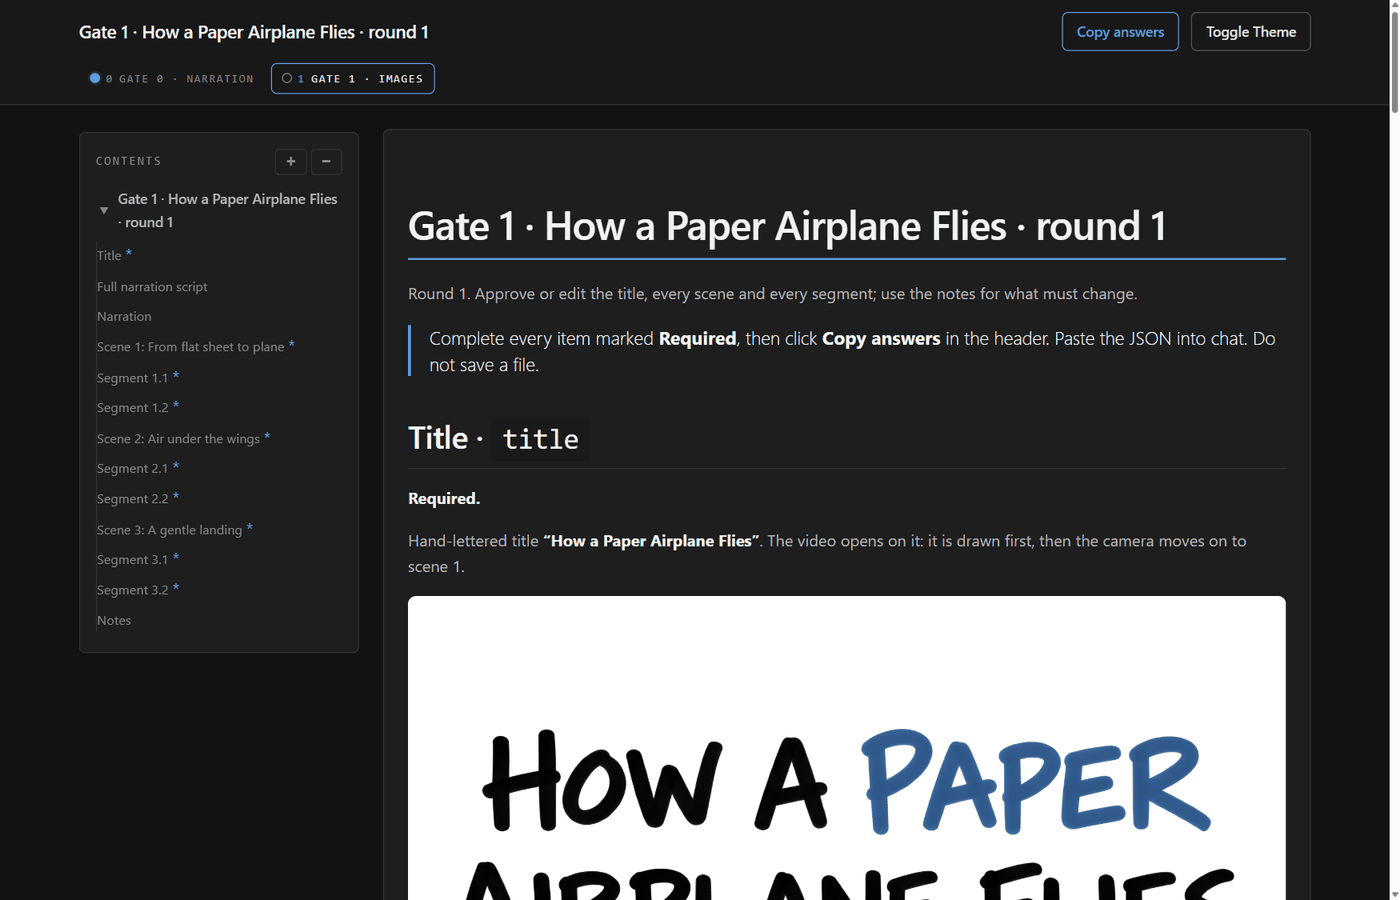
Gate 1 is the big review: the title card, the narration audio and every picture. The header now shows the gate bar, with Gate 0 passed (see 4.15).
What the page shows
- Title (until it is approved): the title card. Approve or edit.
- Full narration script: the whole text, for notes only.
- Narration: an audio player with your narration, its total length and where each scene starts. Notes only.
- Character sheets (when there are any): notes only.
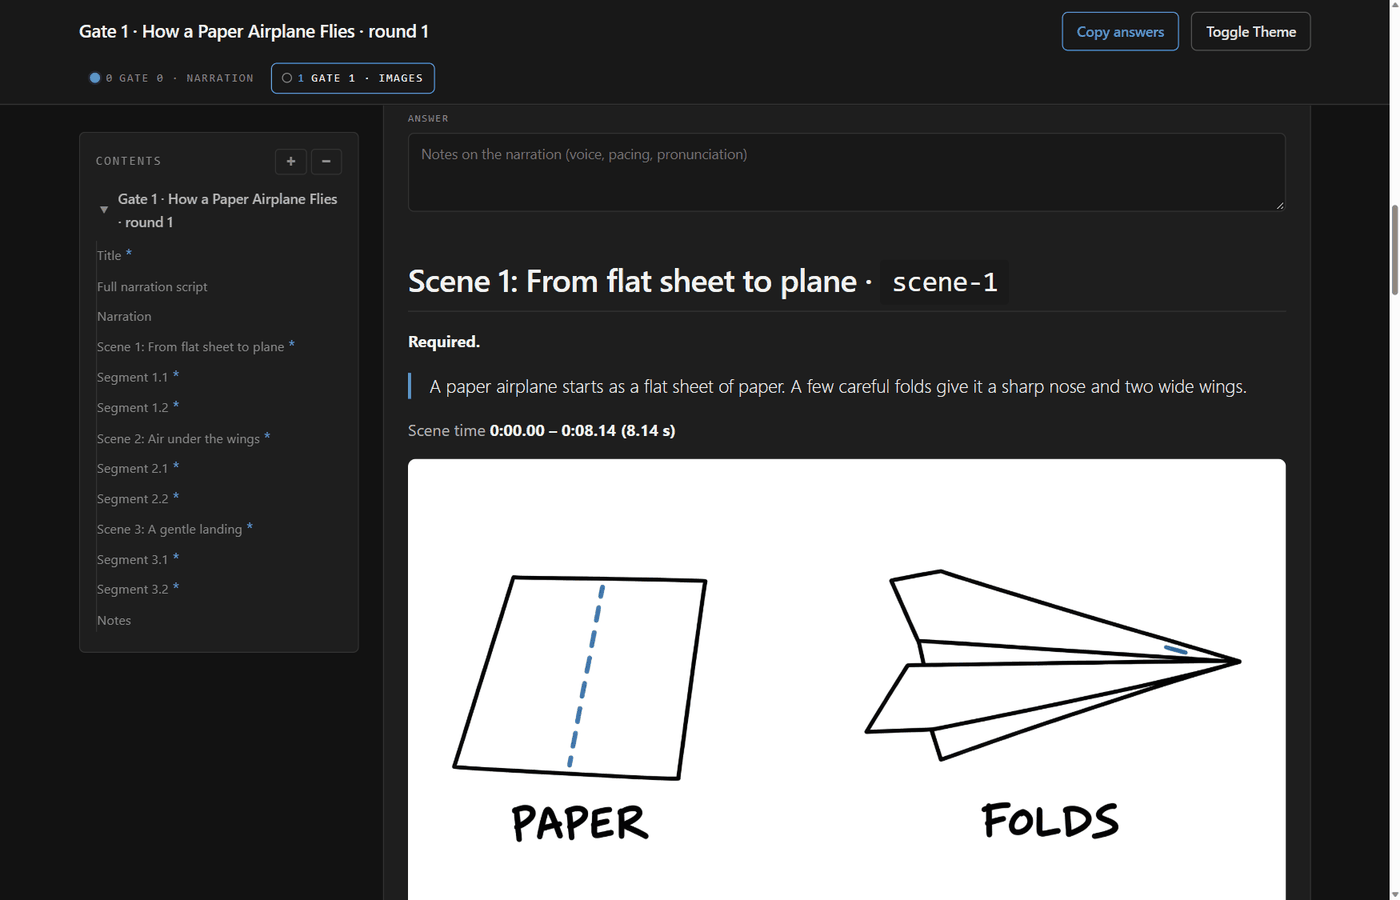
- One question per scene: the scene’s picture, its paragraph and its time span. Approve or edit.
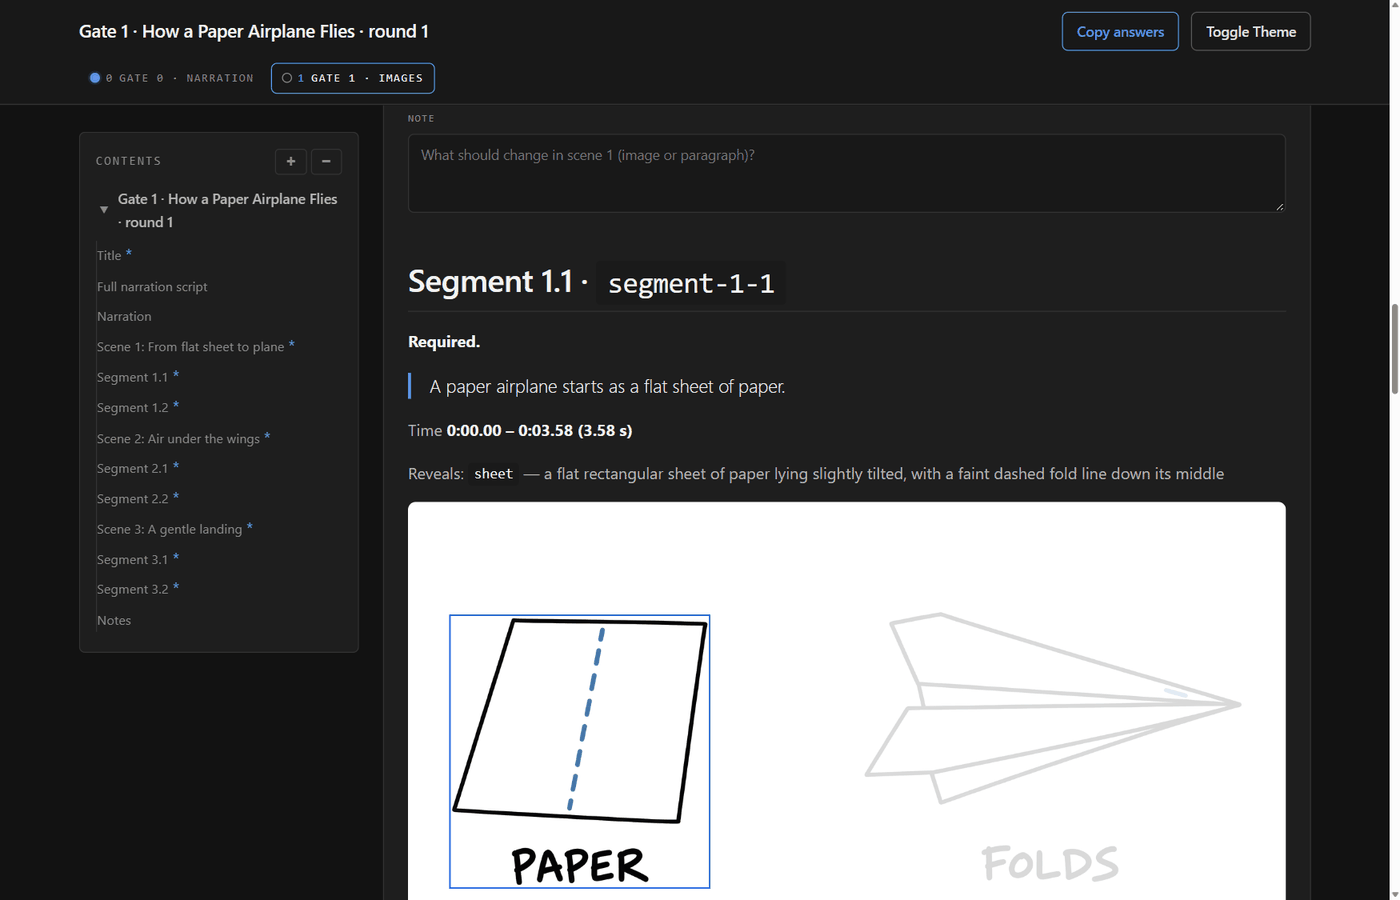
- One question per segment: a highlight picture that shows that sentence’s drawings in a box at full strength and fades everything else, plus the sentence, its time span and the drawings it reveals. Approve or edit. Here you check that each drawing appears with the right sentence.
Scenes you approved in an earlier round are listed collapsed at the top and not asked again, as long as their picture has not changed. A scene that is drawn again must be approved again.
In the sample run, everything was approved in round 1.
Notes that work well:
-
Scene:
Make the airplane bigger and drop the cloud on the left. -
Scene:
The label should read TWO WINGS, not WINGS. -
Segment:
The label belongs to 1.1, but it lights up in the 1.2 highlight. -
Title:
Put AIRPLANE on its own line. -
Script:
2.2: say "lift" instead of "pushes the plane up". -
Narration:
2.1 sounds rushed; I will record a retake.
What happens next
- A picture note starts a new round for that scene: five fresh attempts, with your note as the first attempt’s fix. Then a new Gate 1 round asks about the redrawn scenes.
- A title note starts a new title round the same way.
-
A change to the spoken words goes back to the writer, through the voice review, and to a Gate 0 round that shows only the changed paragraphs. Changed sentences then need new audio: with
recorded, you record just those sentences as retakes. - A change that leaves the words alone (what to draw, where, the title text) goes straight into the script.
Gate 1 passes when every scene and the title are approved.
4.11 The board
The script cuts every segment out of its scene picture and packs all of them, plus the title, onto one 16:9 board in story order, each at a slightly varied size and tilt. Drawings of one scene that touch or sit inside each other stay together as one piece. Then it adds a few hand-drawn flow arrows in wide gaps between drawings that follow each other in the story. The result is videos\board.png. You do nothing here.
4.12 Gate 2: approve the board
Gate 2 shows the board before any video is made, so a layout change costs seconds, not a video render.
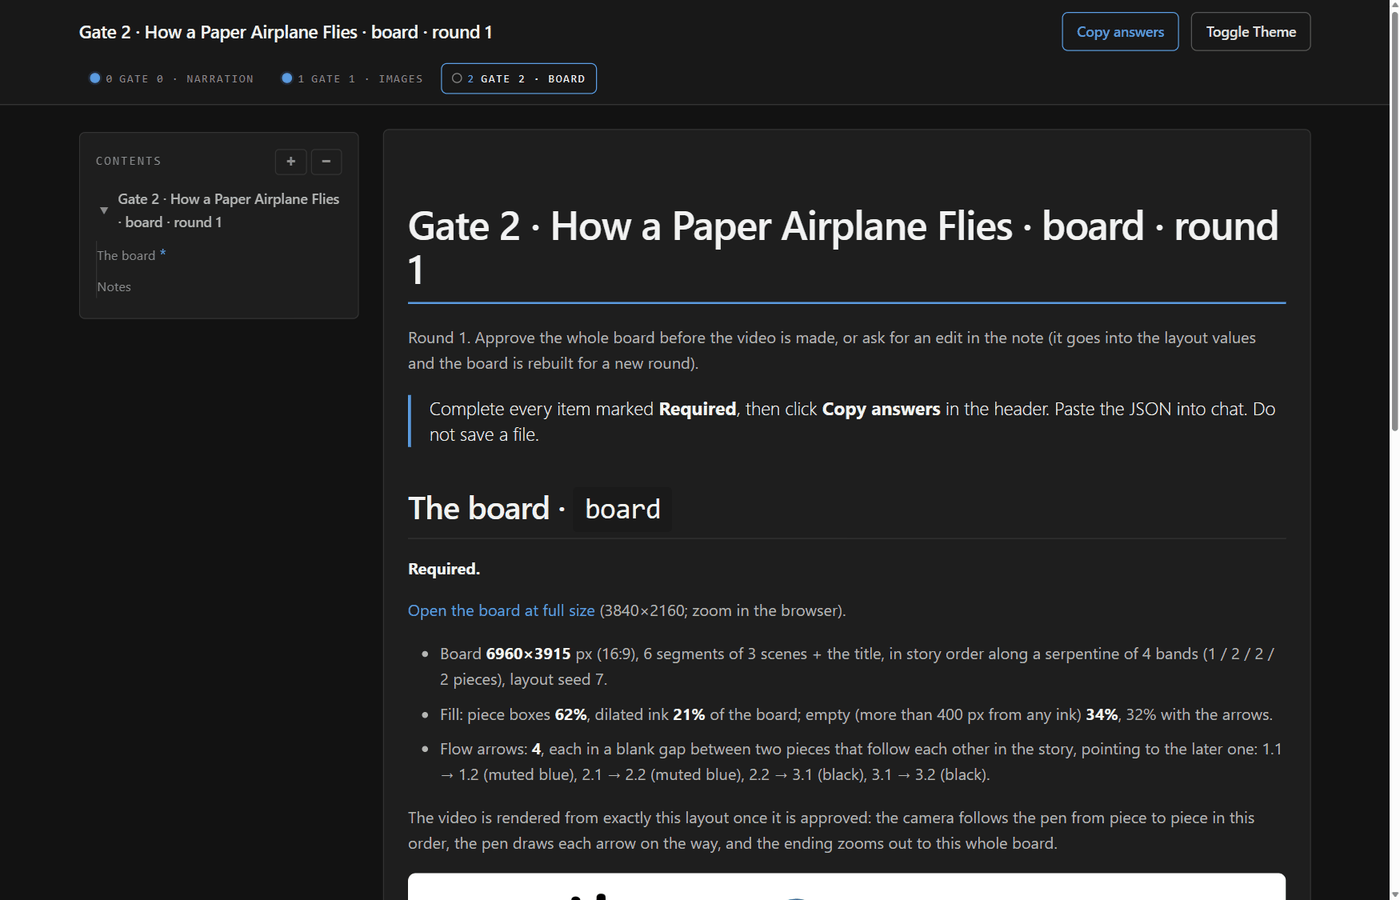
What the page shows: the board’s size, the layout seed, how full it is, its flow arrows, and the board itself (click Open the board at full size to zoom in). One question is required: approve or edit.
In the sample run, round 1 packed the drawings so tightly that two labels sat next to the wrong planes. The answer was an edit:
More space between the pieces: AIR and FOLDS sit next to the wrong planes. Keep each label beside its own drawing.
The agent changed the gap between pieces (gap_px) from 40 to 140 and rebuilt the board. Round 2 lists the note and the changed value:
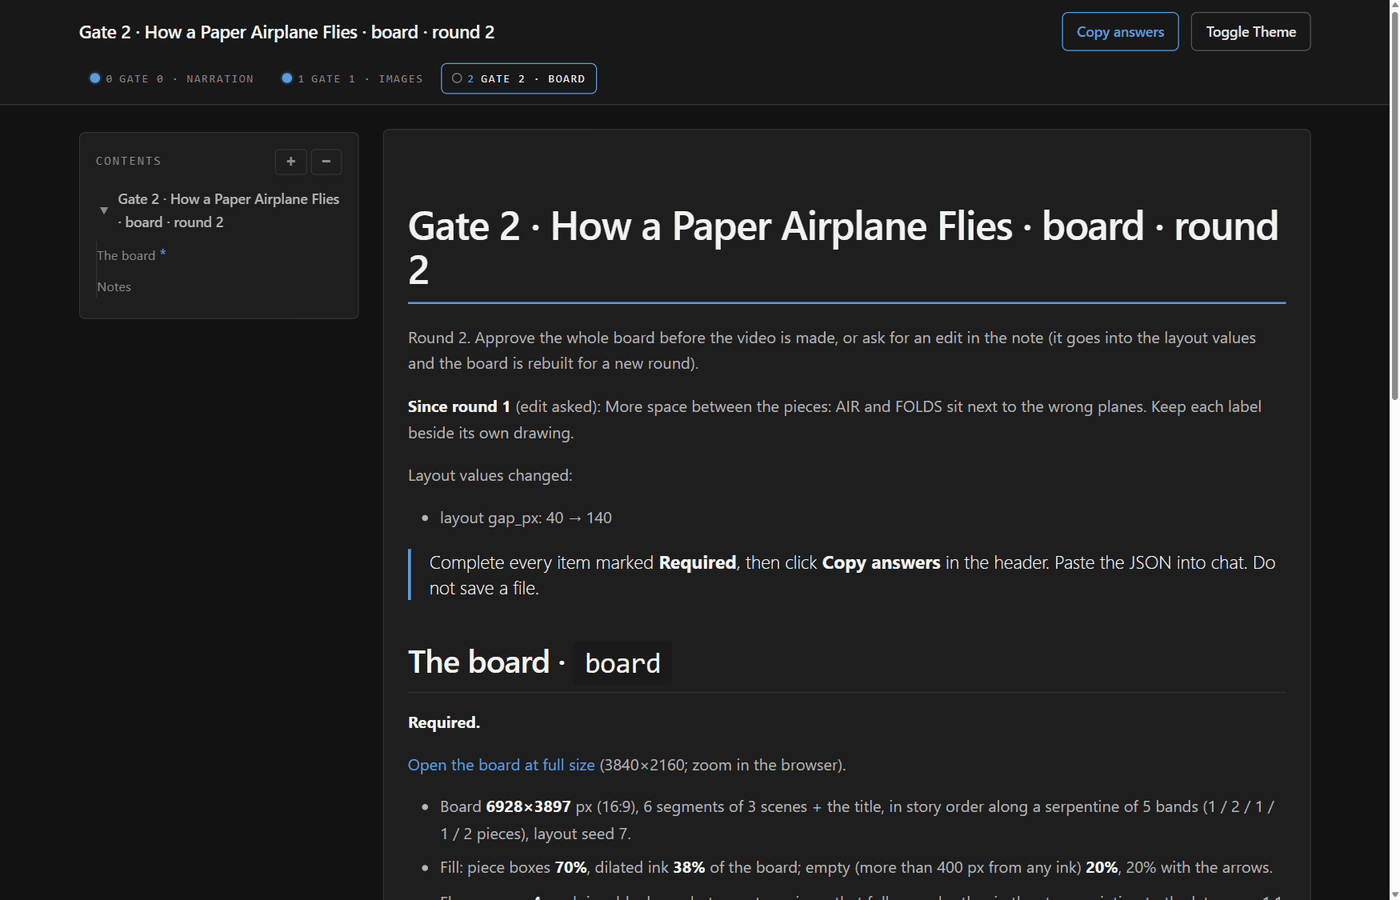
Round 2 was approved. The finished board is the one in section 1.
Notes that work well:
-
More space between the pieces.(largergap_px, as in the sample run) -
New seed.(a different random arrangement) -
Move scene 3 next to scene 2. -
Fewer arrows. -
More margin around the edge.
What happens next. The agent changes the layout values (layout in the style’s module.json: seed, gaps, margin, scale, tilt, arrows), rebuilds the board, and the next round shows it. When you approve, the video is made from exactly this board.
Layout values belong to the style, not the run. Every later video in the same style uses them, and a package update replaces the shipped styles. Before the first such edit the agent tells you this. Copy the styles to a folder of your own and point styles_dir at it, as the sample run did; see Keep your changes safe.
4.13 The video and Gate 3
The script renders videos\final.mp4 from the approved board, plus one Scene-NN.mp4 clip per scene. The pen draws each segment while its sentence is spoken. The camera holds on each group of drawings and glides once to the next group, flow arrows are drawn during the glides, and the video ends with a zoom-out to the whole board.
The sample video, 32.2 seconds at 1920×1080, from start to end:
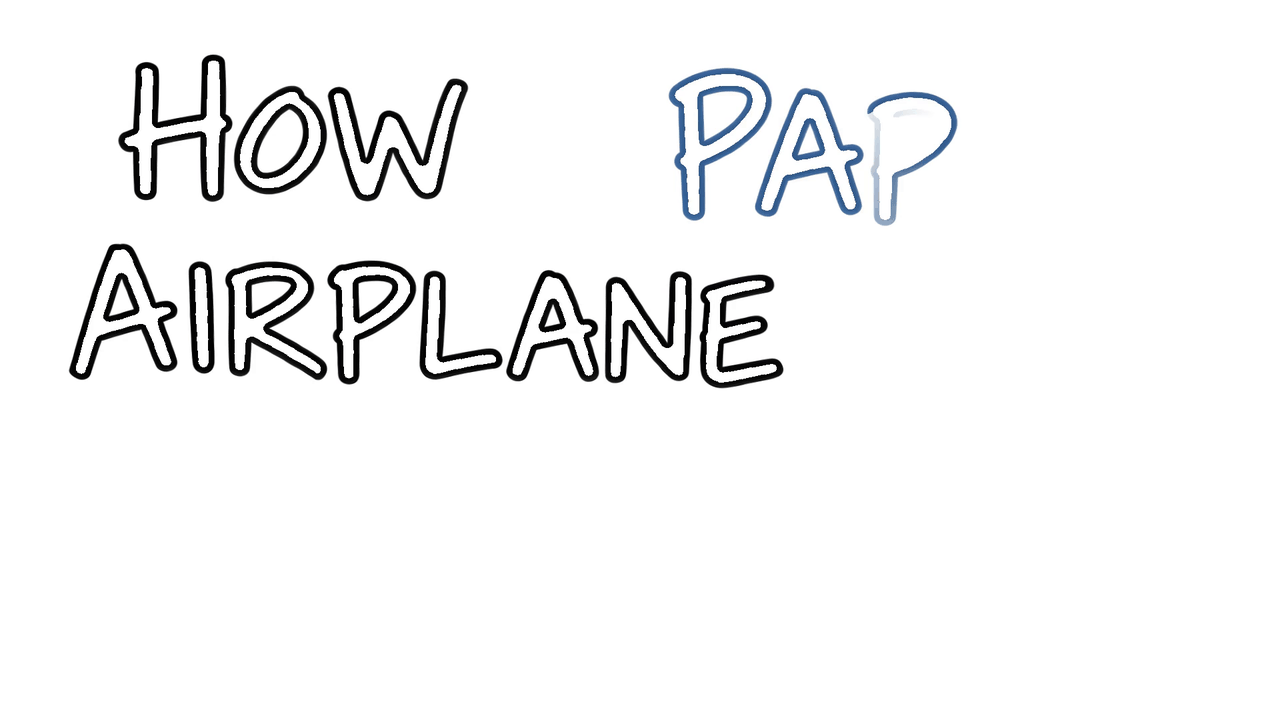
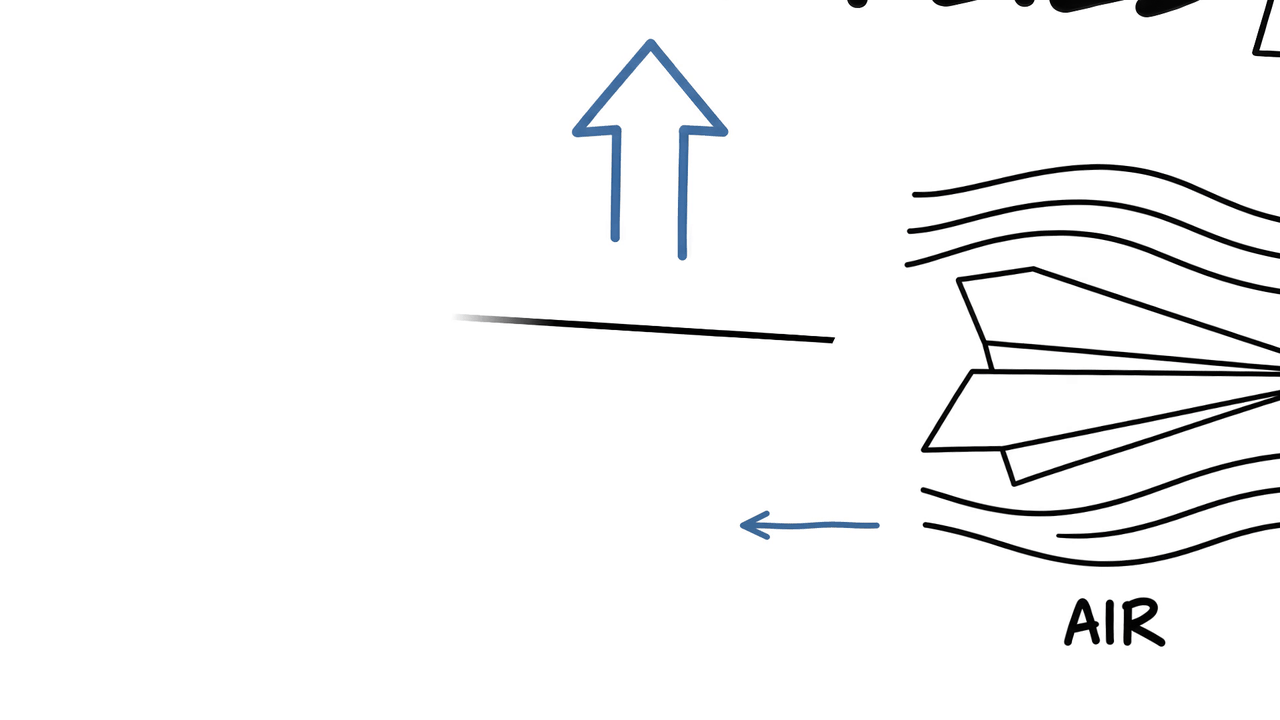
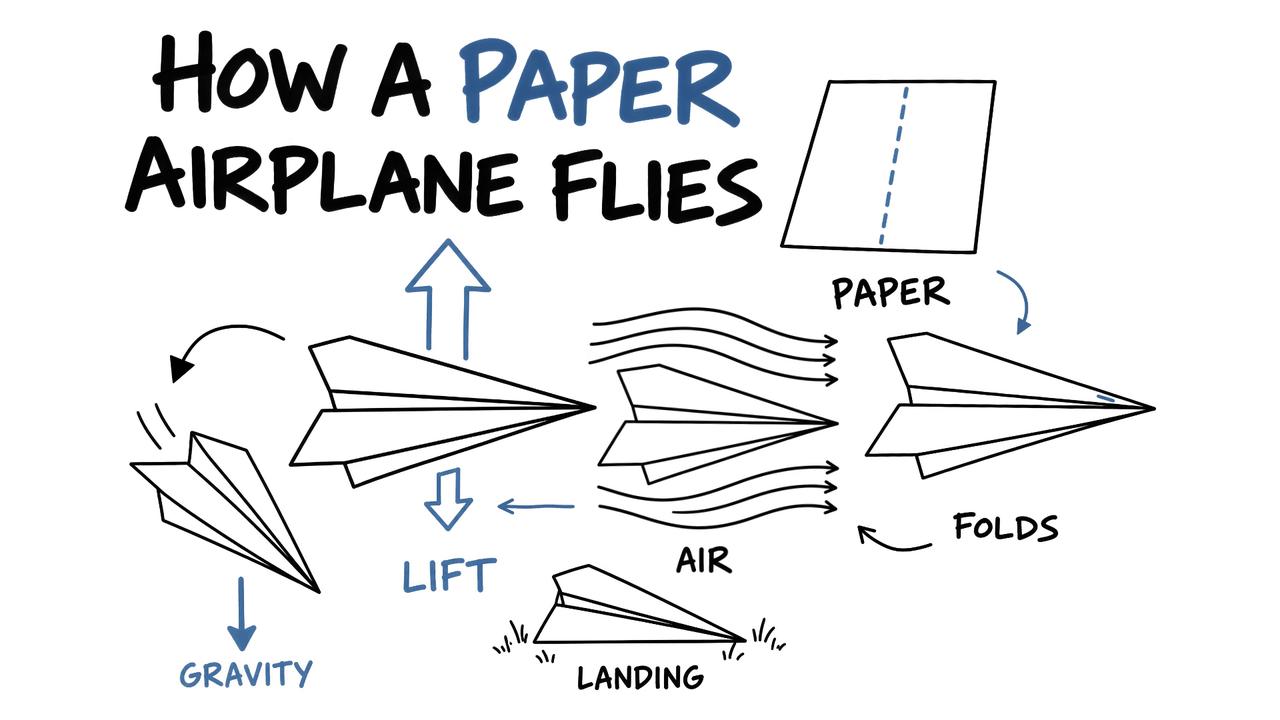
Gate 3 asks about the whole video. In the sample run it was approved in round 1. The screenshot shows the page reopened afterwards: all four gates passed, and the header says when the answers were submitted.
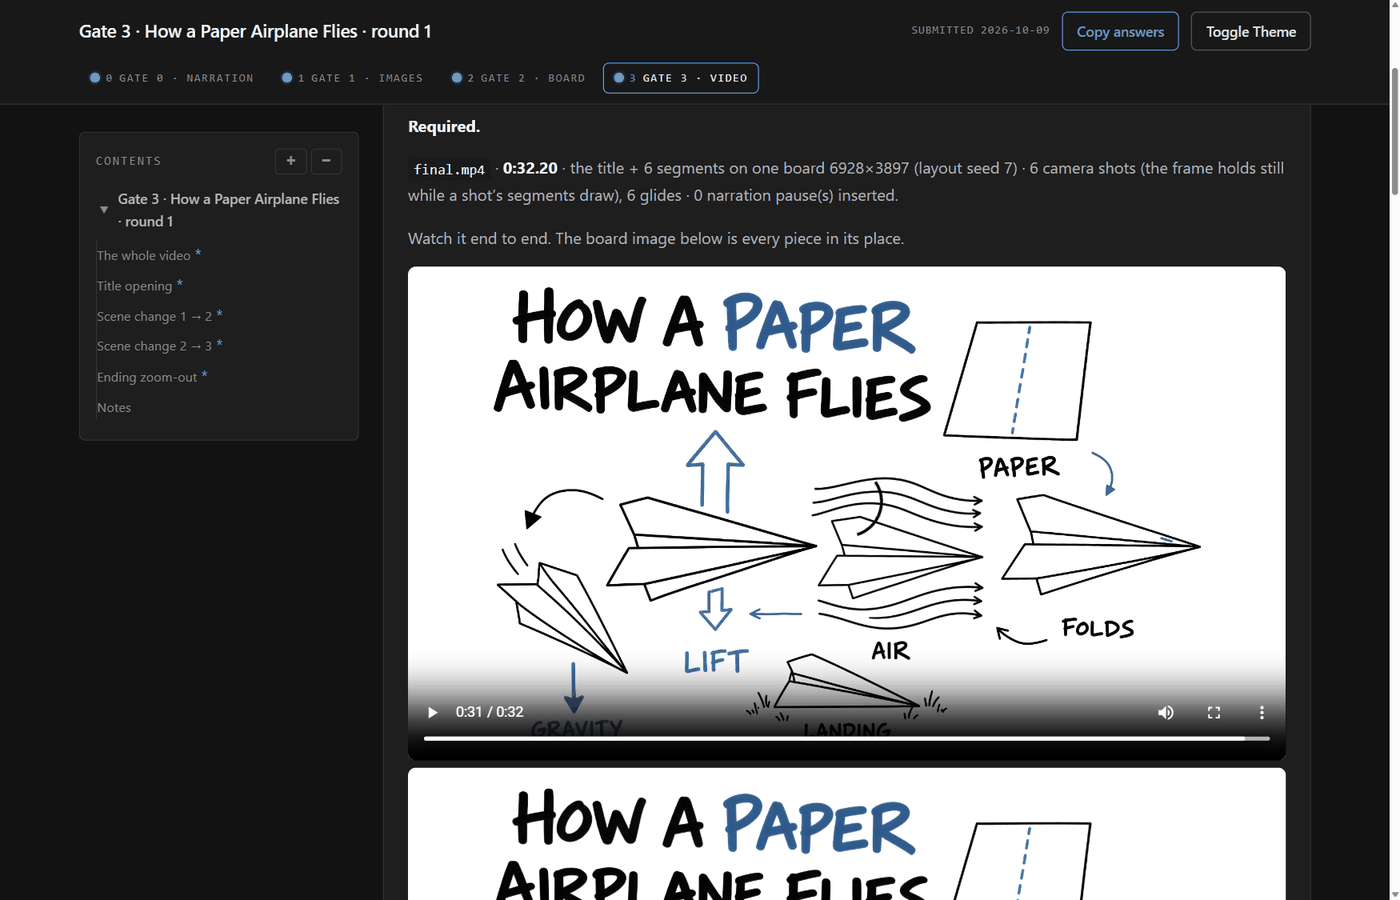
What the page shows
- The whole video: the video, a summary line (length, number of camera shots and glides, inserted pauses) and the board picture.
- Title opening: a clip from the start until just after the camera leaves the title.
- One question per scene change: a clip from 1.5 seconds before the camera moves from one scene to the next until 1.5 seconds after.
- Ending zoom-out: a clip from 1 second before the zoom-out to the end.
Every question is asked again in each round, because a rebuilt video can change anywhere.
Notes that work well:
-
Hold longer on each group before moving on. -
Too much camera motion; use bigger groups. -
Frame the drawings tighter. -
The glide into scene 3 is too fast. -
The zoom-out at the end is too quick.
What happens next. Camera notes become camera values in the style’s module.json (how many drawings per shot, hold time, glide time, framing), and the video is rendered again. Your Gate 2 approval stays. Like the layout, camera values are shared by every run in the style. A layout note (moving drawings, arrows) goes back through a new board and Gate 2. When you approve every question, the run is done: scribe.py status says done, and your video is videos\final.mp4.
If you tell the agent in the chat that the video is fine instead of answering the page, it records that and stops. It never fills in a gate page for you.
4.14 Answering a gate page
Every gate page works the same way.
Required items. Items marked Required (a * in the contents list on the left) need an answer: pick Approve or Edit (say what in the note). Notes are optional on an approval and needed on an edit. The Notes box at the end takes anything else.
Copy answers, then paste. When you are done, click Copy answers in the header. Your answers are copied as one block of JSON. Paste it into the chat with the agent. Don’t save the page as a file. The agent saves your answers next to the page and applies them. If a required answer is missing, it tells you which one and asks you; it never invents an answer.
If copying is blocked. Some browsers block clipboard access for local pages. The page then opens a panel with the answers selected and the message “Clipboard access was blocked. Press Ctrl+C, then paste the selected JSON into chat. Esc closes.” Do exactly that.
Drafts stay in the browser. The page saves your choices and notes in the browser as you go (the header says “draft saved”). If you close the tab or reload, they come back (“draft restored”). Drafts belong to that page in that browser, so a different browser or a private window starts empty. Each new round is a new page and starts fresh. After the agent has applied a round, reopening its page shows your submitted answers and the date they were submitted.
Light or dark. Toggle Theme in the header switches between a dark and a light page.
The page didn’t open? See A gate page won’t open.
4.15 The gate bar
As soon as a run has pages for two gates, every gate page (older ones too) shows a bar in its header. It has one spot per gate built so far, up to four: Gate 0 · Narration, Gate 1 · Images, Gate 2 · Board and Gate 3 · Video. Each spot links to that gate’s newest page, so you can look back at earlier gates. The page you are on has an outline in the accent colour. Hover over a spot to see its state in words (waiting, answered or accepted). Gate 0 pages of a new run show no bar yet, because Gate 0 is the only gate so far.

The dot shows the state of each gate’s newest round:
| Dot | Meaning |
|---|---|
| Hollow ring | Built and waiting for your answers |
| Half-filled grey ring | Answered, with edits requested; a new round follows |
| Solid accent dot (blue in the shipped look) with a soft halo | Passed |
5. Narration options
The setting narration.engine picks who speaks. Set it in settings.local.json and run narrate.py doctor afterwards; it checks only the selected engine.
| Engine | Who speaks | What it needs |
|---|---|---|
recorded (default) |
You, reading narration\reading.md |
faster-whisper only (README step 4) |
elevenlabs |
ElevenLabs text to speech: your own cloned voice or a library voice | An ElevenLabs account, ELEVENLABS_API_KEY, tts.elevenlabs.voice_id |
openai |
OpenAI text to speech with a preset voice | An OpenAI API key in OPENAI_API_KEY, tts.openai.voice |
qwen-clone |
A clone of your voice made on your own graphics card with Qwen3-TTS | A third venv, the model, a 10-20 s sample of your voice and its exact transcript |
Every engine goes through the same transcript check as a recording, and the result is the same narration track and timing. The synthetic engines try up to three takes per sentence and keep the first that passes.
API keys go in the environment, never in a settings file. To set one permanently for your Windows account:
setx ELEVENLABS_API_KEY "your-key"
setx OPENAI_API_KEY "your-key"
setx affects new windows only, so close and reopen your terminal and your harness afterwards.
recorded
The default. There is nothing to set up beyond the install. The workflow is in 4.6 Record the narration.
elevenlabs
-
Put your API key in
ELEVENLABS_API_KEY(above). -
Pick a voice. To clone your own voice, record one to two minutes of clean speech and run:
& $py "SKILL_DIR\scripts\narrate.py" clone-voice --sample my-voice.wavIt prints the new voice id. Options:
--name "My narrator"names the voice in your ElevenLabs Voices, and--remove-background-noisecleans the sample first. You can also copy the id of a library voice from elevenlabs.io under Voices. -
Add to
settings.local.json:{ "narration": {"engine": "elevenlabs"}, "tts": {"elevenlabs": {"voice_id": "the-voice-id"}} }
tts.elevenlabs.output_format defaults to mp3_44100_128, which works on every plan; 44.1 kHz WAV or PCM needs ElevenLabs’ Pro plan. If your account uses EU data residency, set tts.elevenlabs.base_url to https://api.eu.residency.elevenlabs.io.
openai
-
Put your API key in
OPENAI_API_KEY(above). -
Add to
settings.local.json:{ "narration": {"engine": "openai"}, "tts": {"openai": {"voice": "marin", "instructions": "Calm, warm storyteller; unhurried."}} }
Voices: alloy, ash, ballad, coral, echo, fable, nova, onyx, sage, shimmer, verse, marin and cedar (OpenAI recommends marin or cedar). instructions sets the speaking style (not with the tts-1 models). OpenAI’s usage policy asks you to tell viewers the voice is AI-generated.
qwen-clone
A local clone of your own voice. It runs on your NVIDIA card and needs no account. The setup (the venv, the model download, the settings) is in the README under Narration: who speaks. You supply:
-
tts.reference_wav: a clean 10-20 second WAV of your voice, one speaker, no music. -
tts.reference_text: a.txtfile with the exact words of that WAV.
Setting tts.presence_eq to vendor/qwen-tts/presence-eq.sh gives the cloned voice a little more presence. Only clone a voice you have the right to use.
Switching engines mid-run
Each sentence remembers which voice made it. After you switch engines (or voices), every sentence counts as changed and is made again in the new voice, so one track never mixes voices. The video is then rendered again too.
Your own voice profile
The voice profile describes how the narrator talks; the writer writes in it and the voice review checks against it. The sample, SKILL_DIR\profiles\sample-narrator.md, is a calm, friendly explainer. To use your own:
-
Copy it somewhere outside SKILL_DIR (so updates don’t overwrite it), for example
%USERPROFILE%\Documents\scribe\my-voice.md. - Describe your voice: who is speaking, cadence, words to avoid, how you open and close.
-
Point
voice_profileat it insettings.local.json. -
Raise its
Version:line whenever you change it. A narration reviewed against an older version gets a new voice review.
6. Styles and colours
The two styles
| Style | Look |
|---|---|
rsa_animate (default) |
Black chisel-marker line art in the manner of the RSA Animate explainers: cartoon figures with big expressive heads, visual metaphors, speech bubbles and short hand-lettered ALL-CAPS labels. One accent colour, used sparingly for emphasis words, arrows and key highlights. The sample run uses it. |
sketchnote |
The same drawing language, a little more colourful: about four in five labels are black, the one or two most important words are in the accent, and the accent marks the key shapes. |
Both share the same drawing speed, board layout and camera values. Pick the style when you start a run (see 4.2); it is fixed once the pictures start.
Each style is a folder with three files:
-
palette.json: the colours, the only place to change them. -
style_guide.md: the wording the image prompts use (theimage-promptblock for scenes and character sheets, thetitle-colourblock for the title card). -
module.json: drawing speed, board layout and camera values.
The styles live in SKILL_DIR\styles unless you set styles_dir.
Keep your changes safe: shared styles
A style’s files are read by every run in that style. An edit made for one video changes every later video in the style:
-
a Gate 2 layout edit (gaps, seed, arrows) in
module.json, -
a Gate 3 camera edit in
module.json, -
a colour change in
palette.json.
A package update also replaces SKILL_DIR\styles with fresh copies. So before the first edit, copy the styles to a folder of your own and point styles_dir at it. This is what the sample run did before its Gate 2 edit:
Copy-Item -Recurse "SKILL_DIR\styles" "$env:USERPROFILE\scribe-styles"
{"styles_dir": "%USERPROFILE%/scribe-styles"}
From then on every edit goes into your copy. To keep different looks for different kinds of videos, copy a style folder inside your styles folder under a new name (for example rsa_animate_wide) and ask for that style by its folder name when you start a run.
Changing the accent colour
The shipped palettes are black ink plus one muted blue accent:
"colours": {
  "ink":  {"name": "black",      "hex": "#000000"},
  "main": {"name": "muted blue", "hex": "#3D6A99"}
},
"arrows": {"ink": 0.6, "main": 0.4}
To use another accent, change main’s name and hex, for example {"name": "forest green", "hex": "#2F6B3A"}. The rules:
-
nameis the colour in plain words the image model understands. Keepink’s name one word, because the prompt says “pure-black”. -
hexis#RRGGBB. -
Every colour must be clearly darker than
ink_thresholdinmodule.json(luminance below 200 by default), or the pipeline does not see it as ink. Pastels and light yellows fail; the doctor names the colour and its luminance. -
arrowssets how often the board’s flow arrows use each colour (here 60% black, 40% accent). - The board is always white.
To add a second accent, add a role (for example second), use it in the style guide’s prompt blocks as {second} (its name) or {second.hex}, and list it under arrows if the arrows should use it.
Colours are targets for the image model. Nothing measures them, and no picture is scored on colour.
Change colours before you start a run. A change midway affects the run like this:
| What | Effect of a colour change |
|---|---|
| Scene pictures already chosen | Kept as they are. Only scenes drawn again later use the new colour. |
| Title card | Drawn again (a new title round). |
| Character sheets | Drawn again only if the agent rebuilds them (characters.py build --force). |
| Board | Built again if any arrow changes colour, so Gate 2, the video and Gate 3 come again. |
To check a new colour, run & $py "SKILL_DIR\scripts\render_scenes.py" doctor --style rsa_animate. It checks the palette and the style guide.
Gate page colours
The gate pages use plain greys and one blue accent, in a dark and a light theme. To change the accent, edit --accent, --accent-hover, --accent-soft and --on-accent in both theme blocks of SKILL_DIR\vendor\html-questions\assets\page.css. The style is copied into each page when it is built, so only pages built afterwards get the new colours. An update replaces this file too, so keep a copy of your edit.
7. Settings reference
Settings live in three files, read in this order; a later file overrides an earlier one key by key:
-
SKILL_DIR\settings.json: the package defaults, with a note on every key. Don’t edit it, because updates replace it. -
SKILL_DIR\settings.local.json: your machine’s values. List only the keys you change. -
The file named by the environment variable
SCRIBEBOARD_SETTINGS, if it is set.
Rules:
-
Nested keys are written nested:
narration.engineis{"narration": {"engine": "recorded"}}. -
Use forward slashes in paths (
%USERPROFILE%/tools/realesrgan). In JSON a single backslash breaks the file; write\\if you must use backslashes. -
%VARS%and~expand. A relative path is relative to the folder of the file that sets it. -
nullmeans “not set”; what that means for each key is in the tables. - An unknown key is refused, so a typo never silently does nothing.
render_scenes.py doctor lists every value with the file it came from.
Paths and tools
| Key | Default | What it does | When to change |
|---|---|---|---|
python |
null (the Python running the script) | The scripts’ Python. The scripts start their child scripts with it, and the agents run every command with it (they look it up with settings.py python) |
Always: set it to the venv from README step 2 |
realesrgan_dir |
null | The folder holding realesrgan-ncnn-vulkan.exe and models\, which enlarges every picture to 4K |
Always: README step 3 |
asr.whisper_python |
null | python.exe of the faster-whisper venv, which checks every narration sentence and cuts your recording |
Always: README step 4 |
chrome |
null (the default browser) | The chrome.exe that opens gate pages in a new tab |
When gate pages should open in Chrome and Chrome is not your default browser |
styles_dir |
styles (inside SKILL_DIR) |
The folder of the styles | Before your first style, layout or camera edit (6) |
voice_profile |
profiles/sample-narrator.md |
The voice the narration is written in and checked against | When you have your own profile (5) |
gpu_queue |
null (GPU work runs directly) | An optional hook: a PowerShell script that runs each GPU job inside a lease, for a graphics card shared with other work. It is called as <script> run -Agent NAME -Purpose TEXT -Timeout SECONDS -Payload COMMAND; exit 75 means no lease before the timeout |
Only if you already run such a queue |
gpu_queue_log |
null | The queue’s log, named in lease error messages | With gpu_queue only |
powershell |
null (pwsh if on PATH, else powershell) |
The PowerShell that runs the gpu_queue script |
With gpu_queue only, to pick a specific PowerShell |
Narration
| Key | Default | What it does | When to change |
|---|---|---|---|
narration.engine |
recorded |
Who speaks: recorded, elevenlabs, openai or qwen-clone |
To use a synthetic voice (5) |
tts.presence_eq |
null (loudness normalisation only) | A presence-eq.sh file with an ffmpeg EQ for the narration track |
vendor/qwen-tts/presence-eq.sh suits qwen-clone |
tts.elevenlabs.voice_id |
null | The ElevenLabs voice id (from clone-voice or your ElevenLabs Voices) |
Required for elevenlabs |
tts.elevenlabs.model_id |
eleven_multilingual_v2 |
The ElevenLabs model; null = the API’s default | Rarely |
tts.elevenlabs.output_format |
mp3_44100_128 |
mp3_*, wav_* or pcm_*; 44.1 kHz WAV/PCM need the Pro plan |
Rarely |
tts.elevenlabs.base_url |
null (https://api.elevenlabs.io) |
The API server | For EU data residency: https://api.eu.residency.elevenlabs.io |
tts.openai.model |
gpt-4o-mini-tts |
gpt-4o-mini-tts, tts-1 or tts-1-hd |
Rarely |
tts.openai.voice |
marin |
The preset voice | To try another voice |
tts.openai.instructions |
null | The speaking style, for example “Calm, warm storyteller; unhurried.” (not for tts-1*) |
To shape the delivery |
tts.openai.base_url |
null (https://api.openai.com/v1) |
The API base | Only for a compatible proxy |
tts.qwen_python |
null | python.exe of the Qwen3-TTS venv |
Required for qwen-clone |
tts.qwen_synth |
vendor/qwen-tts/qwen_tts_synth.py |
The voice clone synthesis script (bundled) | Never |
tts.reference_wav |
null | Your 10-20 s voice sample | Required for qwen-clone |
tts.reference_text |
null | A .txt with the exact words of the sample |
Required for qwen-clone |
Package internals (leave as they are)
| Key | Default | What it does |
|---|---|---|
render.engine_registry |
vendor/render/engines.json |
The image engine registry; it finds the ChatGPT driver |
render.prompt_meta_dir |
vendor/render |
The folder with prompt_meta.py, which stamps every picture with its prompt |
render.drivers.chatgpt |
null (from the registry) | The ChatGPT driver, codex_render.py |
html_questions |
vendor/html-questions/scripts/html_questions.py |
Builds and reads the gate pages |
engines.qwen |
false |
Keep false: the local Qwen-Image engines are not part of this package |
render.drivers.qwen_t2i, render.drivers.qwen_ref, comfy_host, md_questions_legacy |
null / unused | Not used by this package |
8. How scoring and attempts work
Every scene picture (and the title card) is checked by a review agent that did not draw it. The reviewer only answers a checklist; the script computes the score. A picture starts at 100 points and loses points for each finding:
| Finding | Points |
|---|---|
| A drawing is missing | 20, fails the attempt |
| A label is misspelled or missing | 20, fails the attempt |
| A hand, pen or marker is visible | 15, fails the attempt |
| A drawing is cut off at the edge | 15, fails the attempt |
| A character doesn’t match its sheet | 20 each, fails the attempt |
| Frame or border; background not plain white; photo or 3D look; gradients or grey wash | 15 each |
| Text nobody asked for | 10 each |
| Drawings touching or overlapping | 10 |
| Layout not followed | 10 |
| Drawing style differs from scene 1 | 10 |
| An object nobody asked for | 5 each |
Pass: a score of 80 or more and no finding that fails the attempt. Colour is never scored. In the sample run every scene and the title scored 100.
Attempts. Each scene gets up to five attempts per round:
- ChatGPT gets two tries per attempt. If both fail (an error, a refusal, a timeout), the attempt counts as failed and the next one starts.
- An attempt whose worker died or ran longer than 120 minutes is recorded as failed (“render stalled”) and counts too.
- A review that fails names a required fix, which goes into the next attempt’s prompt.
- A pass ends the round, and that picture is used.
Flagged. When five attempts end without a pass, the best one is kept and flagged. “Best” means that an attempt whose checklist passed beats one with a missing drawing or a wrong label; among those, the highest score wins. Gate 1 shows flagged scenes like any other. Look closely, then approve it if you can live with it, or edit it with a note, which starts a new round of five attempts. A flagged title card says so on Gate 1 and asks you to check the spelling.
Exhausted. A scene is exhausted when its five attempts produced nothing that could even be reviewed, usually because every render failed. The agent stops and tells you. What to do:
- Run the render doctor and check the Codex line (Codex login). Check that your ChatGPT plan still has image generation available.
- If ChatGPT refuses or replaces the content (a copyrighted character, a real person), ask the agent to change that drawing’s description in the script.
- Ask the agent to start a new round for the scene with a note. Each new round gets five fresh attempts.
Density warnings. After a pass, the script measures how long each segment will take to draw and compares that with the time its sentence gives it; the target band is 75% to 125%. A segment outside the band gets a density warning on the verdict and nothing more: the attempt still passes. The video absorbs the difference. A segment that draws too slowly may be drawn up to 1.35 times faster, a pause is inserted when even that is not enough, and a quick drawing simply finishes early while its sentence goes on.
In the sample run four of the six segments were outside the band, all on the quick side (41% to 67% of their sentence’s time), and the video was fine: those drawings simply finish early while their sentence goes on. Act only if the video at Gate 3 looks rushed or idle at that spot; then edit the scene at Gate 1 (“simpler”, “more detail”). Setting density_mode to "fail" in the style’s module.json makes a miss fail the attempt instead, with a generated fix; that costs more attempts.
9. Files in a run folder
These are the files you may want to open. Never edit the files the scripts own (state.json, checklists, verdicts, pictures); the agent changes things through the scripts.
| Path | What it is |
|---|---|
story.md |
Your story (any Markdown file you named) |
narration.json |
The narration text: paragraphs and numbered sentences |
script.json |
The visual script: style, scenes, drawings, labels, layout, which sentence reveals what, the title text |
voice\voice.json |
The latest voice review: status, score, flagged sentences and their fixes |
narration\reading.md |
(recorded) Your reading script, with any sentences to re-record on top |
narration\recording.wav |
(recorded) Your reading (or .mp3, .m4a, .flac) |
narration\retake_<id>.wav |
(recorded) Single-sentence retakes |
narration\segment_<id>.wav |
Each sentence’s audio as cut and checked |
narration\narration.wav, narration.mp3 |
The finished narration track |
alignment.json |
When each sentence starts and ends in the narration |
characters\<id>_sheet.png |
Character sheets |
scenes\scene_<N>_4k.png |
The chosen picture of each scene (3840×2160) |
scenes\scene_<N>_seg_<id>_highlight.png |
The segment highlights shown at Gate 1 |
scenes\attempts\ |
Every attempt with its review |
scenes\run_summary.md |
A per-scene table: status, attempts, scores |
scenes\_contact.png |
The contact sheet of all chosen pictures |
title\title_4k.png |
The title card |
gates\gate<N>-r<R>\ |
Round R of Gate N: the page (.html), your answers and changes.json |
videos\board.png |
The whole board |
videos\final.mp4 |
The finished video |
videos\Scene-NN.mp4 |
One clip per scene |
videos\preview\ |
Small 960×540 previews, if the agent made any |
The gate pages show pictures, audio and video from where they are in the run folder, and the run’s files record full paths (the story, the gate answers). Don’t move or rename the run folder, or files inside it, while the run is in progress. A finished run’s videos can be copied anywhere.
10. Troubleshooting
Every script that fails prints one line starting with FAILED, followed by the reason. The agent reads it; this section is for when you want to fix things yourself.
Settings file errors
| Message | Fix |
|---|---|
FAILED settings: cannot read ...settings.local.json: ... |
The file is not valid JSON. The usual causes are single backslashes in paths (use /), a missing comma, or a trailing comma. |
FAILED settings: ...: unknown key 'x' (known: ...) |
A typo in a key name, or a key at the wrong nesting level. Compare with settings.json. |
... must be true or false / ... must be a non-empty string or null |
The wrong type: write true/false without quotes, paths and names in quotes, or null. |
FAILED settings: SCRIBEBOARD_SETTINGS=... is not a file |
The environment variable names a file that does not exist. Fix or remove it. |
render_scenes.py doctor
The render doctor collects every problem and prints them together at the end: one FAILED doctor: line, then one indented line per problem.
Problem line (under FAILED doctor:) |
Fix |
|---|---|
<key> = <path> (<file>) does not exist |
The path in that setting is wrong. Fix it in the named file. |
Codex CLI not ready (NO_CODEX ...): install it: npm install -g @openai/codex (needs Node.js), then sign in: codex login |
Install Node.js, then the Codex CLI, then sign in. See Codex login. |
Codex CLI not ready (NEED_LOGIN ...): sign in once in a terminal: codex login |
Run codex login in a terminal and sign in with a ChatGPT plan that includes image generation. |
Codex CLI not ready (...): run the driver's check by hand to see why |
Run the check yourself (see Codex login) and read its output. |
engine: registry ... does not exist, engine: chatgpt driver ... does not exist, engine: no driver for chatgpt ..., engine: chatgpt is disabled ... |
The package files or the render.* settings were changed. Remove any render keys from settings.local.json; if that does not help, install the package again (README step 1). |
upscale: realesrgan_dir is not set in settings (the folder with realesrgan-ncnn-vulkan.exe) |
Do README step 3 and set realesrgan_dir (step 5). |
upscale: ...realesrgan-ncnn-vulkan.exe not found (realesrgan_dir in ...) |
realesrgan_dir must point at the folder that directly contains the .exe. If unzipping created a subfolder, point at that subfolder. |
stamp: render.prompt_meta_dir is not set ... / stamp: no prompt_meta.py in ... |
Remove render.prompt_meta_dir from settings.local.json (the default is right), or install the package again (README step 1). |
gpu_queue in ... needs PowerShell: none on PATH, set powershell in settings |
Set powershell to your PowerShell, or set gpu_queue back to null. |
prompts: no palette at ... / prompts: no style guide at ... |
The style name is wrong, or styles_dir points at the wrong folder. The shipped styles are rsa_animate and sketchnote; a copied styles folder must hold the style folders directly. |
prompts: ...hex must look like #RRGGBB, not ... |
Fix the colour code in palette.json. |
prompts: ...: #xxxxxx has luminance N, not below module.json ink_threshold 200; ... (pick a darker colour) |
That colour is too light to count as ink. Pick a darker one. |
prompts: ... unknown key(s) ..., ... names no colour ..., ... has no ```image-prompt block |
An edit broke palette.json or style_guide.md. Compare with the shipped file. |
One problem shows up only while rendering: upscale: Real-ESRGAN lists no NVIDIA Vulkan device. Update your NVIDIA driver and check that the NVIDIA card is enabled.
narrate.py doctor
The narration doctor marks each check ok or FAIL as it goes, then ends with FAILED doctor: and the names of the failed checks.
FAIL line |
Fix |
|---|---|
python <path> |
The python setting points at a file that does not exist. |
asr.whisper_python: asr.whisper_python is not set in settings (settings.local.json) |
Do README step 4 and set asr.whisper_python. |
faster-whisper 'medium' cached locally |
The speech model is not downloaded. Run the command the line shows (README step 4, last line). |
ffmpeg on PATH / ffprobe on PATH |
Install ffmpeg (the README names a build) and add its bin folder to PATH. Close and reopen the terminal and the harness. |
elevenlabs: ELEVENLABS_API_KEY in the environment, voice set / openai: OPENAI_API_KEY in the environment, voice set |
The key is not in the environment (set it with setx and restart the harness), or tts.elevenlabs.voice_id / tts.openai.voice is not set. |
PRESENCE_EQ parsed |
The file in tts.presence_eq is not a valid presence EQ file. Use vendor/qwen-tts/presence-eq.sh or null. |
tts.qwen_python ..., qwen_tts_synth --help lists --text-file and --seed, qwen_tts importable, 1.7B model + voice reference present |
(qwen-clone) Redo the qwen-clone setup in the README: the venv, the model download (or QWEN_TTS_MODELS), and the two reference files. |
PowerShell for the GPU queue ... |
As for the render doctor above. |
FAILED narration.engine in ... is 'x'; expected one of qwen-clone, elevenlabs, openai, recorded |
A typo in narration.engine. |
Codex login
Every picture is made through the Codex CLI on your ChatGPT sign-in:
npm install -g @openai/codex
codex login
The render doctor checks the sign-in. To run the same check on its own:
& $py "SKILL_DIR\vendor\render\engines\codex\codex_render.py" check
It prints LOGGED_IN (...) when ready, NEED_LOGIN when you must sign in, or NO_CODEX when it cannot find the CLI. If codex works in your terminal but the check says NO_CODEX, set the environment variable CODEX_CMD to the full path of codex.cmd (in PowerShell: (Get-Command codex.cmd).Source) and restart the harness.
If renders start failing midway through a run, your plan’s image generation may be used up for now. Wait, then ask the agent to continue. Failed attempts count toward the five, so a scene may end flagged or exhausted (8).
The run stopped about its style
scribe.py says STOP: this run was started in style 'X' (scenes/state.json), but script.json names 'Y'. The pictures were drawn in one style and the script now names another. Tell the agent which one you want:
-
Keep the first style: the agent sets
stylein the script back. Nothing is lost. - Use the new style: start a new run folder for it (the cleanest way), or let the agent start the pictures over in the new style, which throws away every picture of this run.
A gate page won’t open
-
The page is a file in the run folder:
gates\gate<N>-r<R>\holds one.htmlfile. Open it by double-clicking, or drag it into your browser. The agent also prints its path. -
To have pages open in Chrome, set
chrometo yourchrome.exe; null uses your default browser. - If pictures or the video are missing on the page: the page shows files where they are in the run folder. Check that nothing was moved or deleted.
- Answers you already pasted for a round can’t be changed by rebuilding that round. Ask the agent for the next round instead.
Copy answers does nothing
If the browser blocks the clipboard, the page opens a panel with the answers selected. Press Ctrl+C, paste into the chat, and press Esc. If no panel appears, try another browser, or reload (your draft comes back) and try again.
A sentence keeps failing in a recording
The check compares what faster-whisper hears with the text. When one sentence fails again and again:
-
Read the transcript in the agent’s report (
REJECT | <what it heard>). It shows what went wrong. - Pace: it must be between 1.2 and 6 words per second. Very slow, drawn-out reading or long pauses inside the sentence can fail, and so can rushing.
- Unusual words (names, jargon, made-up words) may be heard differently. Speak them clearly. If the speech model keeps mishearing a word, ask the agent to reword the sentence (this goes back through Gate 0, changes only).
- Exactly the text. Read the sentence word for word, without adding “so” or “and”.
- Room and microphone: background noise or clipping hurts the transcript.
-
One recording file only:
more than one recording.* in ...narration; keep onemeans you saved, for example, bothrecording.wavandrecording.m4a. Delete one.
A retake always wins over the long recording for its sentence. If a retake is worse than the original, delete it.
Density warnings
See Density warnings. They need no action unless the video looks rushed or idle at that spot.
Starting over
- The whole video: make a new run folder with your story and ask for a new video. This is the cleanest way.
- Only the narration text: edit it at Gate 0. Everything that depends on it is redone automatically, and only what changed.
- Only one picture: edit it at Gate 1 with a note. The scene gets a new round of five attempts.
- Only the board or the camera: edit at Gate 2 or Gate 3.
Don’t delete single files from a run folder to force a redo; the driver may then rebuild more than you meant, or stop. Ask the agent instead.
11. Updating and cleaning up
Updating
Install the new version over the old folder, as in the README’s Update section. Copy the new render-scribe folder, giving the skills folder (not SKILL_DIR itself) as the destination so the copy merges into the existing folder:
Copy-Item -Recurse -Force render-scribe "$env:USERPROFILE\.claude\skills"
Or, with the release download, unzip it over the old folder:
Expand-Archive render-scribe-<new version>.zip -DestinationPath "$env:USERPROFILE\.claude\skills" -Force
(Use your harness’s skills folder.) What survives and what does not:
-
Both replace the package’s files and keep every other file in SKILL_DIR, so
settings.local.json(not part of the package) stays. Files that an older version had and the new one dropped stay behind too. -
The package’s own files are replaced:
settings.json, the styles inSKILL_DIR\styles, the sample voice profile andpage.css. Keep your own styles and voice profile outside SKILL_DIR (6, 5). Your styles copy is not updated; if the release notes mention style changes you want, compare the newSKILL_DIR\styleswith your copy. -
If the new
requirements.txtlists other versions, run README step 2’spip installagain. - Run both doctor checks afterwards.
A run you finished keeps its video. A run in progress continues with the new version; scribe.py decides from the files what, if anything, must be redone.
Cleaning up
-
A finished run: keep
videos\final.mp4(and theScene-NN.mp4clips andboard.pngif you want them). The rest of the run folder is only needed to make changes. Once you are sure, delete or archive the whole run folder. - A run you still want to change: keep the whole folder; the pipeline needs its history (attempts, reviews, gate rounds).
-
Uninstalling: delete SKILL_DIR, your styles copy, the venvs (
%USERPROFILE%\venvs\scribe,scribe-whisperand, if made,scribe-qwen-tts), the Real-ESRGAN folder, and the downloaded speech model in your Hugging Face cache (%USERPROFILE%\.cache\huggingface).