Sharpen Hard — manual
A Blender add-on that turns soft, mushy AI-generated meshes into crisp hard-surface geometry with flat n-gon panels — then re-unwraps the result and bakes the textures back from the untouched original.
Version 0.20.0. Blender 4.2 or newer. Panel: 3D viewport → N sidebar → ♥SH tab → “Sharpen Hard”, with the version and a ? in the panel’s header bar.
Source: D:\GitHub\sharpen_hard\
Contents
- What it fixes
- Quick start
- The panel, top to bottom
- Installation
- The Sharpen slider and Sharpen Cycles
- The fourteen steps
- Recipes
- Scripting
- Troubleshooting and traps
- Version history
- Related repo docs
What it fixes
Image-to-3D generators (TRELLIS.2 in this repo) hand back a dense triangle soup. A 90-degree corner is not one sharp edge — it is a chamfer spread over several triangles, each turning 10-25 degrees. Measured on two subjects, the median dihedral angle of a whole model is 0.009 degrees (a locker) and 0.098 degrees (a crate). Nothing on the mesh is flat and nothing is sharp.
Sharpen Hard alternates two operations to fix that:
- Limited dissolve merges near-coplanar faces into single n-gon panels.
- The planar walk pulls each vertex toward the best-fit plane of the faces around it, so vertices on a panel boundary converge to the intersection line of two planes and corner vertices to the corner point — a CAD-like snap.
Each planar pass makes more faces truly coplanar, which lets the next dissolve merge further. That is why the pair repeats — see The Sharpen slider and Sharpen Cycles.
Sharpening destroys the UV atlas by design. Steps 11-14 rebuild it: a fresh unwrap, a triangulation, the shading, and a bake that pulls colour, normal, roughness and metallic off the hidden original.
Quick start
Install, short version
-
Zip
D:\GitHub\sharpen_hard\and install it with Preferences → Add-ons → Install from Disk. - On Windows, if you want the Make Manifold step, open Preferences → Add-ons → Sharpen Hard and press Install Repair Support (about 3.5 MB, once per Python version).
Full detail, including the per-Python-version trap: Installation.
First run, 60 seconds
- Import or select a mesh. Object Mode, one active mesh object.
- Open the N sidebar, ♥SH tab.
- Leave the Sharpen slider in the middle.
- Press Run Checked Steps.
Steps 3 (Make Manifold), 10 (Make Planar B) and 12 (Triangulate) start unchecked and the other eleven start checked, which is the setting that measured best on finished props. Make Manifold costs 3-4x the run time and usually makes the result worse — turn it on only when dissolve is visibly stalling at open edges; see 3. Make Manifold. On Mac and Linux it cannot run at all and the step box is flagged Windows only.
Blender will freeze. That is normal — every step runs inside execute() and
the viewport cannot repaint on its own. The add-on paints the step name in the
lower left of the viewport in orange-red while it works and flashes teal for a
second when it finishes. Everything also goes to the console, prefixed
[sharpen_hard].
When it finishes you have a new object called <name>_sharp with a fresh UV
atlas and baked maps, and the original hidden beside it. The Last Run box
at the bottom of the panel holds one line per step, with the numbers each one
measured.
The panel, top to bottom
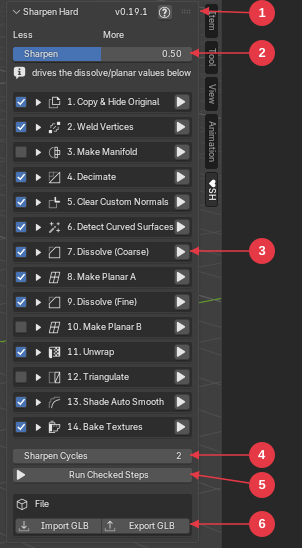
- Version and docs link — the installed version, read from the manifest, and a ? that opens this manual. Both sit in the panel’s header bar, so they are still there with the panel collapsed.
- The Sharpen slider — one dial that writes the dissolve angles, planar iterations and cycle count below it.
- The per-step ▶ button — runs that step once, whatever Sharpen Cycles says. To its left, the checkbox decides whether Run Checked Steps includes the step, and the disclosure triangle opens that step’s own settings. Steps 3, 10 and 12 start unchecked.
- Sharpen Cycles — how many times the dissolve/planar block repeats.
- Run Checked Steps — every checked step, in registry order.
- Import GLB / Export GLB — the file box. Export writes only the selected objects and skips hidden ones.
- The panel header carries the version on the right and a ? button that opens this manual at https://cw1.me/sharpenhard-docs. Both sit in the header bar itself, so they are still there with the panel collapsed. The version is read from the manifest, so it always matches what is installed.
- Less / More labels, then the Sharpen slider, then the note “drives the dissolve/planar values below”.
- Fourteen boxes, one per step, numbered 1. to 14.. Each box has a checkbox (does Run Checked Steps run it), a disclosure triangle (its settings), the step name with an icon, and a ▶ button that runs only that step, once.
- Sharpen Cycles.
- Run Checked Steps.
- File — Import GLB and Export GLB. See below.
-
Last Run — one line per step and a
total <n>sline, kept until the next run.
File — Import GLB and Export GLB
The pipeline starts from a GLB and usually ends as one, and Blender’s own glTF operators sit several menus deep. These are the same operators, aimed at the one format this add-on cares about.
Import GLB loads a .glb or .gltf and leaves what it brought in
selected, with the first mesh active — ready for step 1 without another
click. It does not join multiple objects into one: that is a decision about
the asset, not a detail, so make it yourself if you want a single mesh.
Export GLB writes only the selected objects, and skips hidden ones. That matters here: step 1 leaves the original hidden in the file as the bake source, and it has no business in an export. The file is named after the active object rather than the .blend. The button is greyed out with no mesh selected.
Installation
Sharpen Hard is a Blender extension: it carries a
blender_manifest.toml, not a bl_info block.
| field | value |
|---|---|
| id | sharpen_hard |
| name | Sharpen Hard |
| version | 0.20.0 |
| type | add-on |
blender_version_min |
4.2.0 |
| licence | GPL-3.0-or-later |
| maintainer | Chipp Walters chipp@altuit.com |
Manifest: D:\GitHub\sharpen_hard\blender_manifest.toml
The add-on needs nothing beyond Blender itself. NumPy ships with Blender. The only optional download is the Windows repair support for step 3.
Install the add-on
From a zip
Zip the folder D:\GitHub\sharpen_hard\ and use
Edit → Preferences → Add-ons → Install from Disk.
The manifest’s paths_exclude_pattern keeps libs/, testing/,
__pycache__/ and *.pyc out of a built extension, so a zip built by
blender --command extension build ships without repair support. You download
that once from inside Blender — see below.
As a linked folder
The related Make Manifold add-on is installed on this machine by junctioning its source folder into the portable Blender’s extension directory, for example:
E:\BlenderTestEnvironment\blender-5.0.0-stable.a37564c4df7a\portable\extensions\user_default\make_manifold
The same layout works for sharpen_hard. Edits to the source are then live
after a Blender restart. Installed this way the module is
bl_ext.user_default.sharpen_hard.
Headless, straight from the repo
The pipeline scripts never install the add-on. They register it from the repo,
after disabling any extension install of the same id — registering twice makes
the second registration steal every class from the first. The helper is
load_sharpen_addon() in D:\GitHub\model-roboto\scripts\kpack_stage.py:
import addon_utils
addon_utils.disable("bl_ext.user_default.sharpen_hard", default_set=False)
sys.path.insert(0, r"D:\GitHub")          # the folder holding sharpen_hard\
import sharpen_hard
sharpen_hard.register()
assert hasattr(bpy.context.scene, "sharpen_hard")
Never call bpy.ops.wm.read_factory_settings() in a headless stage. It
resets preferences, which unregisters every add-on, and the failure then looks
like a missing module. Use bpy.ops.wm.read_homefile(use_empty=True).
Dependencies: the Windows repair engine
One optional download, needed only by step 3. Every other step works without it, and it is never fetched unless you press the button.
Edit → Preferences → Add-ons → Sharpen Hard shows a Dependencies block with its status and Install button, followed by two path overrides:
- Python — an interpreter override. Leave it empty and the add-on uses Blender’s own bundled Python.
-
Libraries — a folder override for the WinRT packages. Leave it empty and
the add-on uses a
libsfolder beside itself, or Make Manifold’s if that add-on already downloaded them.
Repair support for step 3, Make Manifold
Step 3 hands the mesh to the repair engine that ships with Windows — the
netfabb-derived code under 3D Builder, reachable as the WinRT namespace
Windows.Graphics.Printing3D. Blender does not bundle the Python projection
for it, so five packages have to be downloaded once:
winrt-runtime
winrt-Windows.Foundation
winrt-Windows.Storage
winrt-Windows.Storage.Streams
winrt-Windows.Graphics.Printing3D
About 3.5 MB in total. The list is printed at the bottom of the preferences box.
The button
The Windows Repair Support box in preferences shows either
“Repair support found (cp313): <path>” with a checkmark, or
“No repair support for cp313 (this Blender’s Python).” with an error icon,
and an Install Repair Support button. The button runs
python -m pip install --upgrade --target <libs>\<tag> with all five wheels
in one call, and reports the folder they landed in.
The same warning box and the same button appear inside step 3’s settings drawer in the N-panel, so you find out before a run rather than twenty minutes into one.
On Mac and Linux
Everything except step 3 works. The add-on installs and registers normally, and the other thirteen steps behave exactly as they do on Windows.
Step 3 is unchecked by default there, and its box in the panel is flagged unusable in this slot in red — on the closed box, not buried in the drawer, so you see it before you press anything. The step is never removed from the list; it sits in place, marked unusable. The preferences page says the same.
If you check it anyway, the step raises the Windows repair engine needs Windows and the whole run stops there, because one failing step aborts the
chain. You would be left with the original hidden and a copy that got only as
far as step 2. Nothing is silently skipped and nothing is faked — but there is
nothing to gain by checking it either.
The same red flag appears on Windows when the WinRT packages are missing for this Blender’s Python, where it reads no repair support and the drawer offers the download button.
The support is per Python version, and that matters
The winrt wheels are compiled. They ship _winrt.cp311-win_amd64.pyd and
friends, so a set installed by one Blender is useless to a Blender on another
Python:
| Blender | Python | tag |
|---|---|---|
| 5.0 | 3.11 | cp311 |
| 5.1, 5.2 | 3.13 | cp313 |
This was a real bug, fixed in 0.11.1. Before then the add-on only checked that
a winrt folder existed, said it was ready in Blender 5.1, and the worker then
died on No module named 'winrt._winrt'. Now deps_present() looks for that
exact .pyd filename, and the status line names the tag so “not installed” on
a machine that plainly has the files reads as what it is: a different Blender.
Installs go to libs\<tag>\, for example
D:\GitHub\sharpen_hard\libs\cp313\. Each Blender
installs and finds its own.
Where it looks, in order
winrepair.libs_candidates() checks, and inside each base the <tag>
subfolder before the flat folder:
- the Libraries override from preferences
-
D:\GitHub\sharpen_hard\libs\ -
a sibling
make_manifold\libs\— extensions install as siblings underbl_ext\user_default\
The flat folder is Make Manifold’s layout, and Sharpen Hard’s own layout before 0.11.1. It is still read, but only when what is in it matches the interpreter.
So whichever add-on downloads a given version first, the other finds it, and neither ever writes into the other’s folder — that would make the two uninstall each other.
The Make Manifold add-on is not required
D:\GitHub\sharpen_hard\winrepair.py carries the whole
engine, with threemf.py and repair_worker.py beside it. Nothing in
sharpen_hard imports make_manifold. That add-on is a bench that measures
the same engine against Blender’s 3D Print Toolbox; the two only ever share the
3.5 MB.
Installing by hand
If the button cannot reach the network, run pip yourself against the interpreter that Blender uses:
"<blender>\<version>\python\bin\python.exe" -m pip install --upgrade ^
  --target "D:\GitHub\sharpen_hard\libs\cp313" ^
  winrt-runtime winrt-Windows.Foundation winrt-Windows.Storage ^
  winrt-Windows.Storage.Streams winrt-Windows.Graphics.Printing3D
All five in one call. pip install --target --upgrade prunes the target
directory of anything it thinks it owns, so installing them one at a time
silently deletes the previous one.
Check the install
Headless smoke test, which exercises every step, the whole chain, the cycle expansion, the preview and the curved-surface protection:
blender.exe -b -P "D:\GitHub\sharpen_hard\testing\run_headless_test.py" -- <model.glb>
Exit code 0 is a pass; it prints [PASS] all sharpen_hard smoke tests passed.
Failures print as [FAIL] <what> and the script exits 1.
The Sharpen slider and Sharpen Cycles
The slider
At the top of the panel: a Less / More row, the Sharpen slider, and the note “drives the dissolve/planar values below”.
One dial, sharpen_amount, range 0.0 to 1.0, default 0.5. Moving it writes
seven values into the per-step settings:
| written value | at 0.0 | at 0.5 | at 1.0 |
|---|---|---|---|
Max Angle (coarse) — angle_coarse |
10° | 20° | 30° |
Max Angle (fine) — angle_fine |
1° | 3° | 5° |
Iterations A and B — planar_iters_a/b |
1 | 2 | 3 |
Factor A and B — planar_factor_a/b |
0.50 | 0.75 | 1.00 |
Sharpen Cycles — cycles |
1 | 2 | 3 |
Every value in that table is also the property’s own default, so the middle of the slider and an untouched scene agree. Moving the slider to 0.5 changes nothing.
The coarse range was 15-35 between 0.12.11 and 0.19.0, putting 25° at the midpoint on the reasoning that 25 merges more near-coplanar mush into single panels than 20. That made the panel lie: a fresh scene showed the property default of 20°, and the number silently became 25 the first time anyone touched the slider. 0.19.1 put the range back to 10-30. The span is 20° either way, so the slider still means the same thing end to end.
Hand-edited values survive until the slider moves again
Open a step’s drawer and type a number, and it stays. Nothing recalculates it
behind your back. The next time sharpen_amount changes, every one of the
seven is written over.
So the working order for scripts is: set the amount first, then any
override. D:\GitHub\model-roboto\scripts\bench\sharpen_arm.py does exactly
that, with a comment saying why.
The angles are radians, and they clamp silently
angle_coarse and angle_fine are subtype='ANGLE' properties — Blender
stores them in radians — capped at radians(60) and radians(15). Pass
degrees straight in from a script and Blender clamps without complaint.
This ran the same experiment three times. A sweep asking for 10, 14 and 17.8 degrees set all three to 60 degrees and produced three byte-identical meshes. Nothing failed; the run looked clean.
s.angle_coarse = math.radians(deg)
if abs(math.degrees(s.angle_coarse) - deg) > 0.01:
    raise SystemExit("angle_coarse %s deg was clamped to %.2f"
                     % (deg, math.degrees(s.angle_coarse)))
One real datum survived that mistake: at 60 degrees one subject collapsed to 11,830 faces against 37,534 at 20, and took 446 s against 161 s. The dissolve gets dramatically slower as it merges more.
Sharpen Cycles
At the bottom of the panel, above Run Checked Steps.
| setting | label | default | range |
|---|---|---|---|
cycles |
Sharpen Cycles | 2 | 1 - 10 |
It repeats only the checked dissolve/planar block:
dissolve_coarse → planar_a → dissolve_fine → planar_b
Each planar pass makes more faces truly coplanar, so the next dissolve merges further. The property’s own description says 2-4 captures most of the benefit.
What repeats and what does not
The runner takes the checked steps in registry order, then replaces the first
block member with the whole block repeated cycles times, dropping the later
members from their original positions. With everything checked and cycles = 3:
copy  weld  manifold_early  decimate  clear_normals  detect
  dissolve_coarse planar_a dissolve_fine planar_b
  dissolve_coarse planar_a dissolve_fine planar_b
  dissolve_coarse planar_a dissolve_fine planar_b
unwrap  triangulate  bake  auto_smooth
Uncheck a block member and it drops out of every repeat — unchecking
Make Planar A and Make Planar B gives you dissolve_coarse → dissolve_fine, three times over.
Detect Curved Surfaces is deliberately outside the block. It must run once, on pristine geometry: after a dissolve leaves a few giant faces, the median edge length explodes and the detector’s radius floor silently disables protection. The headless smoke test asserts this — with cycles = 3 it requires the report to show the coarse dissolve three times, the weld once and the detect once.
The ▶ buttons always run once
A per-step ▶ button runs its step exactly once, whatever Sharpen Cycles says. Cycles apply only to Run Checked Steps.
The fourteen steps
The add-on is a registry of fourteen steps. Each one is a plain function
(context, settings, obj) -> (obj, message). The ▶ button beside a step
and the Run Checked Steps button at the bottom of the panel call the same
functions, so a step behaves the same whether you run it alone while tuning or
as part of the chain.
Every step returns a message. The panel collects them in the Last Run box
and the console prints each one as it happens, prefixed [sharpen_hard].
Those numbers are the point — they are how you tell a run that worked from one
that quietly did nothing.
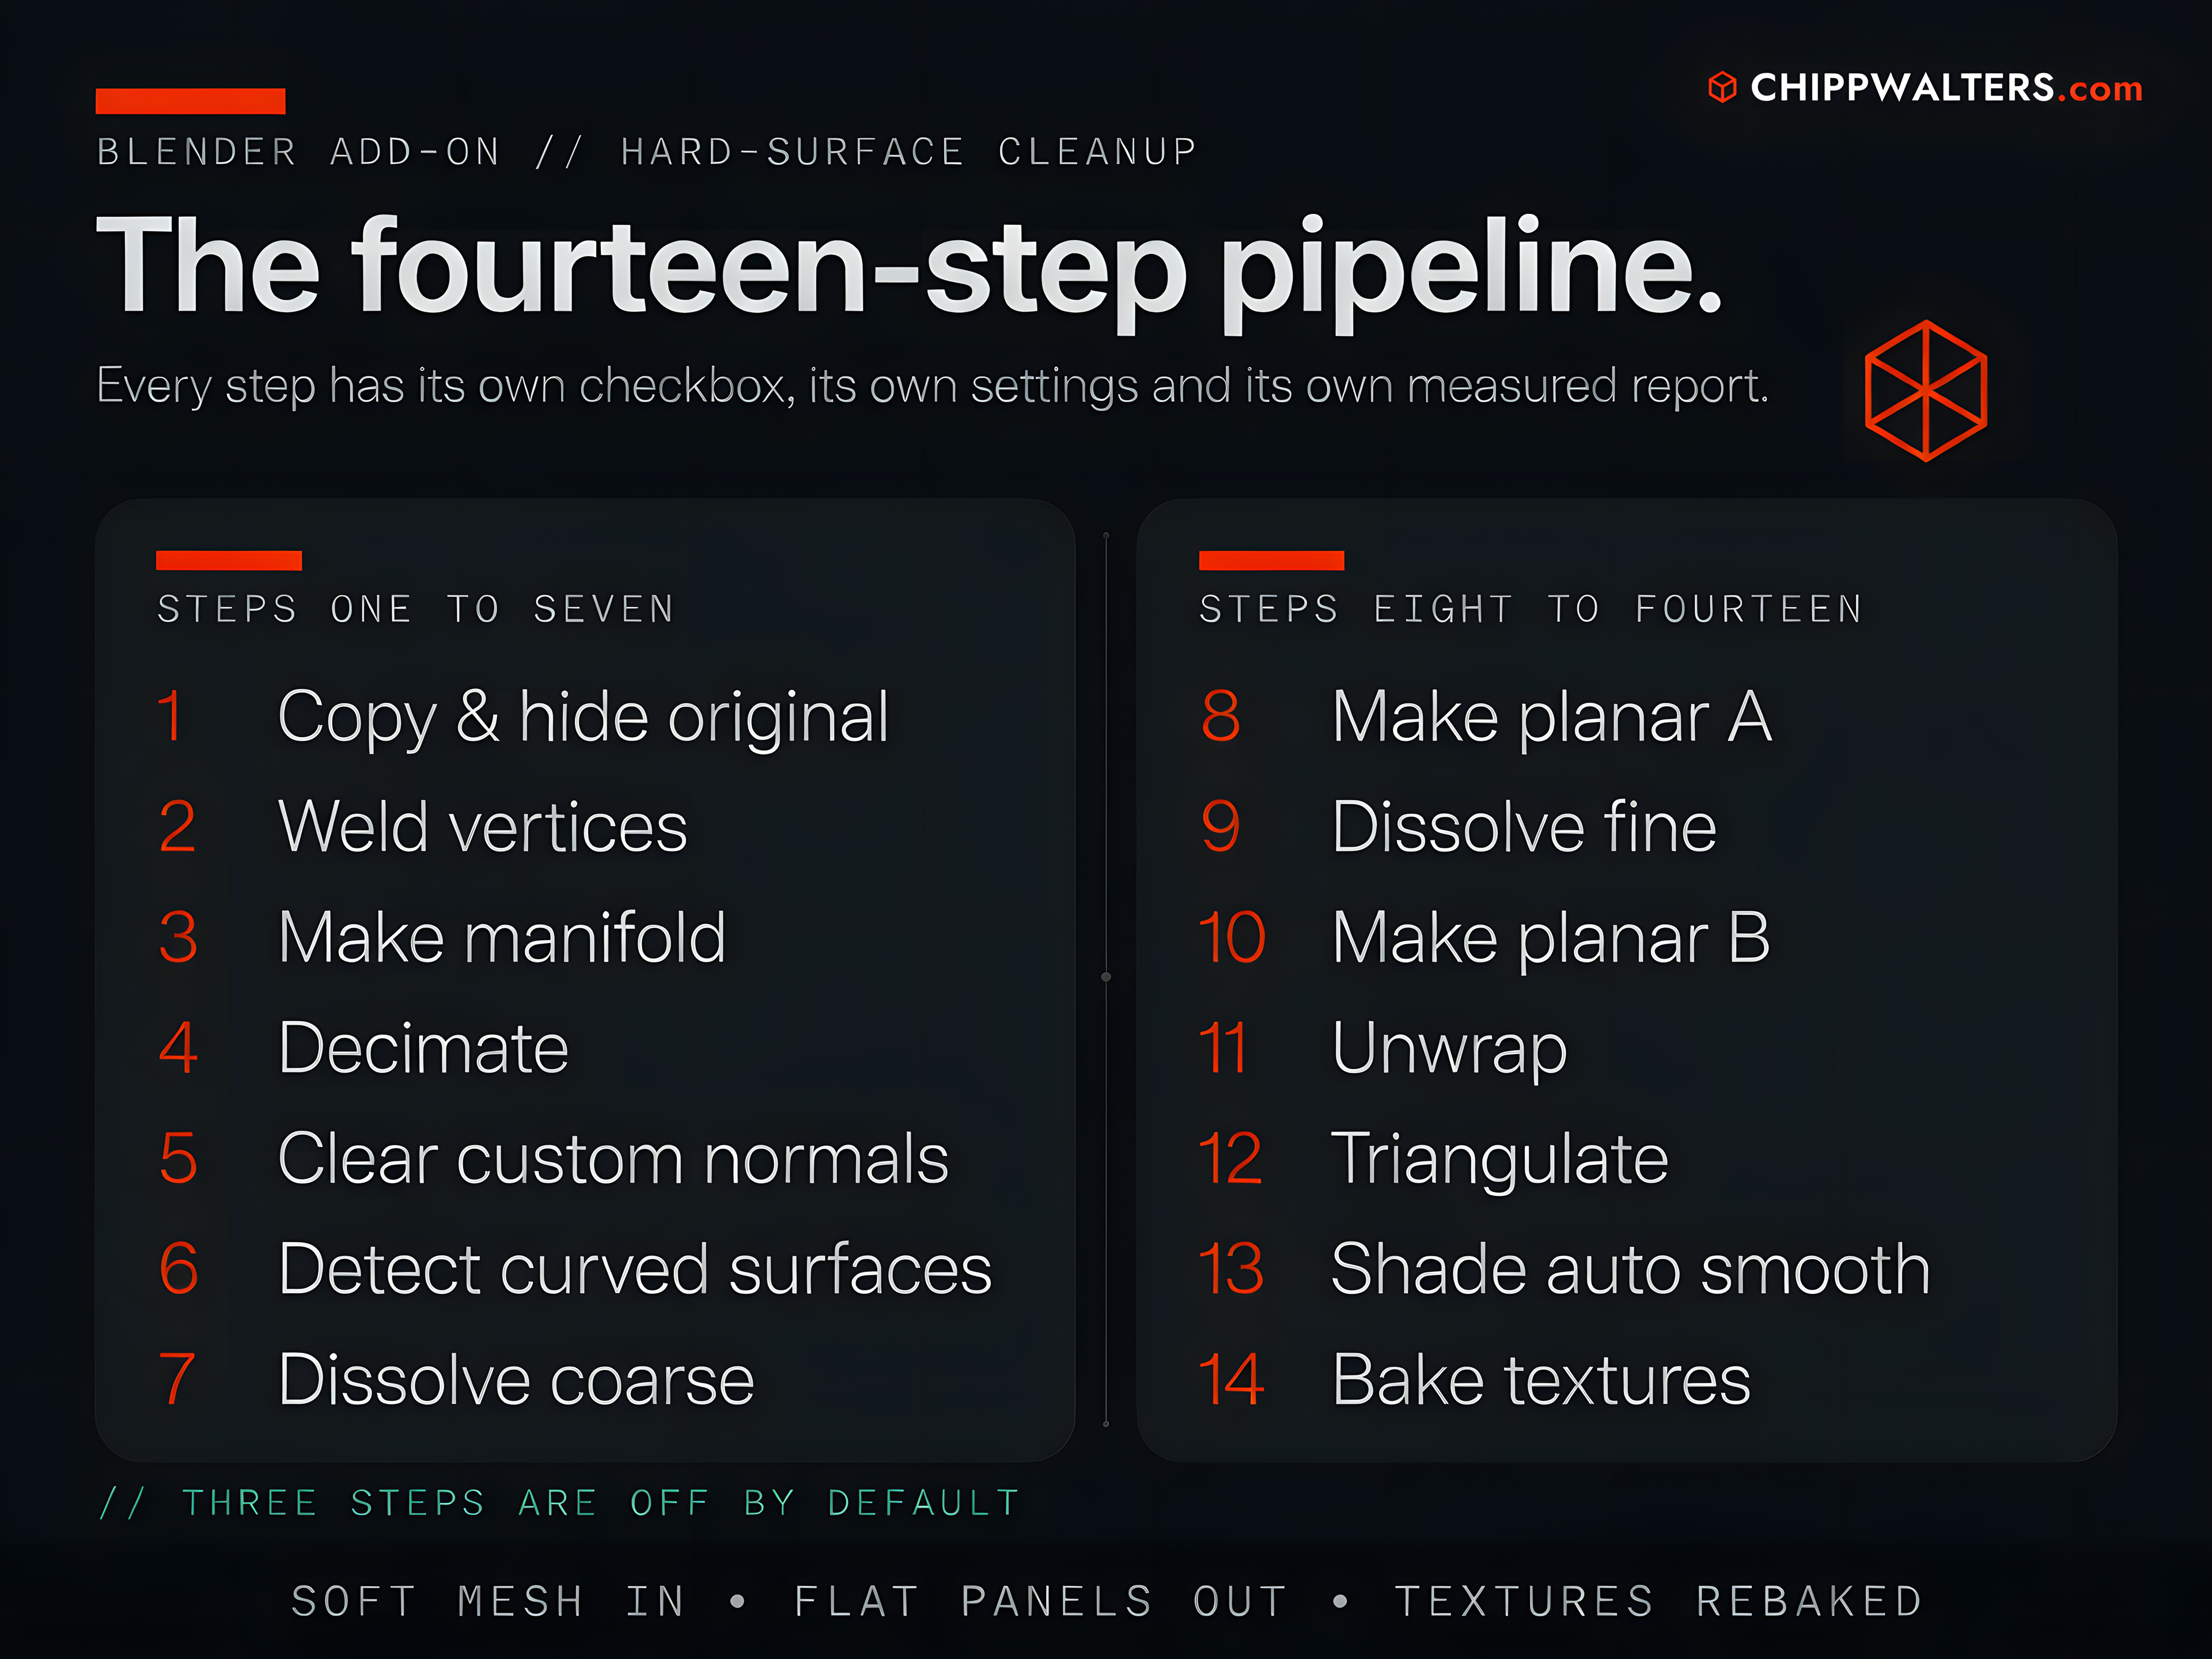
 1 Copy & Hide Original      8 Make Planar A
 2 Weld Vertices             9 Dissolve (Fine)
 3 Make Manifold            10 Make Planar B
 4 Decimate                 11 Unwrap
 5 Clear Custom Normals     12 Triangulate
 6 Detect Curved Surfaces   13 Shade Auto Smooth
 7 Dissolve (Coarse)        14 Bake Textures
Step ids, for scripting: copy, weld, manifold_early, decimate,
clear_normals, detect, dissolve_coarse, planar_a, dissolve_fine,
planar_b, unwrap, triangulate, auto_smooth, bake.
Eleven are checked by default. The three that are not are 3. Make Manifold, 10. Make Planar B and 12. Triangulate.
1. Copy & Hide Original — copy
Duplicates the active object to <name>_sharp, links the copy into the same
collections, selects it and makes it active. The original is hidden three ways
— eye, viewport and render — so it cannot leak into a render or an export. The
copy is unhidden all three ways, so re-running on an already-hidden object
still works.
The copy carries a custom property sharpen_source holding the original’s
name. Step 14 finds its bake source through that property. Delete it, and
the bake either fails or comes back black.
Settings drawer: no settings, just the note “Original kept as the bake source”.
Report: copied to <name>_sharp, original hidden
Turn it off when you are working on a mesh you are happy to modify in place, and you are not going to bake. The KPACK INSERT cleanup leaves it out for exactly that reason: an INSERT must contain exactly one mesh.
2. Weld Vertices — weld
Merge by Distance over the whole mesh.
TRELLIS GLBs arrive about 37% duplicate vertices — a glTF import is split at every UV seam and every flat-shaded corner, so it has no vertex adjacency at all. Until those are merged a limited dissolve stops dead at invisible walls, and the planar walk sees no neighbours.
| setting | label | default | range |
|---|---|---|---|
weld_dist |
Weld Distance | 1e-5 | min 0.0, soft max 0.001 |
Report: welded 534,956 -> 85,479 verts (84.0%)
If the percentage is near zero on a fresh glTF import, something is wrong — check the scale of the model against the weld distance.
Turn it off almost never. It is the first thing every other tool in the chain assumes.
3. Make Manifold — manifold_early
Windows only. Hands the mesh to the OS repair engine — the netfabb-derived code
under 3D Builder, reached as Windows.Graphics.Printing3D through a temporary
3MF and a subprocess.
Its job is not watertightness. It is to unblock limited dissolve, which stops at open and non-manifold edges the same way it stops at unwelded seams — a failure the weld step cannot reach. Decimate then trims the roughly 43% extra faces the repair adds.
The step rescales the mesh so its longest edge lands near 150 mm before the round trip, because the engine welds and fills against absolute millimetre tolerances, and scales it back afterwards.
Measured on a genuinely broken 166k-face ship: every open and non-manifold edge
closed in 23 s, the existing surface moved 0.002%, volume changed 0.085%.
Blender’s 3D Print Toolbox failed the same file. Detail:
D:\GitHub\model-roboto\docs\WINDOWS_MESH_REPAIR.md
| setting | label | default | range |
|---|---|---|---|
manifold_timeout |
Timeout (s) | 600 | 30 - 3600 |
repair_clean |
Clean After Repair | off | — |
The worker runs as a subprocess precisely so the timeout can kill it. 600 s is fine interactively; the batch pipeline passes 1800.
Clean After Repair dissolves the zero-area faces the engine leaves behind. Its own description warns that this was measured to reopen the mesh — every merge threshold tested broke the seal and raised bowtie counts. It is offered because sharpen re-unwraps and re-bakes anyway, so a reopened surface may still dissolve better. Measure before trusting it.
The drawer also says “Windows repair engine; destroys UVs” and “Unwrap/Bake rebuild them anyway”, and shows the Install Repair Support button if the WinRT packages for this Blender’s Python are missing.
Report:
faces 165,990 -> 237,702, boundary 3,757 -> 0, non-manifold edges 4,390 -> 0, SEALED in 33s
— or still open in place of SEALED. With Clean After Repair on it appends
, cleaned -> <n>f boundary <n>.
Leave it off unless the dissolve is stalling. It starts unchecked everywhere — in the add-on since 0.15.0 and in the pipeline all along. Measured 2026-07-28 on three finished props, each rebuilt from its original high-poly GLB with nothing else changed:
| model | sharpen time, repair on → off | faces after, on → off | better |
|---|---|---|---|
| equipment locker | 410s → 104s | 7,337 → 68,374 | off — repaired over-flattens: diagonal creases across the door, louvre vents melted shut |
| supply bin | 148s → 52s | 20,453 → 47,963 | off — repaired leaves torn shards along the top rim in 3 of 4 views |
| battery module | 58s → 20s | 70,720 → 96,519 | a wash, slight edge to repaired on rib separation |
Turn it on for a subject whose dissolve stalls on open edges. That is the case the repair exists for.
It belongs here and nowhere else. A second Make Manifold after the sharpening cycles shipped in 0.11.0 and was removed in 0.12.0: the engine remeshes, so it hands back triangles where the dissolve had just built flat panels. The seal is real and worthless.
4. Decimate — decimate
A native DECIMATE modifier in collapse mode with use_collapse_triangulate
on, applied immediately. The ratio is target_faces / current_tris.
UVs and materials die here. That costs nothing in the normal chain, because step 11 rebuilds the atlas and step 14 bakes onto it from the original.
| setting | label | default | range |
|---|---|---|---|
target_faces |
Target Faces | 250,000 | 1,000 - 2,000,000 |
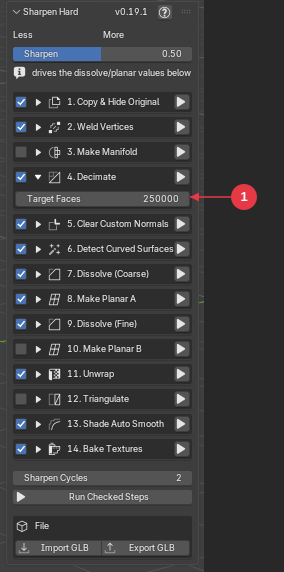
-
Target Faces — the triangle budget. The collapse ratio is
target_faces / current_tris, so the step hits this number exactly.
Report: decimated 801,280 -> 200,000 tris, or
already 120,000 tris, under target -- skipped when the mesh is already inside
the budget.
Turn it off when the mesh is already at the density you want, or when the atlas on it is the deliverable — a collapse decimate will wreck it. The INSERT pipeline decimates with Mesh Press’s “Keep UVs” path instead, for that reason.
PyMeshLab was tried here and lost
Version 0.16.0 added a PyMeshLab engine for this step and 0.18.0 removed it. Recorded so nobody spends the day again. Measured on an 814k-face ship, same welded input:
| engine | time | tris (target 200,000) | crisp edges |
|---|---|---|---|
| Blender collapse | 9.5s | 199,999 (exact) | 25.3% |
| PyMeshLab quadric | 10.9s | 198,322 | 14.1% |
| PyMeshLab clustering | 1.1s | 158,909 (−20.5%) | 12.7% |
Grid clustering is the only fast one, and it is fast because it snaps vertices to a lattice without looking at the shape. It tessellates flat panels as finely as creases, so a hard-surface model comes back as a uniform triangle soup where the collapse leaves clean panels — obvious on screen, and only half-visible in the aggregate numbers. Clustering also takes a cell size, not a face count, so it misses the budget in both directions.
PyMeshLab’s quadric collapse is the same class of algorithm as Blender’s and hits the target, but it ran slower and cut crisp edges nearly in half.
Blender’s own decimate wins this job outright, so the step has one engine and no dependency. Mesh Press still uses PyMeshLab and should: Poisson reconstruction and manifold repair have no native Blender equivalent. Decimation is the one job Blender already does better.
5. Clear Custom Normals — clear_normals
bpy.ops.mesh.customdata_custom_splitnormals_clear() on the working copy.
AI-generated meshes arrive carrying custom split normals, baked to make the soft original surface read smoothly. They are mesh data, not a shading setting, so nothing else in the pipeline clears them. Leave them on and the sharpened flat panels are still shaded as if they were curved — every corner the dissolve and planar walk just built gets rounded away at render time. Step 14’s Smooth by Angle also has no visible effect while they are present, because a custom normal overrides whatever the modifier computes.
It sits right after Decimate: the normals are stale from that point on, and this is the smallest the mesh ever gets, so the clear is cheapest here.
Settings drawer: no settings, just the note that it clears baked split normals and that they shade sharp panels as if still curved.
Report: cleared custom split normals, or
no custom split normals -- nothing to clear. The second message is normal on
a mesh you modelled yourself, and the step is safe to run twice.
Turn it off when the custom normals are deliberate — a hand-authored mesh whose shading you tuned by hand, and which you are running through the pipeline for the unwrap and bake only.
6. Detect Curved Surfaces — detect
Finds large-radius curved surface and tags it, so the dissolve and planar steps leave it alone. Without it, a nacelle, tube or dome facets.
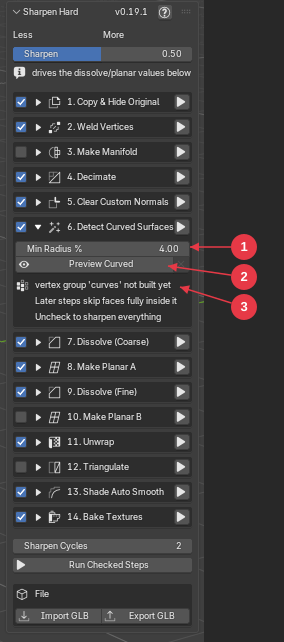
- Min Radius % — the smallest curve radius that counts as deliberate curvature, as a percentage of the bounding-box diagonal.
- Preview Curved — paints the verdict on the mesh without touching geometry. The ✕ beside it clears the paint.
-
The vertex group status — says whether
curveshas been built yet. The two lines under it are the reminder that later steps skip only faces whose vertices are all in the group, and that unchecking the step sharpens everything.
The detector does not look at single edges. The surfaces that need protecting are panels and greebles wrapped around a cylinder — locally every edge is panel detail and the curve only exists at a larger scale. Measured on a mining tug, per-edge detection found 7,241 noise regions, best sign coherence 0.10, and protected nothing. So it works in six stages:
- Smoothed normal field. Vertex normals are diffused over the edge graph until features below about 2% of the bounding-box diagonal wash out. Greebles average away; the slow normal rotation of a nacelle survives.
- Radius band. Per edge, on the smoothed field, radius ≈ edge length ÷ angle between endpoint normals. Only radii between Min Radius % of the bounding-box diagonal and 30% of it qualify. Below is fillets — crisping those is the whole point. The floor is also raised to keep smoothing’s own rounded corners from reading as curvature.
- Local sign coherence. Real curvature bends one way; noise flips convex and concave, and cancels.
- Region size, density and total turn. Union-find groups the candidate faces; a region is kept only if it holds at least 64 faces (or 0.2% of the mesh, whichever is larger), its candidate-edge density is at least 0.2, and its normals sweep at least 25 degrees. A quarter barrel is already 90 degrees; the gentle bulges a raw TRELLIS hull carries only turn 10-20, and protecting those painted flat panels as speckle.
- Discreteness veto. Smoothing turns any smallish convex box into a ball, so cargo pods, arm housings and plate rims pass every test above. Their raw normals give them away: a box concentrates its area on a few flat directions, a barrel spreads it continuously. Measured on the mining tug and an all-box inspection machine, box-like regions put at least 38% of their area within 10 degrees of their 3 dominant normals; every true barrel or dome region stayed at or under 34%. Regions at or above 36% are dropped. The check runs on raw normals and on lightly-smoothed ones, because surface wobble can hide a flat panel’s discreteness in the raw field.
- Assembly size. An isolated ring of curved trim — an exhaust port, a rounded plate corner — is locally identical to a ring band of a nacelle. What differs is company: real curved surfaces arrive as several regions split by greeble bands (each tug nacelle: 3-5 regions, 2.5-3.3% of the surface), junk arrives alone (0.6% or less). Nearby survivors are clustered, and a cluster is kept only if it carries at least 1.5% of the mesh’s surface area. A standalone clean cylinder passes — it is most of its own mesh.
What survives is dilated by one ring and written to a vertex group called
curves, and the same faces are left selected so they show in Edit Mode.
The group is the interface. A later step protects a face only when all
its vertices are in curves, which makes a hand-edited group behave the way a
selection does — the boundary ring of a selection does not drag its neighbours
in. Select vertices in Edit Mode and assign or remove them to correct whatever
the detector got wrong.
| setting | label | default | range |
|---|---|---|---|
protect_radius_pct |
Min Radius % | 4.0 | 0.5 - 50.0 |
The drawer also holds Preview Curved and a ✕ clear button, and says
whether the curves group “exists - edit it freely” or is “not built yet”.
Preview Curved (mesh.sharpen_preview) runs only the detector, on a
throwaway welded copy, and paints the result as a colour attribute called
SharpenPreview — orange for protected, blue-grey for will be sharpened.
It switches the viewport to Solid / Attribute shading, because attribute
colours do not render in Material Preview. Geometry is not touched. Re-run it
after changing Min Radius %. Clear Preview removes the attribute and
puts the viewport back to Material colours.
Report:
protected 12.4% of 200,000 faces -> vertex group 'curves' (18,320 verts) at radius 4.0%
Preview instead sets preview: 12.4% protected at radius 4.0% (3.2s).
Run it once, before the dissolve and planar steps. It is deliberately left out of the cycle block: after a dissolve pass leaves a few giant faces, the median edge length explodes and the radius floor silently disables protection. Detection must see pristine geometry.
Turn it off to sharpen everything — which is what the pipeline’s INSERT and bench stages do, since those subjects are meant to be curve-free.
7. Dissolve (Coarse) — dissolve_coarse
Limited dissolve at the coarse angle. This is the step that merges the
near-coplanar mush into flat panels. Protected faces are excluded, and
use_dissolve_boundaries is off.
| setting | label | default | range |
|---|---|---|---|
angle_coarse |
Max Angle | 20° | 0° - 60° |
dissolve_delimit_uv |
Keep UV Seams | off | — |
The Sharpen slider writes Max Angle; at the middle of the slider it becomes 25 degrees.
Keep UV Seams adds UV to the dissolve delimiter, so the dissolve stops at
UV island boundaries. It is shared by both dissolve steps — the same property
is drawn in both drawers.
- Leave it off for the normal chain. The atlas is about to be rebuilt by Unwrap, and delimiting only blocks the dissolve.
- Turn it on when the mesh already carries the texture it will ship with. One face merged across an island boundary samples both islands. Measured on a textured crate: 3.3% of seam edges eaten without it against 0.6% with, for 1.2% fewer faces dissolved.
Report:
25.0deg: faces 200,000 -> 48,102, mushy 23.1%, crisp 31.8%
With the delimit on it reads 25.0deg keeping UV seams: ....
Mushy is the share of two-face edges turning 5-30 degrees — the fillet band, the enemy. Crisp is the share turning more than 60 degrees.
Turn it off and there is no sharpening left. If you want less, lower the angle rather than dropping the step: at 8 degrees on one measured subject the sharpness gain was exactly zero (54.01 against a baseline of 54.22) — that is decimation under another name — while at 20 the fine detail degraded. The two are the same dial.
8. Make Planar A — planar_a
The planar walk, run over unprotected faces after the coarse dissolve. Each iteration pulls every vertex toward the best-fit plane of the faces around it, so vertices on a panel boundary converge to the intersection line of two planes and corner vertices to the corner point.
| setting | label | default | range |
|---|---|---|---|
planar_iters_a |
Iterations | 2 | 0 - 100 |
planar_factor_a |
Factor | 0.75 | 0.01 - 1.0 |
Two iterations is the working value, measured 2026-07-27: the walk converges almost immediately after a dissolve, and extra passes buy no change in the dihedral angles while still moving vertices — which shows up as drift the bake cage then has to span.
Report:
2x @ 0.75: mushy 23.1% -> 23.1%, crisp 31.8% -> 31.8%, drift 0.073%
Drift is the largest movement of a bounding-box face as a percentage of the original bounding-box diagonal — a cheap first-order warning light for silhouette change, not a real Hausdorff measure.
Do not judge this step by its own report. Across 8 planar passes on two subjects, every one reported no change in either mushy or crisp, and reading that as “the planar steps do nothing” was wrong. Their whole purpose is to change what the next step can do: removing them produced more faces, not fewer (30,682 → 37,534 on one subject, 42,827 → 54,835 on another). The mushy/crisp readout measures the dihedral distribution, not coplanarity, so it cannot see the thing the step changed.
Turn it off on detail-rich subjects. Measured on two subjects, the planar
steps move the surface about 9x more (0.018% mean deviation against 0.002%)
for roughly 5-6% more absolute sharp edge and 22-28% fewer faces — and in
the render they are what smears louvre slats into mounds. The pipeline exposes
this as --no-planar. They are on by default and worth keeping on subjects
that really are large flat panels.
9. Dissolve (Fine) — dissolve_fine
A second limited dissolve at a much smaller angle, now that the planar walk has made more faces truly coplanar.
| setting | label | default | range |
|---|---|---|---|
angle_fine |
Max Angle | 3° | 0° - 15° |
dissolve_delimit_uv |
Keep UV Seams | off | — |
Same mechanism and the same report format as step 7.
Report: 3.0deg: faces 48,102 -> 41,880, mushy 25.0%, crisp 34.2%
On its own this is the useful one for cleaning a mesh you cannot re-unwrap: weld, dissolve fine, planar B, with Keep UV Seams on — see recipe 4.
10. Make Planar B — planar_b
The planar walk again, after the fine dissolve. Identical to step 8 with its own pair of settings.
| setting | label | default | range |
|---|---|---|---|
planar_iters_b |
Iterations | 2 | 0 - 100 |
planar_factor_b |
Factor | 0.75 | 0.01 - 1.0 |
Report: 2x @ 0.75: mushy 25.0% -> 25.0%, crisp 34.2% -> 34.2%, drift 0.062%
11. Unwrap — unwrap
Drops every existing UV layer, welds, runs Smart UV Project, and repacks the islands with the concave shape method.
The weld inside this step is not optional. Smart UV Project grows charts from vertex adjacency, and a mesh imported from glTF has none — every triangle carries its own three vertices. Unwrapping that gives near-per-triangle islands at half the density, and says nothing about it. Measured on one sharpened ship:
| verts | UV area | |
|---|---|---|
| straight from the GLB | 534,956 | 0.2155 |
| welded first | 85,479 | 0.4004 (1.86x) |
Running the whole chain hides this, because step 2 already welded. It only bites when the unwrap runs on its own — which is what any headless or per-file workflow does. Welding here is safe because the UV layers are removed first, so there is no atlas left to protect. The weld uses the same Weld Distance as step 2; set it to 0 and the weld is skipped.
| setting | label | default | range |
|---|---|---|---|
unwrap_angle |
Angle Limit | 66° | 1° - 89° |
unwrap_margin |
Island Margin | 0.0004 | 0.0 - 0.05 |
unwrap_repack |
Concave Repack | on | — |
Angle Limit is Smart UV Project’s own. Larger means fewer, bigger islands.
Island Margin is the gap between islands as a fraction of the atlas. A tight margin plus the concave repack measured 24.5% → 45.1% coverage; too tight and the bake bleeds between islands.
Concave Repack repacks with shape_method='CONCAVE' after projecting, and
nearly doubles usable atlas area. Do not insert an
average_islands_scale before it — that collapsed coverage to 0.6%.
Report: welded 90,120 -> 85,479 verts, unwrapped, islands cover 45.1%, or
already welded, unwrapped, islands cover 45.1%.
Turn it off when the atlas on the mesh is the deliverable. Unwrapping throws away the very texture layout you are trying to keep.
12. Triangulate — triangulate
bmesh.ops.triangulate with the BEAUTY method for both quads and n-gons. No
settings — the drawer says so.
The bake, the glTF exporter and every viewer triangulate eventually. Doing it here, deterministically and before the bake, means the mesh that ships is the mesh that was baked; a mismatch shows up as warped detail.
Report: triangulated 41,880 -> 78,220 faces
Unwrap must come before this. Smart UV Project grows charts across whole n-gons; hand it a triangulated mesh and it has three times the edges to treat as chart boundaries. Triangulating afterwards splits faces along existing loops and carries their UVs along, so the atlas comes through unchanged. Measured 1.03x more usable area — small, but free. The order changed in 0.12.0.
Turn it off for a mesh whose only consumer is Blender, where the n-gon panels are the point. The KIT OPS INSERT cleanup leaves it out.
13. Shade Auto Smooth — auto_smooth
Adds Blender’s Smooth by Angle modifier — the same thing Object → Shade Auto Smooth adds — and leaves it live on the object.
| setting | label | default | range |
|---|---|---|---|
auto_smooth_angle |
Smooth Angle | 10° | 0° - 180° |
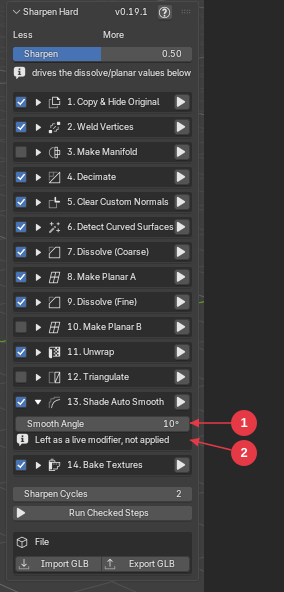
- Smooth Angle — edges sharper than this stay hard. Ten degrees.
- The modifier is left live, not applied, so the angle stays adjustable after the run.
Ten degrees is low on purpose. By this point the mesh is flat panels with real corners between them, and Blender’s own default of 30° smooths straight across the shallower ones — undoing on screen what the dissolve and planar walk just built in geometry. Raise it if a protected curved surface still facets; drop it to 0 to shade everything flat.
The modifier is not applied. The angle is the one value worth nudging, Blender’s bake evaluates modifiers so the smoothing is present in the bake without being burned into the mesh, and the glTF exporter evaluates them too — so it ships correctly either way. Re-running the step replaces the modifier rather than stacking a second one.
It runs BEFORE the bake, and that matters
0.15.0 put this step last, after the bake. That was wrong. The argument was that the bake reads shading off the original, so a modifier on the target could not skew it. That holds for colour, roughness and metallic — and not for the normal map.
A tangent-space normal bake encodes the difference between the source surface and the target’s shading normals. The map is therefore only correct for the normals the target carried while it was baked. Smooth the target afterwards and you have changed exactly the thing the map was measured against: the normal map that ships no longer matches the mesh it is painted on.
Since 0.20.0 it is step 13, immediately before the bake, so the normal map is baked against the shading the mesh actually ships with.
This step needs step 5. A custom split normal overrides whatever Smooth by Angle computes, so on a mesh that still carries the ones it arrived with, this step appears to do nothing at all.
Report: auto smooth at 10 deg.
There is a second form:
auto smooth at 10 deg (node group appended directly -- asset library was not loaded).
Blender’s operator appends the Smooth by Angle node group from its essentials
asset library, and headless Blender loads that library asynchronously — on
4.5.10 under -b it prints “Asset loading is unfinished”, returns CANCELLED
and adds nothing at all. The step checks the modifier really arrived and, if it
did not, appends the node group straight from
<blender>/<version>/datafiles/assets/geometry_nodes/smooth_by_angle.blend
instead. The result is identical; the longer message tells you which route ran.
If neither works the step raises rather than returning a soft mesh. Measured on
4.5, 5.1 and 5.2: a 32-sided cylinder gets 96 sharp edges at 10° and 64 at 45°.
Turn it off when the shading is somebody else’s job, or when you want the object to carry no modifiers at all.
14. Bake Textures — bake
Bakes PBR maps from the hidden original onto the sharpened mesh, selected to active, in Cycles.
It finds the source through the sharpen_source custom property, falling back
to the object name minus _sharp. It raises, loudly, if:
- there is no source — “no source to bake from – run ‘Copy & Hide Original’ first”
- the source has no node material
- the target has no UVs — “target has no UVs – run ‘Unwrap’ first”
- no maps are selected
| setting | label | default |
|---|---|---|
bake_diffuse |
Color | on |
bake_normal |
Normal | on |
bake_roughness |
Rough | on |
bake_metallic |
Metal | on |
bake_resolution |
Size | Match Source (or 1024 / 2048 / 4096 / 8192) |
bake_res_diffuse |
Color size | Follow Bake Size |
bake_res_normal |
Normal size | Follow Bake Size |
bake_res_roughness |
Rough size | Follow Bake Size |
bake_res_metallic |
Metal size | Follow Bake Size |
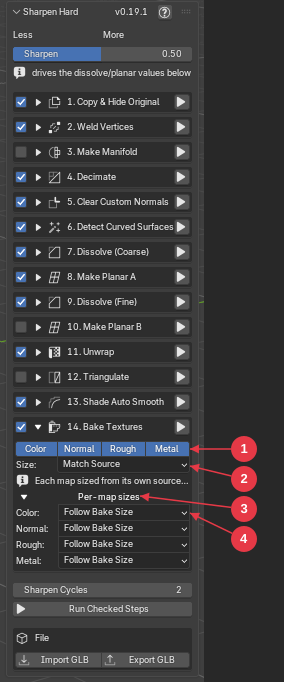
- The four map toggles — Color, Normal, Rough and Metal. Unticked maps are not baked at all.
- Size — Match Source by default, which sizes each map from the texture feeding that channel on the original.
- Per-map sizes — a nested drawer, shut by default, holding one size override per channel.
- A per-channel override — each defaults to Follow Bake Size, so the common case stays one control.
Each map is sized from its own source texture
Size defaults to Match Source, and it matches per channel, not once for the run. An AI-generated asset rarely ships four maps at one size — a measured example carries a 2048 colour map beside 1024 normal, roughness and metallic — and one number for all four either wastes memory on three of them or throws away half the colour detail.
So each map is sized from the texture feeding that Principled input on the original. The lookup walks back through intervening nodes, so a normal map reached through a Normal Map node is found the same as a colour map wired straight in. Non-power-of-two sources round up: a 1000px roughness map bakes at 1024. Sizes are clamped to 1024-8192.
Two fallbacks, both stated in the report rather than assumed:
- A channel with no image — a constant roughness, say — takes the size of the largest map on the object, so the set stays consistent.
- A source with no images at all falls back to 4096.
Overrides. Every channel has its own size setting, shut away under
Per-map sizes in the drawer. Each defaults to Follow Bake Size. The
order is: the channel’s own setting, then Size, then Match Source. Setting
Size to a number still drives every map, so
s.bake_resolution = '1024' in an existing script behaves exactly as it did.
The console prints every map’s size and the reason before the first bake, so a long run says up front what it is going to make:
[sharpen_hard] diffuse -> 2048px (source base color is 2048px)
[sharpen_hard] normal -> 1024px (source normal is 1024px)
[sharpen_hard] roughness -> 1024px (source roughness is 1000px -> 1024)
[sharpen_hard] metallic -> 1024px (no metallic map, matched the largest (2048px))
What it does, in order
- Unhides both objects, clears any preview paint, and puts the viewport back to Material colours.
-
Builds a fresh material
<target>_bakedholding one Principled BSDF, and replaces the target’s materials with it. -
Switches to Cycles at 4 samples and takes the first GPU backend that answers
— OPTIX, CUDA, HIP, METAL, ONEAPI — so NVIDIA, AMD, Apple silicon and Intel
Arc all get their card. Failing all of them it uses the CPU and says so:
the console prints
[sharpen_hard] baking on <device>either way, because a bake that quietly drops to CPU just looks broken-slow. The previous render engine is restored at the end. -
Measures the surface deviation — the 99th-percentile distance from
sampled target vertices to the nearest point on the source — and sizes the
cage from it:
cage = clamp(deviation × 2, diagonal × 0.01, diagonal × 0.25)andray = cage × 2.5. Guessing the cage as a fixed fraction of the bounding box failed on a control console that drifted 7.3% of its diagonal during sharpening: rays missed and the atlas came back 30% lit. - For each map: creates the image, prefills it with magenta — a colour the bake cannot produce, so a ray miss can be told from a legitimately black texel — bakes, counts what was filled, repaints any remaining magenta neutral (mid-blue for the normal map, black otherwise) and packs the image into the .blend.
- Wires the results into the Principled: colour to Base Color, roughness to Roughness, metallic to Metallic, and the normal map through a Normal Map node.
- Re-hides the original, three ways.
Everything but the normal map is baked as EMIT
The colour, roughness and metallic channels are temporarily rewired through an
Emission shader on the source material and baked with type='EMIT'. Only the
normal map uses a native pass.
Measured 2026-07-27 on one ship: the native DIFFUSE pass, even colour-only,
lit 2.2% of texels — a black atlas — while the identical setup through EMIT
lit 97.7%. This is what made baking “never work very well”. EMIT returns
exactly the socket value, with no shading, no light paths and no pass-filter
subtleties. Verified: colour 97.7%, roughness 99.7%, metallic 99.7%.
Images
The maps are named <target>_diffuse, <target>_normal, <target>_roughness
and <target>_metallic, and they are packed into the .blend, not written
to disk. Colour is sRGB; the rest are Non-Color. Save the file or export the
object to get files out.
Report:
baked 4 maps in 26.0s (deviation 1.23%): diffuse 2048px 97%, normal 1024px 99%, roughness 1024px 99%, metallic 1024px 99%
Each map carries its own size, because with Match Source they are routinely different and one number would misreport three of them.
The console adds a line per map with the time, the fill percentage and the island coverage:
[sharpen_hard] deviation p99 1.23% of diagonal -> cage 0.0246, ray 0.0615
[sharpen_hard] baked DIFFUSE 2048px in 11.2s, filled 97.7% of atlas (islands cover 45.1%)
A map that filled less than 85% of what its islands cover is flagged
<-- SUSPECT, rays missed in the console and appended to the panel report as
WARNING: DIFFUSE filled only 30.1% vs 45.1% island coverage. That is a real
failure, not a cosmetic one — do not ship the result.
Turn it off when something else makes the texture. The pipeline does: it sends the sharpened mesh back to Trellis for a re-texture instead, because the bake is a transfer and reproduces the source atlas faithfully, flaws included, while Trellis regenerates from the concept image. Measured on a mining tug: the bake took 13 s and Trellis 88 s, and the side-by-side call went to Trellis anyway — the source atlas carries a muddy yellow-green wash that the bake reproduces exactly, and Trellis came back with clean colour separation and crisper panel lines. (Do not compare the two on atlas PSNR. The baked atlas fills the space around its islands with shredded noise, roughly 40% of the image, and the metric reads that noise as detail.)
The bake stays in the add-on because it is the right tool when a faithful copy is what you want — and it is the only one of the two that produces a normal map.
Recipes
Five chains that are known to work.
1. The full chain — sharpen and re-bake
Use it when you want one crisp, textured object out of one soft, textured one, in Blender, with no other tool involved.
Everything checked, Sharpen slider in the middle, Run Checked Steps. With Sharpen Cycles at 2 that is:
copy → weld → [manifold_early] → decimate → clear_normals → detect
     → (dissolve_coarse → planar_a → dissolve_fine → planar_b) × 2
     → unwrap → triangulate → bake → auto_smooth
You end up with <name>_sharp carrying a fresh atlas and four packed images,
and the original hidden beside it as the bake source. Leave the original in the
file: deleting it breaks a re-bake.
Make Manifold and Make Planar B start unchecked. Turn Make Manifold on only when the dissolve is stalling on open edges.
2. Geometry only — sharpen, then texture somewhere else
Use it when something else will paint the mesh. This is what the repo’s pipeline does: it sharpens, then sends the result back to Trellis for a re-texture from the original concept image.
Everything but the bake:
copy → weld → decimate → clear_normals → detect
     → (dissolve_coarse → planar_a → dissolve_fine → planar_b) × cycles
     → unwrap → triangulate → auto_smooth
Headless, D:\GitHub\model-roboto\scripts\sharpen_for_trellis.py:
blender.exe -b -P "D:\GitHub\model-roboto\scripts\sharpen_for_trellis.py" -- ^
    --glb model_pbr.glb --out model_sharp.glb ^
    [--amount 0.5] [--target-faces 200000] [--sharpen-cycles 2] ^
    [--no-planar] [--no-detect] [--manifold] [--manifold-timeout 1800]
Three things that silently ruin this if changed:
-
Export the sharpened object alone. The
copystep hides the original rather than deleting it, and Trellis’s loader merges every mesh in the file. Ship both and it textures them interpenetrating. Export withuse_selection=True, use_visible=False— that keeps the hidden original out without unhiding it, deleting it, or touching its hide flags. - The export must carry UVs. With them Trellis preserves the layout exactly; without them it falls back to its own unwrap — 178,026 per-triangle islands against 42,824 charts, at 0.30 density against 0.40. The stage refuses to export a mesh with no UV layer.
-
Unwrap before triangulate. Worth 1.03x on its own. The weld inside
unwrapis the part that matters (1.86x), and the chain already welded at step 2.
Note --sharpen-cycles, not --cycles: Blender’s own argument parser claims
--cycles even after --, as an ambiguous match for --cycles-device.
3. Minimal — no sharpening, just a legal mesh
Use it when you only need the face budget and a usable atlas.
copy → weld → decimate → unwrap → triangulate
Steps 1, 2, 4, 11, 12. Nothing in it is decoration: the weld because a glTF import carries no vertex adjacency, the decimate because of the budget, and the unwrap and triangulate because the decimate just destroyed the atlas.
Measured on the test ship: 815,884 faces to 199,999 in 22 seconds, atlas coverage 39.1%.
blender.exe -b -P "D:\GitHub\model-roboto\scripts\sharpen_for_trellis.py" -- ^
    --glb model_pbr.glb --out model_sharp.glb --minimal
4. Clean a mesh that already carries its final texture
Use it when the atlas on the mesh is the deliverable — a textured GLB you must not re-unwrap.
Steps 2, 9 and 10 only — Weld Vertices, Dissolve (Fine), Make Planar B — with Keep UV Seams on.
The mesh arriving from a glTF import is split at every UV seam and has no adjacency at all, so the weld has to come first or the dissolve stops at invisible walls and the planar walk sees no neighbours. What you get instead of near-coplanar triangle mush is flat n-gon panels. Measured on one textured prop: 26,307 faces → 18,415, texture unchanged.
The three steps that are absent matter as much as the three that are:
- No Copy. It would leave a second mesh in the file.
- No Unwrap. The atlas is the thing you are protecting.
- No Triangulate. N-gons are the point.
And the delimit is the whole reason this chain is different: with the texture already painted, one face spanning two islands samples both. Measured 3.29% of seam edges eaten without the delimit against 0.56% with, for 1.2% fewer faces dissolved.
The implementation is cleanup_for_insert() in
D:\GitHub\model-roboto\scripts\kpack_stage.py. It runs after the
decimate, not before — Mesh Press triangulates on its way to the face budget
and would undo the panels.
s = bpy.context.scene.sharpen_hard
s.sharpen_amount = 0.5          # writes the derived dissolve knobs
s.dissolve_delimit_uv = True
by_id = {sid: fn for sid, _l, _e, _x, fn in sharpen_hard.STEPS}
cur = obj
for sid in ("weld", "dissolve_fine", "planar_b"):
    cur, msg = by_id[sid](bpy.context, s, cur)
Check that the UV layer survived. That stage raises if it did not.
5. Tuning, by hand
Use it when you do not yet know what the mesh needs.
- Run 1. Copy & Hide Original with its ▶ button.
- Run 2. Weld Vertices. Look at the percentage.
- Open 6. Detect Curved Surfaces, set Min Radius %, press Preview Curved. Orange is protected, blue-grey will be sharpened. Adjust and preview again — it never touches geometry. Press ✕ to clear.
- Run 4. Decimate and 5. Clear Custom Normals, then 6. Detect Curved Surfaces for real.
-
Run 7 through 10 one at a time, reading
faces,mushy,crispanddriftafter each. Repeat the four as many times as the mesh keeps improving. -
Correct the detector by hand if it got something wrong: in Edit Mode, select
vertices and assign or remove them from the
curvesvertex group. A face is protected only when all its vertices are in the group. - Finish with 11, 12, 13 and 14.
Undo works — every operator is REGISTER | UNDO.
Where the pipeline uses each recipe
| Script | Chain |
|---|---|
D:\GitHub\model-roboto\scripts\sharpen_for_trellis.py |
Recipe 2, or recipe 3 with --minimal |
D:\GitHub\model-roboto\scripts\kpack_stage.py |
Recipe 4 (cleanup_for_insert) |
D:\GitHub\model-roboto\scripts\kpack_sharp_stage.py |
Recipe 1, straight through the bake |
D:\GitHub\model-roboto\scripts\bench\sharpen_arm.py |
Recipe 2 split in two: export after the cycles, then unwrap + triangulate + bake and export again |
Both kpack_sharp_stage.py and sharpen_arm.py leave Detect Curved
Surfaces off by default: those subjects are meant to be curve-free, and
protection only holds back the sharpening.
Scripting
Through the operators
bpy.ops.mesh.sharpen_step(step='weld')     # one step, exactly once
bpy.ops.mesh.sharpen_run_all()             # every checked step, with cycles
bpy.ops.mesh.sharpen_preview()             # paint the detector's result
bpy.ops.mesh.sharpen_preview_clear()
bpy.ops.mesh.sharpen_install_repair()      # download the WinRT packages
bpy.ops.mesh.sharpen_import_glb(filepath=r"D:\in.glb")   # selects + activates
bpy.ops.mesh.sharpen_export_glb(filepath=r"D:\out.glb")  # selection only
sharpen_step and sharpen_run_all need an active mesh object in Object
Mode. Both return {'CANCELLED'} and report the error on failure;
sharpen_run_all also returns {'CANCELLED'} with a warning if nothing is
checked. The full per-step log is in
bpy.context.scene.sharpen_hard.last_report, one line per step plus a
total <n>s line — read it rather than guessing which steps ran.
Settings live on the scene: bpy.context.scene.sharpen_hard.
Through the step functions
This is what every pipeline script does. It skips the checkboxes and the operator poll, and gives you the message string directly:
by_id = {sid: fn for sid, _label, _enable, _expand, fn in sharpen_hard.STEPS}

ctx = bpy.context
s = ctx.scene.sharpen_hard
s.sharpen_amount = 0.5          # FIRST -- it overwrites the derived knobs
s.target_faces = 250_000

cur = obj
for sid in ["copy", "weld", "decimate", "clear_normals", "detect",
            "dissolve_coarse", "planar_a", "dissolve_fine", "planar_b",
            "dissolve_coarse", "planar_a", "dissolve_fine", "planar_b",
            "unwrap", "triangulate", "auto_smooth"]:
    cur, msg = by_id[sid](ctx, s, cur)
    print(f"  [{sid}] {msg}", flush=True)
Three rules the existing callers all follow:
-
Thread the object through.
copyreturns a different object from the one it was given. Ignore the return value and every later step runs on the original. -
Select and activate the object first. Several steps drive Blender
operators (
modifier_apply,smart_project,bake) that work on the selection. - Check the step ids exist, and fail loudly if they do not:
missing = [x for x in steps if x not in by_id]
if missing:
    raise SystemExit("FAIL: sharpen_hard has no step(s) %s -- it has %s"
                     % (missing, sorted(by_id)))
The useful module-level names are STEPS (the registry tuple),
SHARPEN_BLOCK (the four ids the cycle repeats) and _VGROUP (the string
"curves").
If you are baking
The bake follows sharpen_source back to the hidden original. Before it runs,
check the link is intact — a silently missing source produces a black atlas and
a plausible-looking GLB. assert_bake_source_intact() in
D:\GitHub\model-roboto\scripts\bench\sharpen_arm.py checks that the property
is still there, that the object still exists in bpy.data, that it is not the
target itself, and that it still has a node material.
Troubleshooting and traps
Each of these was measured. Where a number is quoted, it came from a real run.
Blender freezes while a step runs
Expected. Every operator here blocks: the work happens inside execute(),
so Blender will not repaint on its own.
The add-on paints the step name in the lower left of the 3D viewport in
orange-red (#fe4023) while it works, and flashes teal (#3fbba9) for one
second when it finishes. A failure stays up for four seconds. It forces the
repaint itself, because nothing else will. The status bar and the cursor
progress carry the same message, and the console gets everything regardless —
including headless runs, where the overlay does not exist.
If the viewport is blank and silent, look at the console. Every line is
prefixed [sharpen_hard].
Make Manifold is the slowest. It blocks on a process outside Blender. Measured 38 s on 814k faces, and it grows with the mesh, which is why the step announces the face count and says “this can take a minute, please wait” before it starts.
The UV atlas is destroyed. That is the design
Sharpening kills UVs, and both Decimate and Make Manifold kill them outright. Steps 11-13 exist to rebuild the atlas and bake the textures back from the untouched original.
Coverage alone will not tell you. Measured on one sharpened subject, coverage improved from 78.9% to 96.3% while the overlap ratio went from 0.837 to 50.2 — the charts stack about fifty deep. It looks like a win and is unusable.
If you must keep the atlas, do not run the sharpening chain. Use recipe 4: weld, dissolve fine, planar B, with Keep UV Seams on.
Unwrapping alone gives a low-density atlas
Smart UV Project grows charts from vertex adjacency, and a mesh imported from glTF has none — every triangle carries its own three vertices. Unwrapping that gives near-per-triangle islands at half the density, and reports success.
Step 11 welds first, for that reason. Measured on one sharpened ship: straight from the GLB, 534,956 verts and UV area 0.2155; welded first, 85,479 verts and UV area 0.4004 — 1.86x.
Running the whole chain hides this, because step 2 already welded. It only bites when the unwrap runs on its own, which is what every headless or per-file workflow does. If you set Weld Distance to 0, step 11 skips its weld and you are back to the bad case.
Unwrap has to run before Triangulate
Smart UV Project grows charts across whole n-gons. Hand it a triangulated mesh and it has three times the edges to treat as chart boundaries. Triangulating afterwards splits faces along existing loops and carries their UVs along, so the atlas comes through unchanged — checked, every coordinate identical. Measured 1.03x more usable area.
The registry order changed in 0.12.0. If you build a chain by hand, keep
unwrap before triangulate and bake last.
Make Manifold belongs before Decimate, and nowhere else
Running it again after the sharpening cycles undoes them. The engine remeshes,
so it hands back triangles where the dissolve had just built flat n-gon panels.
A manifold_late step shipped in 0.11.0 and was removed in 0.12.0.
Its purpose here is to unblock limited dissolve, which stops dead at open and non-manifold edges — the same failure the weld exists to fix, and one the weld cannot reach. Decimate then trims the roughly 43% extra faces the repair adds.
“No repair support for cp313 (this Blender’s Python)”
The winrt wheels are compiled per Python version. Blender 5.0 runs Python
3.11, Blender 5.1 and 5.2 run 3.13. A set installed by one is useless to the
other, and this used to report ready and then die on
No module named 'winrt._winrt' — the 0.11.1 bug.
Press Install Repair Support, either in Preferences → Add-ons → Sharpen
Hard or in step 3’s own drawer in the N-panel. It installs to
libs\<tag>\ for this interpreter only. Full detail:
Repair support for step 3.
If the worker reports MISSING_DEPS:, the add-on appends “press Install Repair
Support in the add-on preferences” to the message. Installing the wheels one at
a time is the other way to get here — pip install --target --upgrade prunes
the target, so each install deletes the last. Pass all five in one call.
The repair times out
repair did not finish within 600 s -- raise the timeout, or the mesh may be beyond this engine.
Raise Timeout (s) (max 3600). The pipeline uses 1800, because the add-on’s 600 is fine interactively and too tight for a batch — measured 37 s on a clean ship and a timeout on a busier prop.
There is deliberately no fallback. A mesh reported as repaired that was never repaired poisons every later step silently.
“Clean After Repair” reopens the mesh
It says so in its own description, and the measurement is in
D:\GitHub\model-roboto\docs\WINDOWS_MESH_REPAIR.md. Every merge threshold
tested on the sealed 237k-face result broke the seal, and bowtie counts went
up, not down:
| after repair | boundary | nm-edge | nm-vert | zero-area | shut |
|---|---|---|---|---|---|
| untouched | 0 | 0 | 10,460 | 2,897 | yes |
| merge 1e-5, degen 1e-5 | 105 | 149 | 10,487 | 1,918 | no |
| merge 1e-4, degen 1e-4 | 1,046 | 4,477 | 11,327 | 95 | no |
The closure depends on coincident-but-distinct vertices the engine kept on purpose. The option exists anyway because sharpen re-unwraps and re-bakes regardless, so a reopened surface may still be the better dissolve input. Measure it; do not assume it.
Curved surfaces come back faceted
Run 5. Detect Curved Surfaces before the dissolve and planar steps. Without it a nacelle, tube or dome is flattened into panels like everything else.
Then check the result with Preview Curved before committing: orange is protected, blue-grey will be sharpened. Raise or lower Min Radius % and preview again.
If the detector protects nothing on an obviously curved model, the curve is
probably below the radius band — the floor is raised to keep smoothing’s own
rounded corners from qualifying, and a region also has to hold at least 64
faces, carry enough candidate edges, and sweep at least 25 degrees of normal.
Correct it by hand: select the vertices in Edit Mode and add them to the
curves vertex group. A face is protected only when all its vertices are
in the group.
Detect must run once, on pristine geometry. After a dissolve leaves a few giant faces, the median edge length explodes and the detector’s radius floor silently disables protection. That is why Sharpen Cycles never repeats it.
Fine detail is smeared
Two causes, both measured, both a trade rather than a bug.
The planar steps. They move the surface about 9x more than dissolve
alone — 0.018% mean deviation against 0.002%, consistent across two very
different subjects — for roughly 5-6% more absolute sharp edge. In the render,
louvre slats survive as distinct lines without them and are smeared into mounds
with them. Uncheck 7. Make Planar A and 9. Make Planar B, or pass
--no-planar to the pipeline scripts.
The dissolve angle. On these meshes a 90-degree corner is a chamfer of several triangles each turning 10-25 degrees — and a louvre slat edge is also a chamfer of triangles turning 10-25 degrees. A single global threshold cannot tell a corner it should crisp from a detail it should keep, because on this geometry they are the same measurement. The sweep is monotonic with no knee: at 8 degrees the detail survives and the sharpness gain is exactly zero; at 20 the sharpness is up 1.25x and the detail is going.
So sharpening and detail preservation are the same dial. Picking a number only picks a point on that line.
The bake comes back black, or mostly empty
The step flags it itself. A map that filled less than 85% of what its islands
cover is printed with <-- SUSPECT, rays missed and appended to the panel
report as a WARNING:. Treat that as a failure.
Check, in order:
-
Did step 1 run? The bake follows the
sharpen_sourcecustom property back to the original. Without it: “no source to bake from – run ‘Copy & Hide Original’ first”. - Is the source still there, and still textured? Deleting it, or clearing the property, is the classic way to get a plausible GLB with a black atlas.
- Did step 11 run? “target has no UVs – run ‘Unwrap’ first”.
- Rays missing means the cage could not span the gap between the two surfaces. The step sizes the cage from the measured 99th-percentile deviation, which fixed a control console that drifted 7.3% of its diagonal — the old fixed 3%/6% cage could not reach and the atlas came back 30% lit. If it still misses, the surfaces have moved further than the clamp allows (25% of the diagonal); sharpen less.
Magenta never ships: unfilled texels are prefilled with a colour the bake cannot produce, counted, and then repainted black — or mid-blue on the normal map — before the image is packed.
An all-black colour map with a high fill percentage is a different thing and
was the old failure this step fixed: the native Cycles DIFFUSE pass lit 2.2%
of texels on one ship where an EMIT bake of the same setup lit 97.7%.
Everything but the normal map is baked through EMIT now.
The baked images are not on disk
They are packed into the .blend, named <object>_diffuse, <object>_normal,
<object>_roughness, <object>_metallic. Save the file, export the object, or
unpack them from the Image editor.
Nothing happens when I press a button
- Run Checked Steps reports “no steps checked” and cancels if every box is clear.
- Every run operator needs an active mesh object in Object Mode. In Edit Mode the buttons are greyed out.
-
Clear Preview is only enabled when the
SharpenPreviewcolour attribute exists. -
Decimate reports
already <n> tris, under target -- skippedwhen the mesh is inside the budget already. That is not a failure.
Preview shows nothing
The preview forces the viewport to Solid shading with Attribute colour, because attribute colours do not render in Material Preview. If you switch shading back yourself the paint disappears.
The unprotected colour is a distinct blue-grey rather than the default viewport grey, precisely so preview mode is obvious even when nothing is protected.
If the weld changed the face count, the operator warns that “preview indices may be approximate” — the detection runs on a throwaway welded copy so it sees the same graph the real run will.
Setting the amount from a script wiped my values
sharpen_amount has an update callback that writes the two dissolve angles,
both planar iteration counts, both factors and the cycle count. Set the amount
first, then apply overrides. Hand-edited values then survive until the
amount changes again.
And convert degrees to radians. angle_coarse and angle_fine are ANGLE
properties capped at 60° and 15°; pass degrees straight in and Blender clamps
without complaint. A sweep asking for 10, 14 and 17.8 degrees ran three
identical experiments at 60 degrees and looked clean the whole way.
Headless: the add-on will not register
-
Never call
bpy.ops.wm.read_factory_settings(). It resets preferences, which unregisters every add-on. The failure looks like a missing module. Usebpy.ops.wm.read_homefile(use_empty=True). - Disable an extension install of the same id before registering from the repo. Registering twice makes the second registration steal every class from the first.
-
Prove the registration landed:
assert hasattr(bpy.context.scene, "sharpen_hard").
Leftover working state in a shipped asset
Two things the chain leaves on the object are working state, not asset data:
-
the
curvesvertex group from step 6 -
the
sharpen_sourcecustom property from step 1
D:\GitHub\model-roboto\scripts\kpack_sharp_stage.py strips both before
saving an INSERT. A SharpenPreview colour attribute is cleared by the
dissolve, planar and bake steps, and by Clear Preview.
The metrics lie in two known ways
-
mushyandcrispcannot see what the planar steps do. They measure the dihedral distribution, not coplanarity. Eight planar passes across two subjects all reported no change, and the steps were still doing their job — removing them produced more faces, not fewer. - Deviation is nearly blind to detail smoothing. Flattened louvres still sit within 0.66% of the original surface, so the number shrugs while the model visibly degrades. Deviation catches displacement, not loss of high-frequency detail.
Only the render catches the second one. Never accept a metric improvement without looking at the model.
Version history
Current: 0.20.0, from
D:\GitHub\sharpen_hard\blender_manifest.toml. The panel
header shows the manifest version, so it always matches what is installed.
From 0.12.13 on, the changelog is D:\GitHub\sharpen_hard\Changes.md. Earlier
entries came from D:\GitHub\model-roboto\Changes.md, where this add-on’s
history was kept under its old name. Only the versions recorded there are
listed. 0.12.1 through 0.12.10 have no entries — that is a gap in the
record, not a claim that nothing changed.
0.20.0 — 2026-08-02
- Shade Auto Smooth moved before Bake Textures — it is now step 13 and the bake is step 14. A tangent-space normal bake encodes the difference between the source surface and the target’s shading normals, so smoothing after the bake left the shipped normal map disagreeing with the mesh it is painted on.
- Target Faces now defaults to 250,000, up from 200,000.
0.19.1 — 2026-08-02
-
The Sharpen slider’s midpoint now matches the panel. At 0.5 the coarse
dissolve angle was 25°, but
angle_coarsedefaults to 20°, so an untouched scene read 20 and silently jumped to 25 the moment the slider moved. The range is back to 10-30. Every other derived value already agreed with its default.
0.19.0 — 2026-08-02
- Triangulate now starts unchecked. The flat n-gon panels the sharpening just built are usually what you want to keep; triangulating throws that readable topology away for anyone who is not exporting straight to an engine that demands triangles. Turn it on when the target needs it.
0.18.1 — 2026-08-02
-
Internal only:
ARCHITECTURE.mdrefreshed for 0.14.0-0.18.0. No change to any step, setting or default.
0.18.0 — 2026-08-02
- The PyMeshLab decimate engine is gone, one version after it arrived. Measured against Blender’s own modifier on an 814k-face ship: clustering ran in 1.1s against 9.5s but tessellated flat panels as finely as creases (12.7% crisp edges against 25.3%, and 20.5% under target), and PyMeshLab’s quadric collapse was slower at 10.9s AND worse at 14.1%. Blender wins this job outright, so the Engine dropdown, the Timeout, the PyMeshLab installer and both modules are removed. See 4. Decimate for the table.
0.17.0 — 2026-08-02
- Bake sizes each map from its own source texture. Size defaults to Match Source and matches per channel: a source with a 2048 colour map and 1024 normal/roughness/metallic now bakes exactly that mix instead of flattening all four to one size. Non-power-of-two sources round up, sizes clamp to 1024-8192, and both fallbacks (no map on a channel, no images at all) are stated in the report.
- Per-map size overrides under “Per-map sizes” in the Bake drawer, each defaulting to Follow Bake Size. 8192 is now offered, and the report carries each map’s size.
0.16.0 — 2026-08-02
- A fast Decimate engine, through PyMeshLab. Step 4 gains an Engine choice: Auto, PyMeshLab Clustering or Blender Collapse. Measured 8.5x faster on an 814k-face ship and 12.1x on a 1.96M-face dwarf — but clustering is a grid, so it lands near Target Faces rather than on it (−20.5% and +9.6%) and comes out a few points less crisp after the sharpening cycles. Auto falls back to Blender’s collapse when PyMeshLab is absent and names the engine it used.
- Installers for both dependencies in preferences. PyMeshLab and the Windows repair engine now sit side by side in one Dependencies block, each with a status line and an Install button. The Decimate drawer in the N-panel also shows whether PyMeshLab is installed, and offers the button when it is not.
- Make Manifold reads “unable to be used in that slot” on Mac and Linux rather than “Windows only”. The step is never removed from the list.
0.15.0 — 2026-08-02
- Two new steps. 5. Clear Custom Normals drops the custom split normals an AI mesh arrives with — they were baked for the soft original surface and shaded the sharpened panels as if they were still curved. 14. Shade Auto Smooth adds the Smooth by Angle modifier at 10 degrees, last in the chain. Both are checked by default.
-
Shade Auto Smooth checks its own work. Blender’s operator appends the node
group from the essentials asset library, which headless Blender loads
asynchronously — on 4.5.10
-bit returnsCANCELLEDand adds nothing. The step now appends the node group straight off disk when that happens, and says so in its report. - The N-panel tab reads ♥SH, matching the rest of the add-on family. The panel is still called Sharpen Hard.
- Make Manifold and Make Planar B start unchecked. Make Manifold was on by default on Windows; it is a slow, heavy repair most meshes do not need.
0.14.0 — 2026-07-29
- Detect Curved Surfaces stops protecting boxes and isolated trim. Two new region filters: a discreteness veto (a box concentrates at least 38% of its area on 3 flat normal directions, a real barrel at most 34%) and an assembly-size floor (real curved surface arrives in clusters worth 2.5-3.3% of mesh area, junk arrives alone at 0.6% or less). The mining tug now protects exactly its six nacelle barrels; an all-box inspection machine protects nothing, where it used to protect 14 regions.
0.13.1 — 2026-07-29
- Mac and Linux: the first run no longer dies at step 3. Make Manifold is now unchecked by default where it cannot run, and its box is flagged Windows only on the closed box rather than inside the shut drawer.
- Bakes use the GPU on Mac, AMD and Intel Arc, not just NVIDIA — the device picker now tries HIP, METAL and ONEAPI too, and prints which device it got.
0.13.0 — 2026-07-29
- The panel header carries the version and a docs link. A ? in the panel’s own header bar opens this manual; the version sits beside it. Both survive the panel being collapsed.
- Import GLB and Export GLB, in a File box at the bottom of the panel. Export writes only the selected objects and skips hidden ones, so the original that step 1 hid stays out of it; import leaves what it brought in selected and active, ready for step 1, and does not join multiple objects.
-
Built zips no longer carry
docs/or developer notes.
0.12.13 — 2026-07-28
-
Renamed to Sharpen Hard. The add-on was called Sharpen Model; its
extension id changed from
sharpen_modeltosharpen_hardand the scene settings moved fromscene.sharpen_modeltoscene.sharpen_hard. Operator names are unchanged. It also left the retopo-roboto repo for one of its own,D:\GitHub\sharpen_hard. Remove any older install first — the old id is a separate extension as far as Blender is concerned, and two copies fight over the same operator names.
0.12.12 — 2026-07-28
- Dissolve can keep UV seams. A new Keep UV Seams option on both dissolve steps, off by default. The normal chain dissolves before Unwrap, where island boundaries are about to be rebuilt anyway; with it on, the dissolve stops at them, which is what a mesh that already carries its final texture needs. Measured on a textured crate: 3.29% of seam edges eaten without it against 0.56% with, for 1.2% fewer faces dissolved.
Same day, in the pipeline rather than the add-on: KIT OPS INSERTs are now cleaned with steps 2, 8 and 9 before they are saved (props/0021: 26,307 faces to 18,415, texture unchanged), and step 3, Make Manifold, was turned off in the batch chain — measured on three finished props it either over-flattens or leaves litter the dissolve tears into shards, for 3-4x the sharpen time.
0.12.11 — 2026-07-28
- The coarse dissolve is 25 degrees at the default slider position, up from 20. The slider range moved from 10-30 to 15-35, so it still means the same thing end to end.
0.12.0 — 2026-07-27
- Unwrap now runs before Triangulate. Smart UV Project grows charts across whole faces, so unwrapping the n-gon mesh gives it fewer edges to treat as chart boundaries. Triangulating afterwards splits along existing loops and carries the UVs with it — checked, and the atlas comes through with every coordinate unchanged. Bake still runs last, so the mesh that ships is still the mesh that was baked.
- Removed the second Make Manifold. Repairing after the sharpening cycles undid them: the engine remeshes, handing back triangles where the dissolve passes had just built flat panels. The one before Decimate stays, which is where it earns its keep.
- The Make Manifold step now says how long it will take and how big the mesh is, and puts a line up before each of the two measuring passes. The viewport cannot repaint while the repair runs, so silence read as a hang.
0.11.1 — 2026-07-27
-
Fixed: Make Manifold failed in Blender 5.1 and 5.2. The repair support is
compiled against one Python version, and Blender 5.0 uses 3.11 while 5.1 and
5.2 use 3.13. The add-on only checked that the files were there, so it said
it was ready and then died on
No module named 'winrt._winrt'. Support is now kept per Python version, and each Blender installs and finds its own. An existing install still works where it always did. - The message that failure produced named nothing useful — it quoted a footnote about pip. It now says which Python has no support and what to press.
0.11.0 — 2026-07-27
- Make Manifold no longer needs the Make Manifold add-on. The Windows repair engine now ships inside Sharpen Hard, so the step works on a machine that has nothing else installed. Preferences → Add-ons → Sharpen Hard has an Install Repair Support button, and the step in the N-panel says so before a run starts if the support is missing. If Make Manifold is installed too, both add-ons share the one 3.5 MB download.
2026-07-27, no version recorded
- Fixed: the unwrap silently halved the atlas. Smart UV Project grows charts from vertex adjacency, and a mesh imported from a GLB has none, so unwrapping a fresh import produced near-per-triangle islands at half the texture density and reported it as success. It now welds first and says which it did. Measured 1.86x more usable atlas.
- Recommended, from the bench: re-texture the sharpened mesh with Trellis rather than baking in Blender. The bake is a faithful transfer and reproduces the source atlas including its flaws; Trellis regenerates from the concept image. The bake remains in the add-on.
- Recommended, from the bench: drop the planar steps. They move the surface about nine times more for roughly five percent more sharpness, and they are what smears fine detail such as louvre slats. They remain on by default.
Related repo docs
-
D:\GitHub\model-roboto\ARCHITECTURE.md— where this add-on sits in the pipeline. -
D:\GitHub\model-roboto\docs\GEN_MODELS_STEPS.md— how the batch pipeline drives this add-on headlessly. -
D:\GitHub\model-roboto\docs\WINDOWS_MESH_REPAIR.md— the Windows repair engine, measured. -
D:\GitHub\model-roboto\docs\SHARPEN_BENCH_RESULTS.md— the bench behind most of the numbers quoted here.